vscode 常用快捷键

多列选择和编辑

方式1:Option➕鼠标左键依次点选

方式2:OptionShift + 鼠标滚动(tuchbar三指移动)来进行多列选择

方式3:
选中一个字符后按Command + Shift + L 组合按键可以全选选中字符,再按一下左或者右方向键,就可以在选中字符的左侧或者右侧插入多列光标了。

Command + Shift + -> 组合按键可以选中至行末尾。不带Shift,只使用Command➕左右箭头是移动光标至行首或行尾。

WordPress笔记

安装

可以在MAMP的Hosts设定中添加WordPress支持,点击Extras下面的➕按钮,添加额外功能,选择WordPress后点击Continue:

然后就自动下载了Wordpress的代码在本地工程目录中。

效果

可以在phpstorm中直接使用浏览器预览效果:

laravel笔记

安装

使用composer下载laravel,composer的安装请参考这里

1
composer create-project laravel/laravel laravel.test "5.5.*"

运行

下面命令会在本地8000端口开启一个laravel服务。

1
php artisan serve

PHP 笔记

文件操作

  • 读取文件内容
1
2
3
4
5
6
7
8
9
10
11
12
13
14
15
# 方法1:直接readfile
echo readfile("test.txt");

# 方法2: fopen -> fread -> fclose
$myfile = fopen("test.txt","r") or die("Unable to open file.");
echo fread($myfile, filesize('test.txt'));
fclose($myfile);

# 方法3: fopen后循环fgets每次读取一行,也可以fgetc每次读取单字符
$myfile = fopen("test.txt","r") or die("Unable to open file.");
while ( !feof($myfile) ){
echo fgets($myfile) . "<br>";
}
fclose($myfile);

  • 写入文件内容
1
2
3
4
5
$myfile = fwrite("test.txt","w") or die("Unable to open file.");
$txt = "Write file test\n";
fwrite($myfile, $txt);
fwrite($myfile, "Write by php\n");
fclose($myfile);
1
2
3
4
5
6
7
8
9
10
11
12
13
# 设置cookie
setcookie("user", "Mooonwhite", time()+3600);

# 获取cookie
if (isset($_COOKIE["user"])) {
echo "Welcome ".$_COOKIE["user"]. "! <br/>";
}
else {
echo "Welcome guest!<br/>";
}

# 删除cookie(设置超市时间为一小时之前)。
setcookie("user", "", time()-3600);

时间日期

  • 获取时间和日期
1
2
3
4
5
6
7
8
# 获取格式化日期时间字符串
$dt = date("Y-m-d h:i:sa");
echo $dt;

# 获取19700101到现在的秒数(时间戳)。
$tm = time();
echo $tm;

Composer安装

1. Composer 安装

可以复制如下脚本保存并本地执行,用来下载composer.phar文件

1
2
3
4
5
6
7
8
9
10
11
12
13
14
15
16
17
#!/bin/sh

EXPECTED_CHECKSUM="$(wget -q -O - https://composer.github.io/installer.sig)"
php -r "copy('https://getcomposer.org/installer', 'composer-setup.php');"
ACTUAL_CHECKSUM="$(php -r "echo hash_file('sha384', 'composer-setup.php');")"

if [ "$EXPECTED_CHECKSUM" != "$ACTUAL_CHECKSUM" ]
then
>&2 echo 'ERROR: Invalid installer checksum'
rm composer-setup.php
exit 1
fi

php composer-setup.php --quiet
RESULT=$?
rm composer-setup.php
exit $RESULT

执行

1
2
chmod a+x install.sh
./install.sh

执行之后会看到本地目录下载好了composer.phar,
然后执行

1
mv composer.phar /usr/local/bin/composer

使得composer可以在任意目录使用,这样就安装完成了。

敲入composer命令,或者composer -V来确认composer是否安装成功。

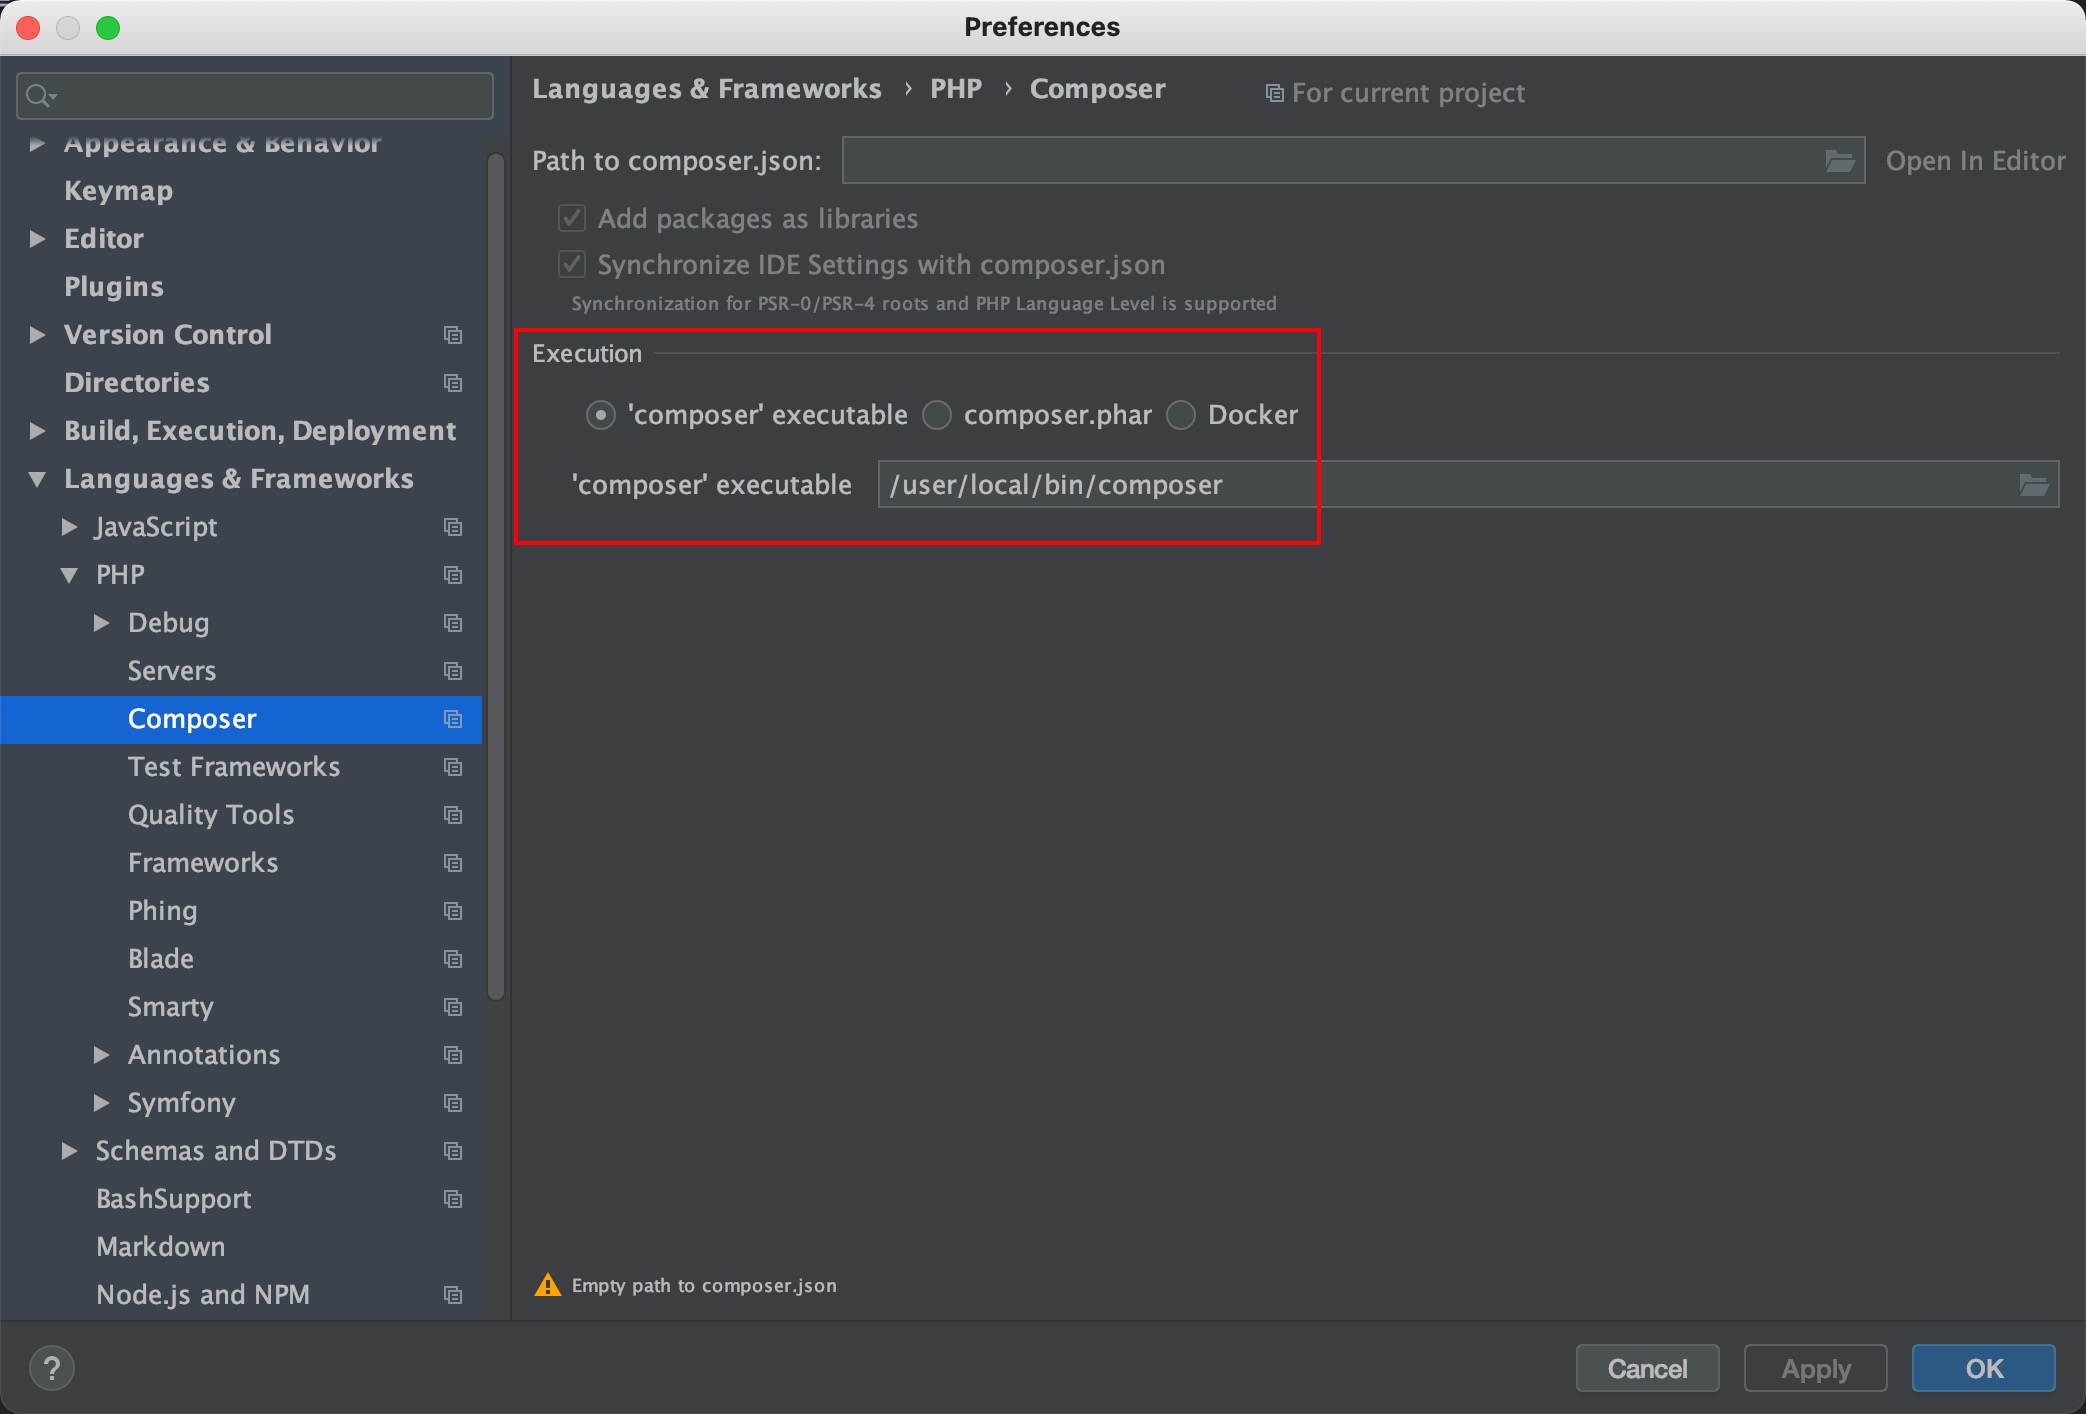
2. PHPStorm配置Composer

Preference -> Languages & Frameworks -> PHP -> Composer
vscode插件使用系列:1.psioniq File Header自动添加文件头

安装

使用vscode时经常需要重复性插入相同的文件头代码,或者Jekyll这种要求的固定格式文件头。使用psioniq File Header可以方便地满足这一需求,而且可以根据不同类型的文件设置生成不同的文件头内容和格式。

command + shift + P 调出命令面板找到Extensions:Install Extensions ,或者command + shift + X后在左侧切换到应用商店,搜索psioniq File Header,找到后安装即可

设置

command + shift + P 打开命令面板后输入settings,选择打开设置,打开settings.json文件

settings.json中添加如下内容后保存:

1
2
3
4
5
6
7
8
9
10
11
12
13
14
15
16
17
18
19
20
21
22
23
24
25
26
27
28
29
30
31
32
33
34
35
36
37
38
39
40
41
42
43
44
45
46
47
48
49
50
51
52
53
54
55
56
57
58
59
60
61
62
63
64
65
66
67
68
69
70
71
72
73
74
75
76
77
78
79
80
81
82
83
84
85
86
87
88
89
90
91
92
93
94
95
96
97
98
99
100
101
102
103
104
105
"psi-header.config": {
"forceToTop": true
},
"psi-header.changes-tracking": {
"isActive": true,
"modAuthor": "Modified By : ",
"modDate" : "Date Modified: ",
"modDateFormat": "date",
"include": [],
"exclude": [
"markdown",
"json"
]
},
"psi-header.license-text": [
"Just have a little faith!"
],
"psi-header.variables": [
["company", "MoonWhite inc."],
["author", "mooonwhite"],
["authoremail", "moonwh173@gmail.com"]
],
"psi-header.lang-config": [
{
"language": "python",
"begin": "###",
"prefix": "# ",
"end" : "###",
"blankLinesAfter": 0,
"beforeHeader": [
"#!/usr/bin/env python3",
"# -*- coding:utf-8 -*-"
]
},
{
"language": "markdown",
"begin": "---",
"prefix": "",
"end": "---",
"blankLinesAfter": 2,
"forceToTop": true
},
{
"language": "javascript",
"begin": "/**",
"prefix": " * ",
"end": " */",
"blankLinesAfter": 2,
"forceToTop": false
}
],
"psi-header.templates": [
{
"language": "c",
"template": [
"File: <<filepath>>",
"Created Date: <<filecreated('YYYY-MM-DD HH:mm:ss')>>",
"Author: <<author>>",
"-----",
"Last Modified: <<dateformat('YYYY-MM-DD HH:mm:ss')>>",
"Modified By: ",
"-----",
"Copyright (c) <<year>> <<company>>",
"",
"<<licensetext>>",
"-----",
"HISTORY:",
"Date \tBy\tComments",
"----------\t---\t----------------------------------------------------------"
],
"changeLogCaption": "HISTORY:",
"changeLogHeaderLineCount": 2,
"changeLogEntryTemplate": [
"<<dateformat('YYYY-MM-DD')>>\t<<initials>>\t"
]
},
{
"language": "markdown",
"template": [
"layout: post",
"title: \"title\"",
"date: <<filecreated('YYYY-MM-DD hh:mm:ss')>> +0800",
"categories: web"
]
},
{
"language": "javascript",
"template": [
"File: <<filepath>>",
"Created Date: <<filecreated('dddd, MMMM Do YYYY, h:mm:ss a')>>",
"Author: <<author>>",
"-----",
"Last Modified: ",
"Modified By: ",
"-----",
"Copyright (c) <<year>> <<company>>",
"------------------------------------",
"Javascript will save your soul!"
]
},
{
"language": "typescript",
"mapTo": "javascript"
}
]

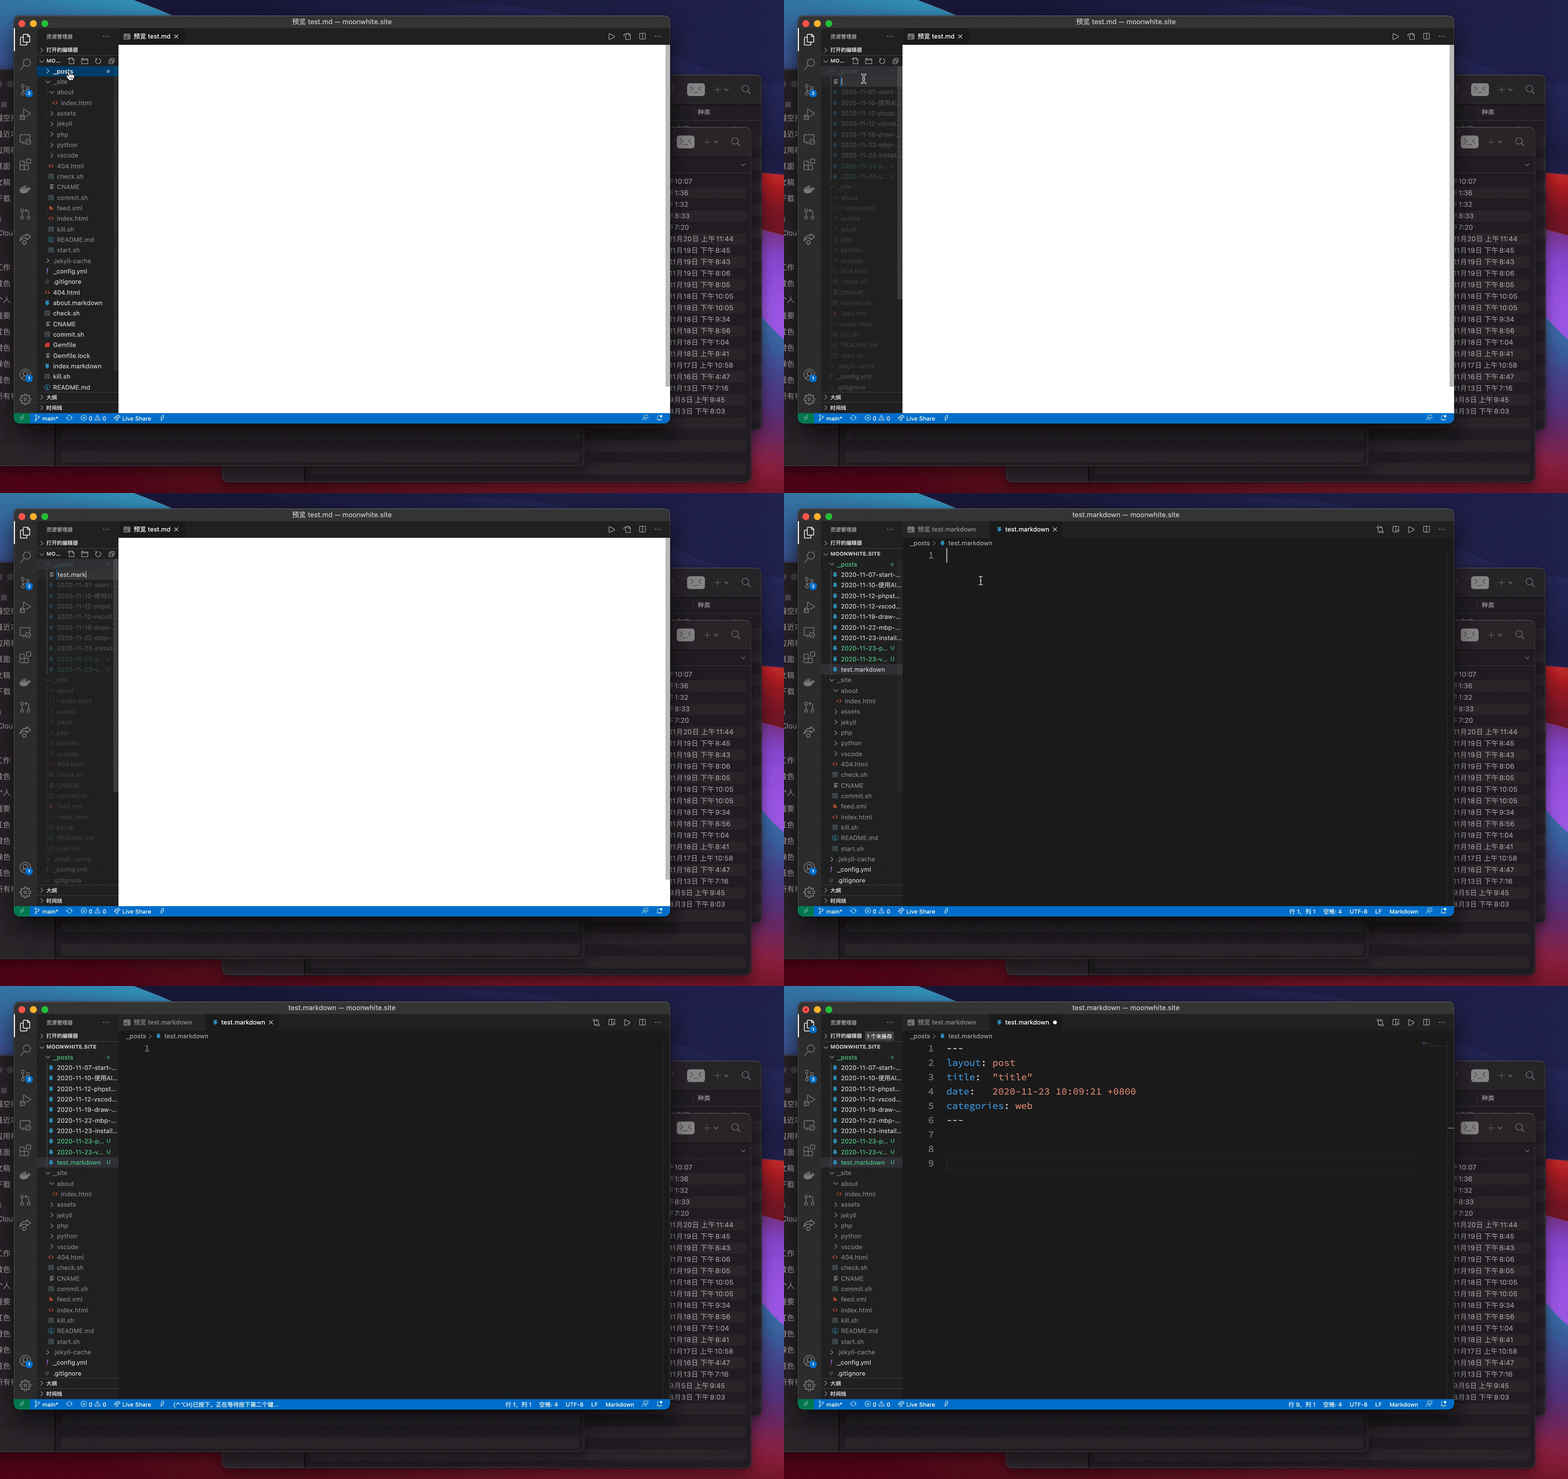
效果:新建一个markdown文件,然后连按两次热键:option + contrl + H 来自动添加文件头。
Mac本地Apache开启VirtualHost

Mac环境的php开发环境搭建推荐另一篇文章
这里仅作记录备忘一下。

Mac自带Apache服务,配置文件在/etc/apache2/httpd.conf

把默认的下面两行注释放开

1
2
LoadModule userdir_module libexec/apache2/mod_userdir.so
Include /private/etc/apache2/extra/httpd-userdir.conf

.
修改默认目录,默认目录在/Library/WebServer/Documents下:

1
2
#DocumentRoot "/Library/WebServer/Documents"
DocumentRoot "/Users/yiny/Sites"

添加如下内容:

1
2
3
4
5
6
7
8
9
10
11
12
13
14
15
16
<Directory "/Users/yiny/Sites">
Options Indexes FollowSymLinks
AllowOverride None
Require all granted
</Directory>

<VirtualHost *:80>
ServerName sjdt.online.test
DocumentRoot "/Users/yiny/Sites/sjdt.online"
DirectoryIndex index.html index.php
<Directory "/Users/yiny/Sites/sjdt.online">
Options -Indexes +FollowSymlinks
AllowOverride All
Require all granted
</Directory>
</VirtualHost>

启动停止命令:

1
2
3
4
5
6
7
8
# 启动
sudo systemctl start

# 停止
sudo systemctl stop

# 重启
sudo systemctl restart

Mac本地安装配置PHP

安装php

1
brew install php
1
brew services start php

php.ini 配置文件位置:

1
/usr/local/etc/php/7.4

使用python和matplotlib实现数据可视化

背景

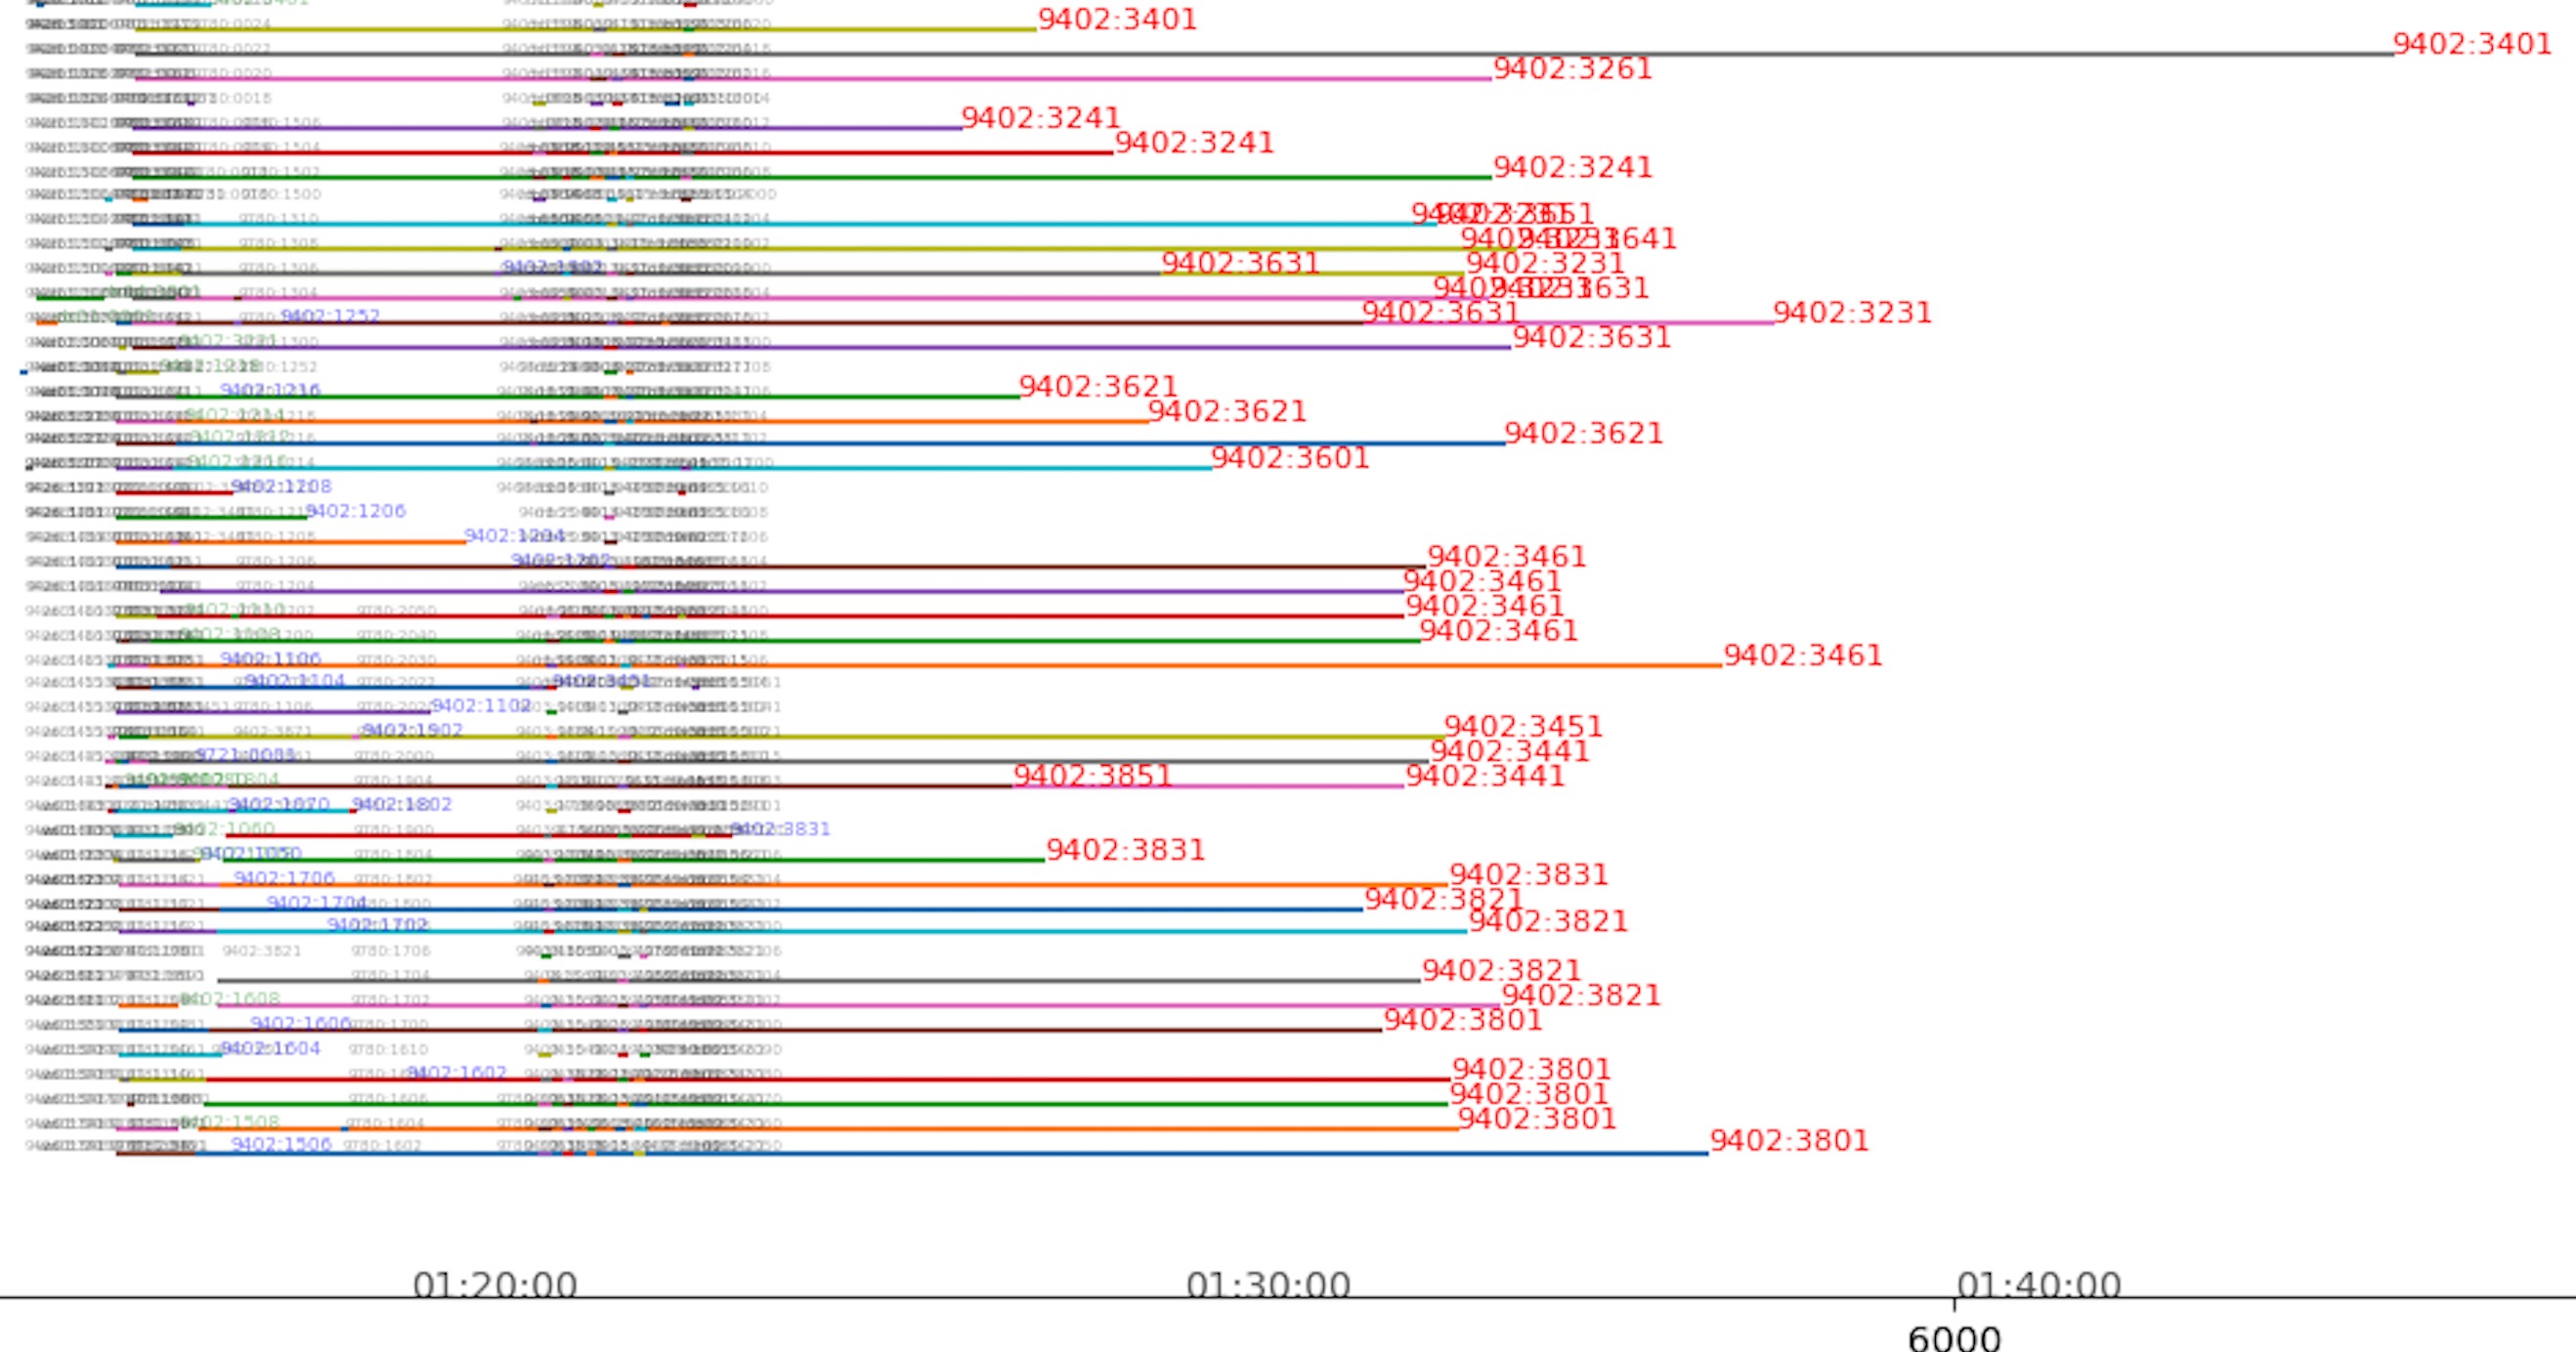
最近有个项目需要对批处理任务进行优化,批处理使用120个进程执行任务,但是任务之间存在依赖关系,任务执行的日志中记载了每个任务开始和结束的时间,看起来不够直观,于是考虑使用python和matplotlib进行可视化加以分析。

工具

  • pycharm
  • matplotlib

实现

关于matplotlib

Matplotlib 是 Python 的绘图库。 它可与 NumPy 一起使用,提供了一种有效的 MatLab 开源替代方案。
这里仅仅用到了Matplotlib的极小部分功能,画线和加文字:

1
2
3
4
5
# 绘制line
plt.plot([start_x_position, end_x_position], [start_y_position, end_y_position])

# 添加文字说明
plt.text(x_position, y_position, text, size, color, alpha, ...)

代码

日志中的时间格式为数值型表示的时间,比如12345表示的是1:23:45,需要进行一下转换。

1
2
3
4
5
6
7
8
9
10
11
12
13
14
15
16
17
18
19
20
21
22
23
24
25
26
27
28
29
def conv2NormalTime(digitalTime):
seconds = 0
minuts = 0
hours = 0
if digitalTime < 60:
seconds = digitalTime
elif digitalTime < 3600:
seconds = digitalTime % 60
minuts = digitalTime // 60
else:
seconds = digitalTime % 60
minuts = (digitalTime // 60) % 60
hours = digitalTime // 3600

if seconds < 10:
seconds = '0' + str(seconds)
else:
seconds = str(seconds)

if minuts < 10:
minuts = '0' + str(minuts)
else:
minuts = str(minuts)

if hours < 10:
hours = '0' + str(hours)
else :
hours = str(hours)
return hours + ":" + minuts + ":" + seconds

由于需要使用秒单位作为参数调用matplotlib,因此需要将时间转换为秒单位,添加函数实现。

1
2
3
4
5
6
7
8
9
10
11
12
13
14
15
16
17
18
def conv2Seconds(digitalTime):
seconds=0
minuts=0
hours = 0
totalSeconds = 0
if digitalTime < 100:
seconds = digitalTime
totalSeconds = seconds
elif digitalTime < 10000:
seconds = digitalTime % 100
minuts = digitalTime // 100
totalSeconds = minuts * 60 + seconds
else:
seconds = digitalTime % 100
minuts = (digitalTime // 100) % 100
hours = digitalTime // 10000
totalSeconds = hours* 3600 + minuts* 60 + seconds
return int(totalSeconds)

绘图代码

1
2
3
4
5
6
7
8
9
10
11
12
13
14
15
16
17
18
19
20
21
22
23
24
25
26
27
28
29
30
31
32
33
34
35
36
37
38
39
40
41
42
43
44
45
46
47
48
49
50
51
52
53
54
55
56
57
58
59
60
61
62
63
64
65
66
import matplotlib.pyplot as plt

def draw():
f = open('log_file.txt', encoding='GBK')
i = 0
machid = 0
jiaoyms = []
fig = plt.gcf()
# 设置宽高比
fig.set_size_inches(100, 15)
# fig.savefig('test2png.png', dpi=100)
# 设置x轴和y轴以及标题显示内容
plt.xlabel('time')
plt.ylabel('process')
plt.title('batch stat - 20201118 - TimeLine')

mintime=1000000
maxtime=0
for line in f:
i += 1
machid += 1
if machid == 120:
machid = 1
# 截取开始时间
starttime = int(line.split('|')[-6])
# 截取终止时间
endtime = int(line.split('|')[-5])
if starttime > 220000:
continue
# 截取其他显示信息
info1 = line.split('|')[5]
info2 = line.split('|')[8]
machine = line.split('|')[17][0:4]
# 开始时间秒数及结束时间秒数
startsecs = conv2Seconds(starttime)
endsecs = conv2Seconds(endtime)
if starttime < mintime:
mintime = starttime
if endtime > maxtime:
maxtime = endtime

# 绘制
plt.plot([startsecs, endsecs], [machid, machid])

# 这里根据不同的任务执行时间长度,显示为不同的风格
if endsecs - startsecs < 10: # 10秒内结束的任务
plt.text(endsecs, machid, info1+":"+info2, size=4, alpha=0.3)
elif endsecs - startsecs <60 : # 1分钟以内结束的任务
plt.text(endsecs, machid, info1 + ":" + info2, size=5, color='green', alpha=0.4)
elif endsecs - startsecs < 600: # 耗时十分钟以内的任务
plt.text(endsecs, machid, info1 + ":" + info2, size=5, color='blue', alpha=0.5)
else: # 耗时十分钟以上的任务,重点关注
plt.text(endsecs, machid, info1+":"+info2, size=8, color='red', alpha=1)

# 取整体任务的开始和结束时间
minsecs=conv2Seconds(mintime)
maxsecs=conv2Seconds(maxtime)

# 每隔10分钟绘制时间刻度
for i in range(minsecs, maxsecs):
if i % 600 == 0:
curTime = conv2NormalTime(i)
plt.text(i, -5, curTime, size=10, alpha=0.7)
# 将绘制结果保存为png图片
plt.savefig("batch_analyze_result.png")
plt.show()

执行结果

搭建本地Web开发环境

1 MAMP 配置

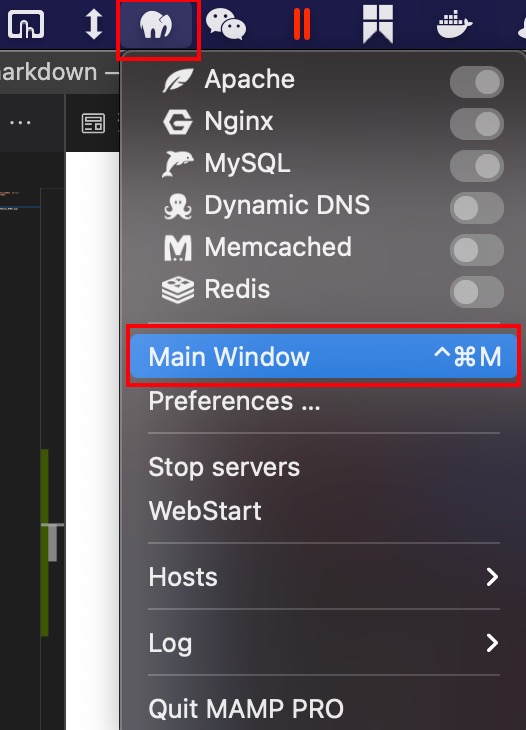
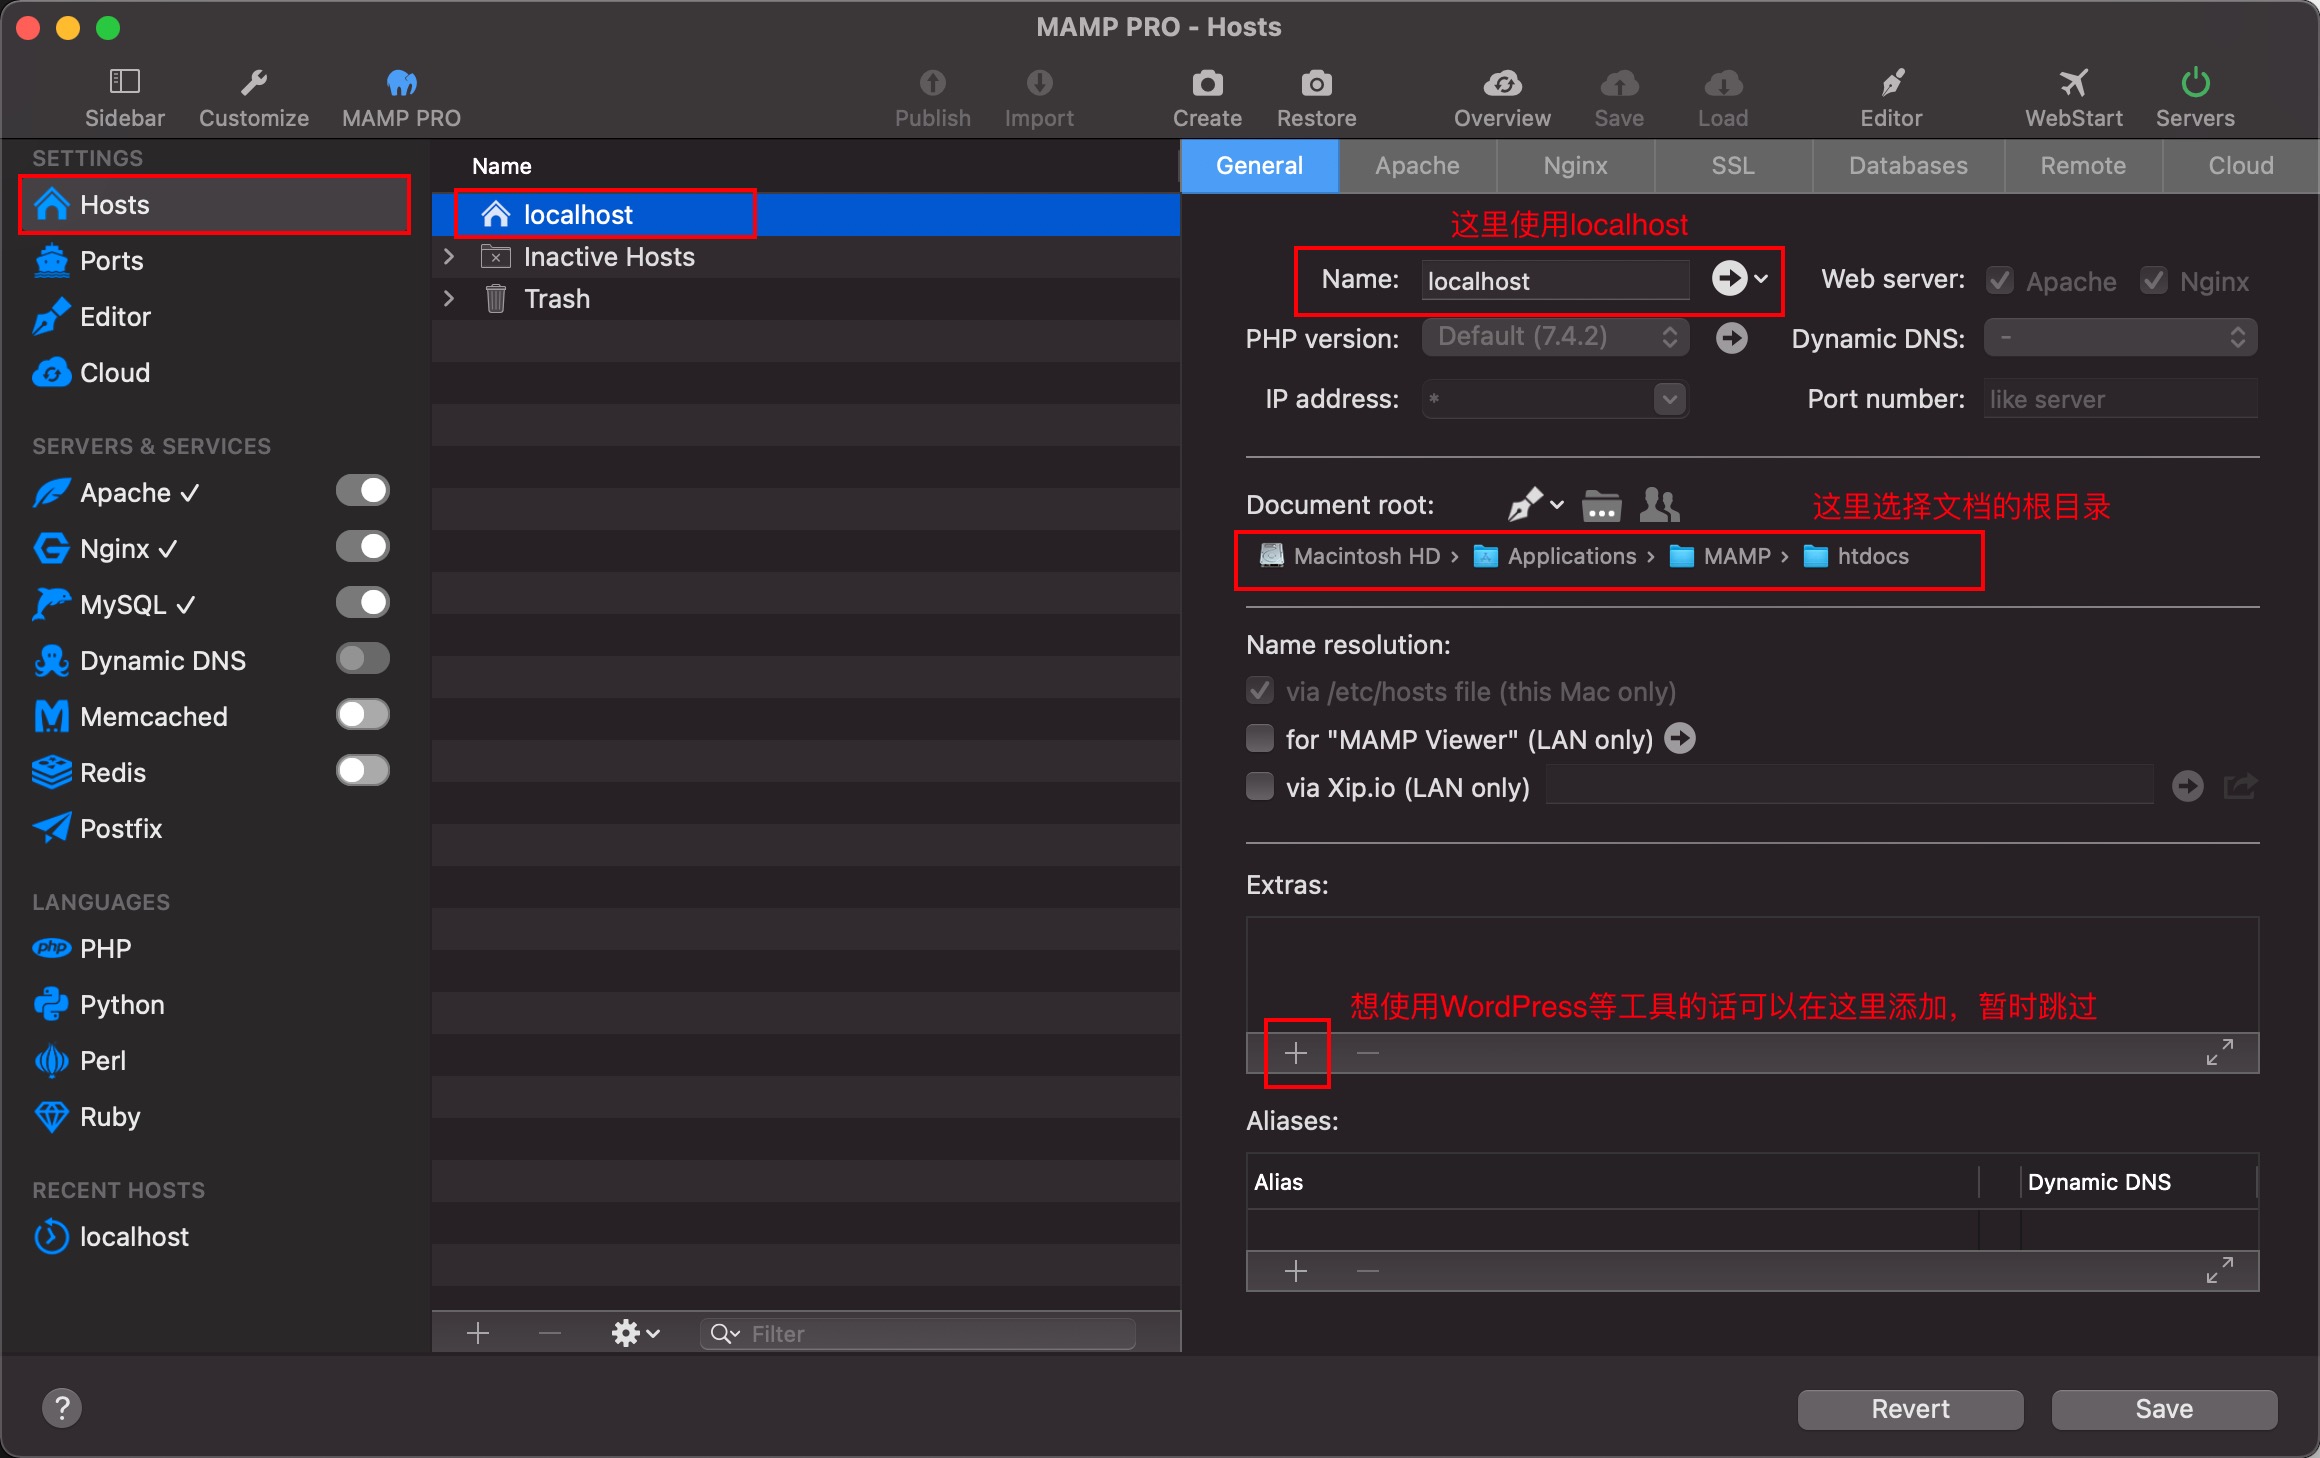
首先配置MAMP的Hosts,在MAMP -> Main Window

这里保留默认配置
修改Apache默认的端口为80,Nginx为8000,MySQL为3316
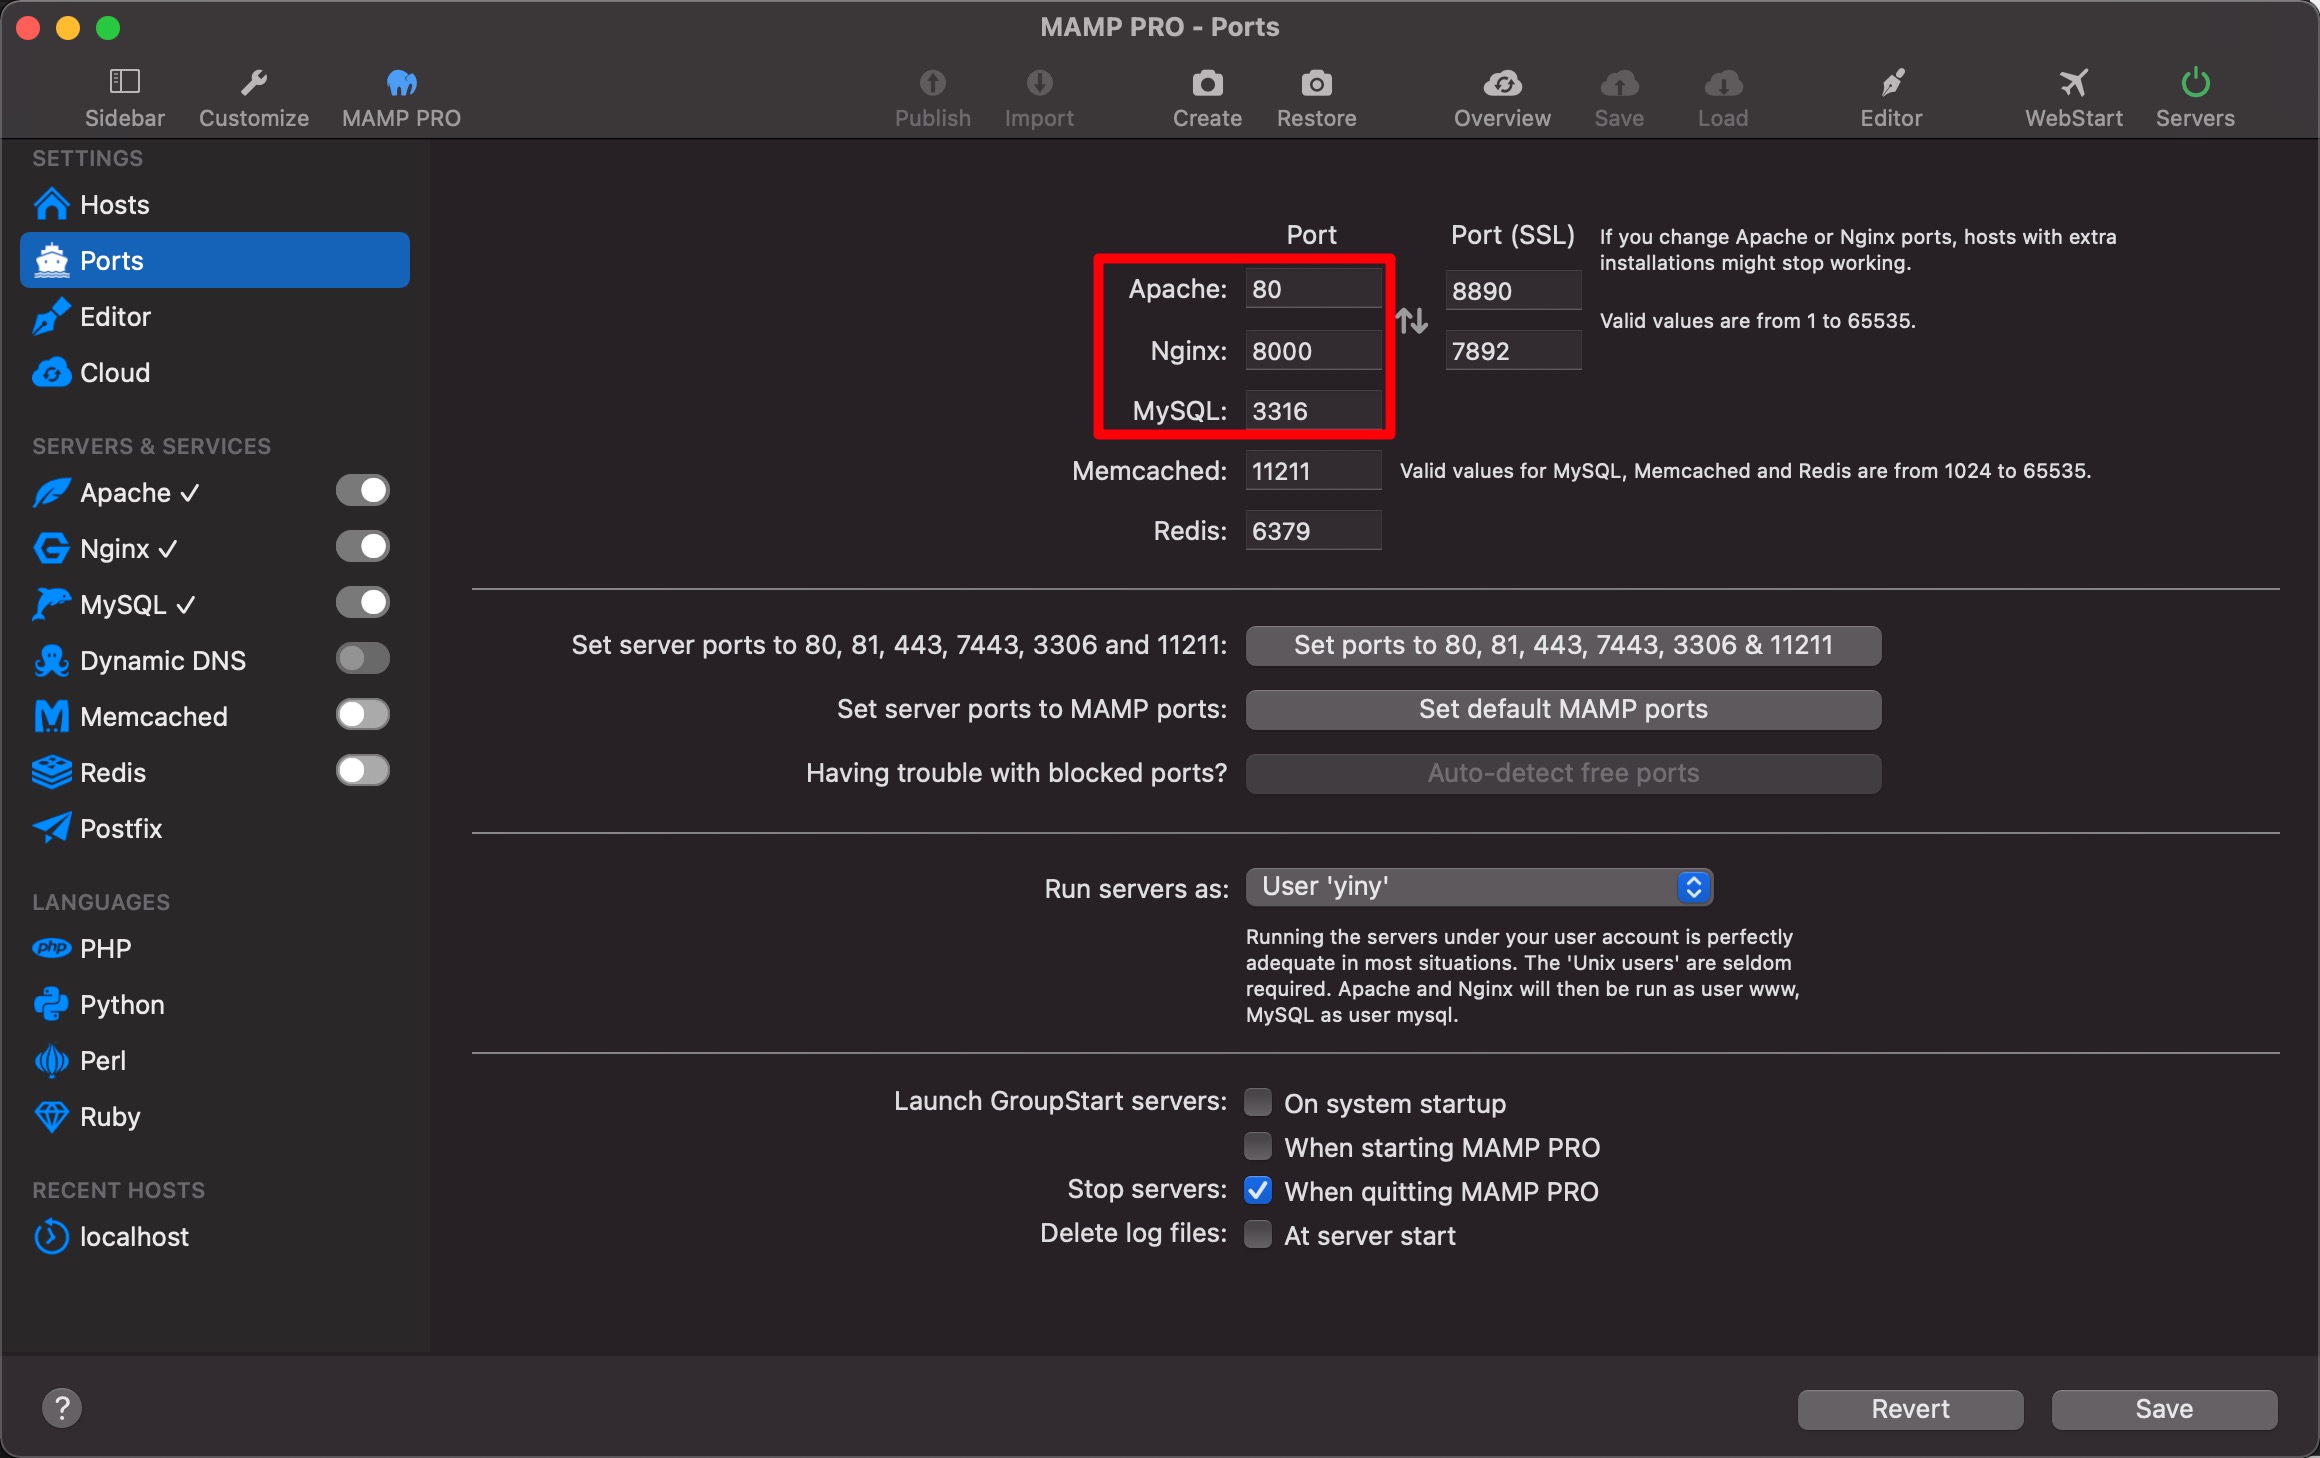
这样基本的Apache+MySQL+PHP环境就配置好了。

2 PHPStorm 配置

phpstorm 中新建php project,项目文档位置选择刚刚MAMP配置的Document Root目录下:/Applications/MAMP/htdocs/sjdt.online
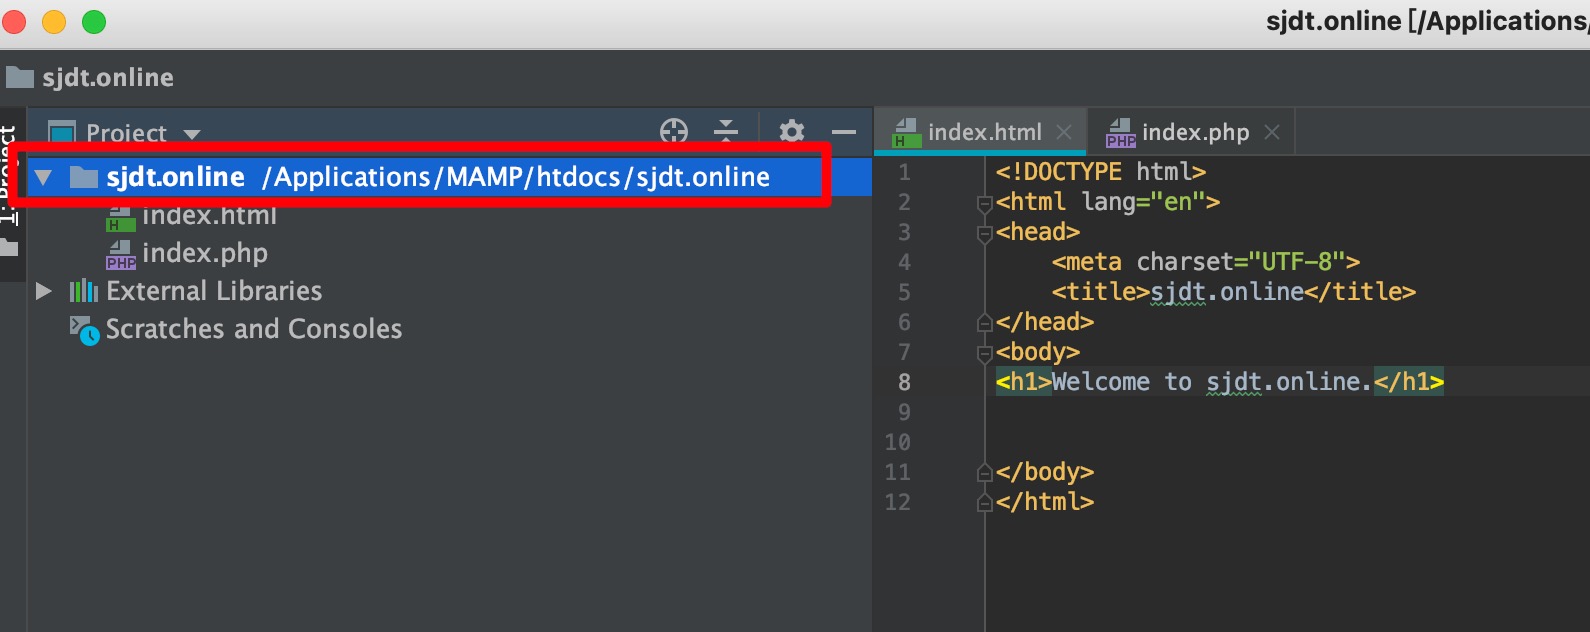
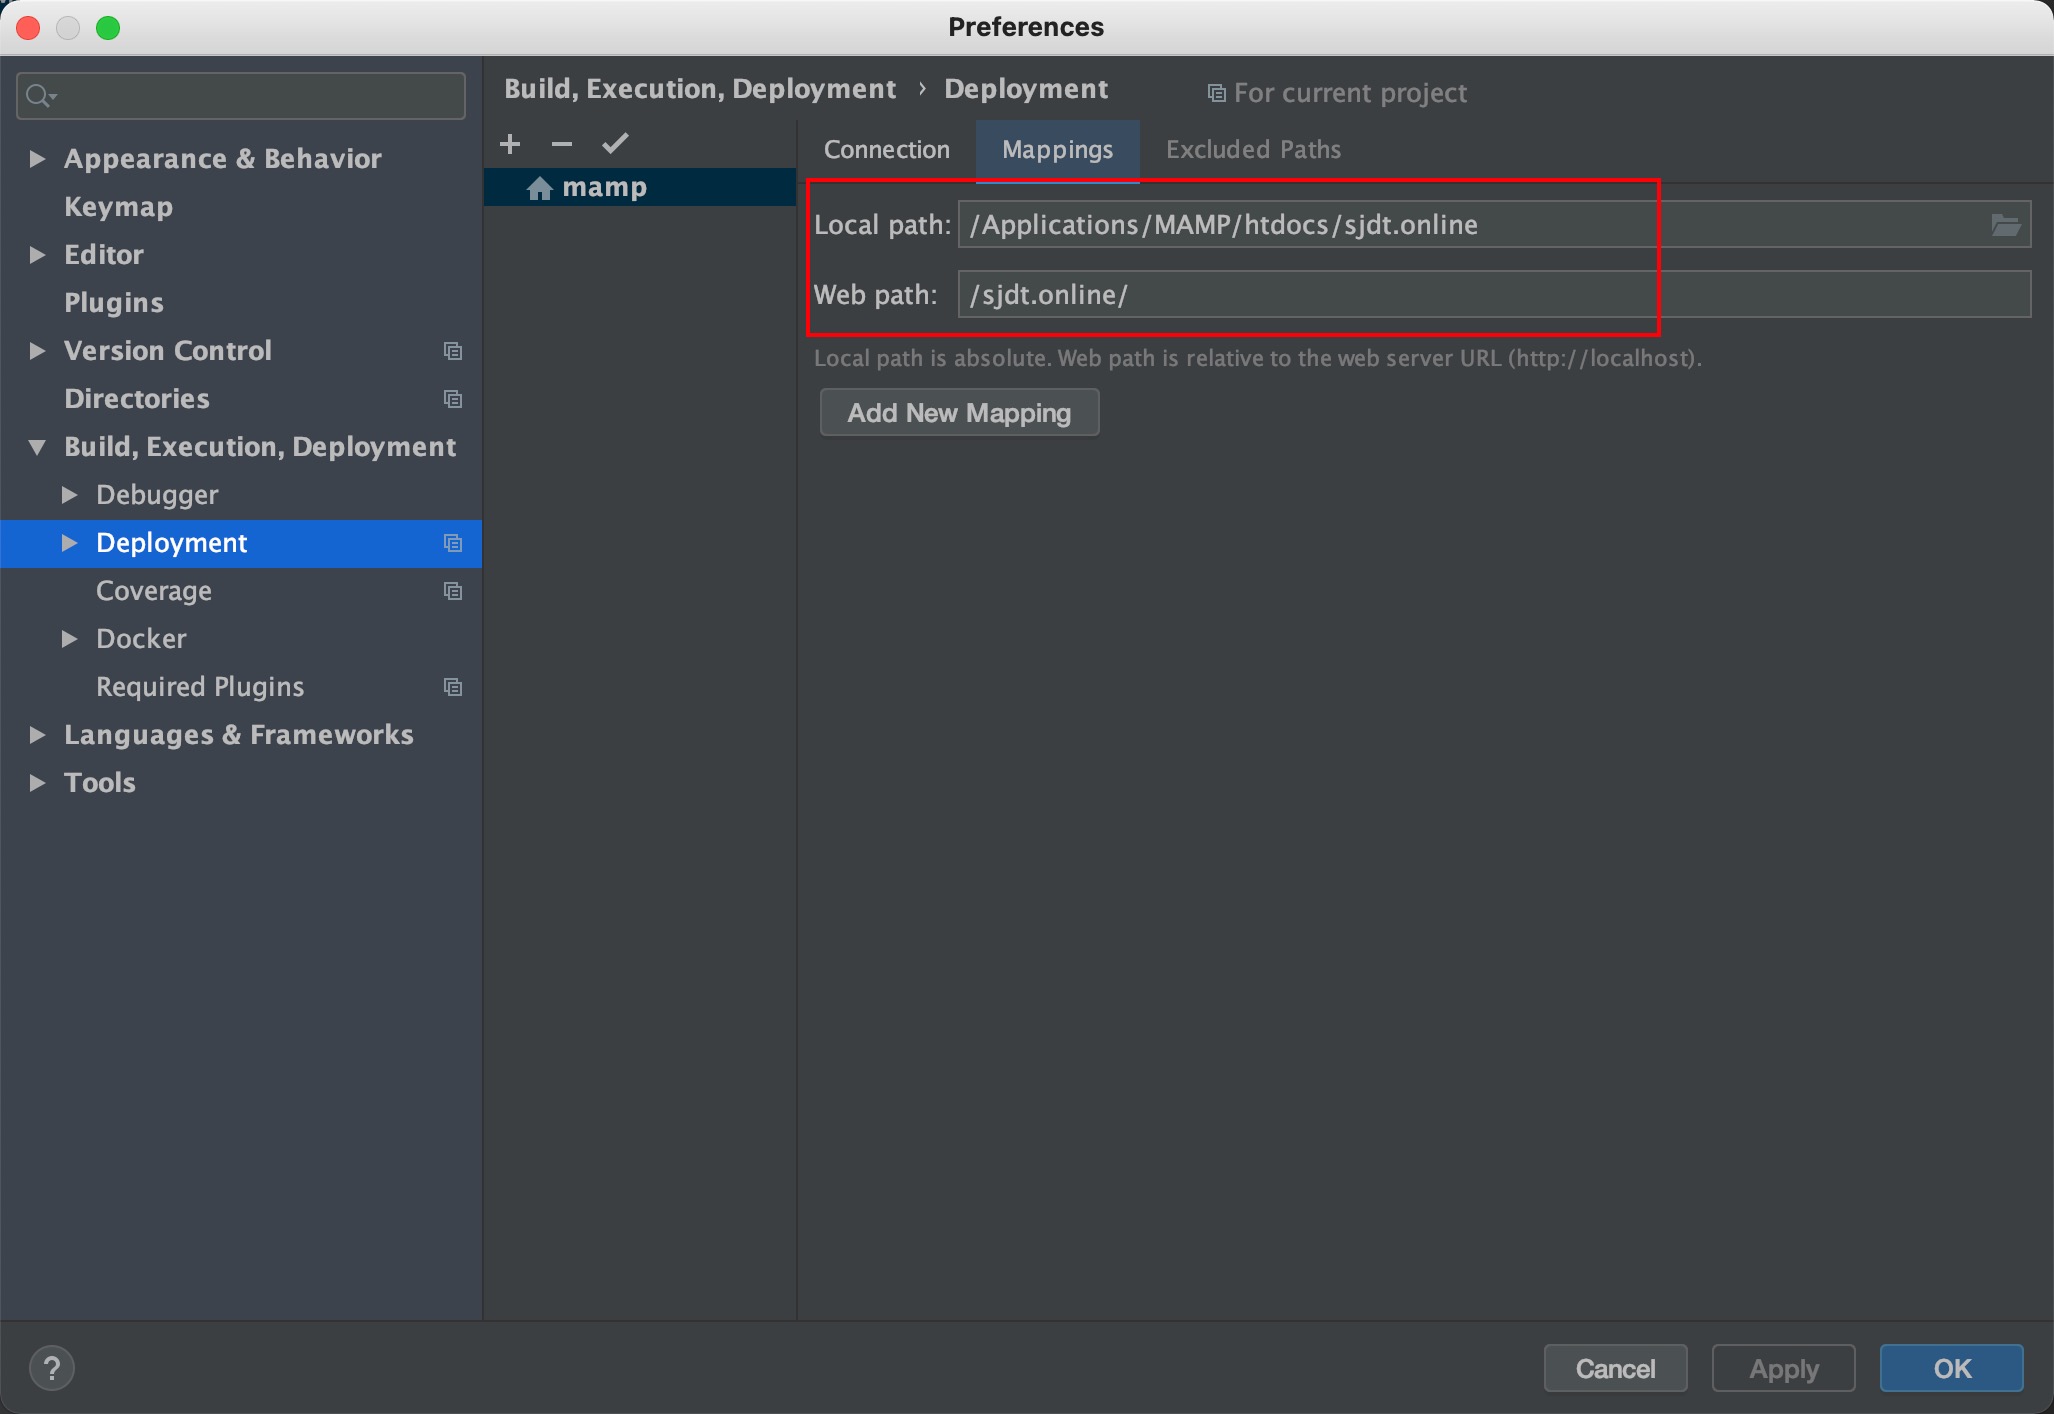
选择:phpstorm -> Preference -> Build,Execution,Deployment -> Deployment,单击右侧的 + 加号新建一个服务器,类型选择In place,名字随便起,这里使用mamp

在Connection Tab页中配置Web server URL为http://localhost

在Mappings Tab页配置本地路径和远程路径之间的映射,这里选择将本地工程目录映射为远程的sjdt.online目录
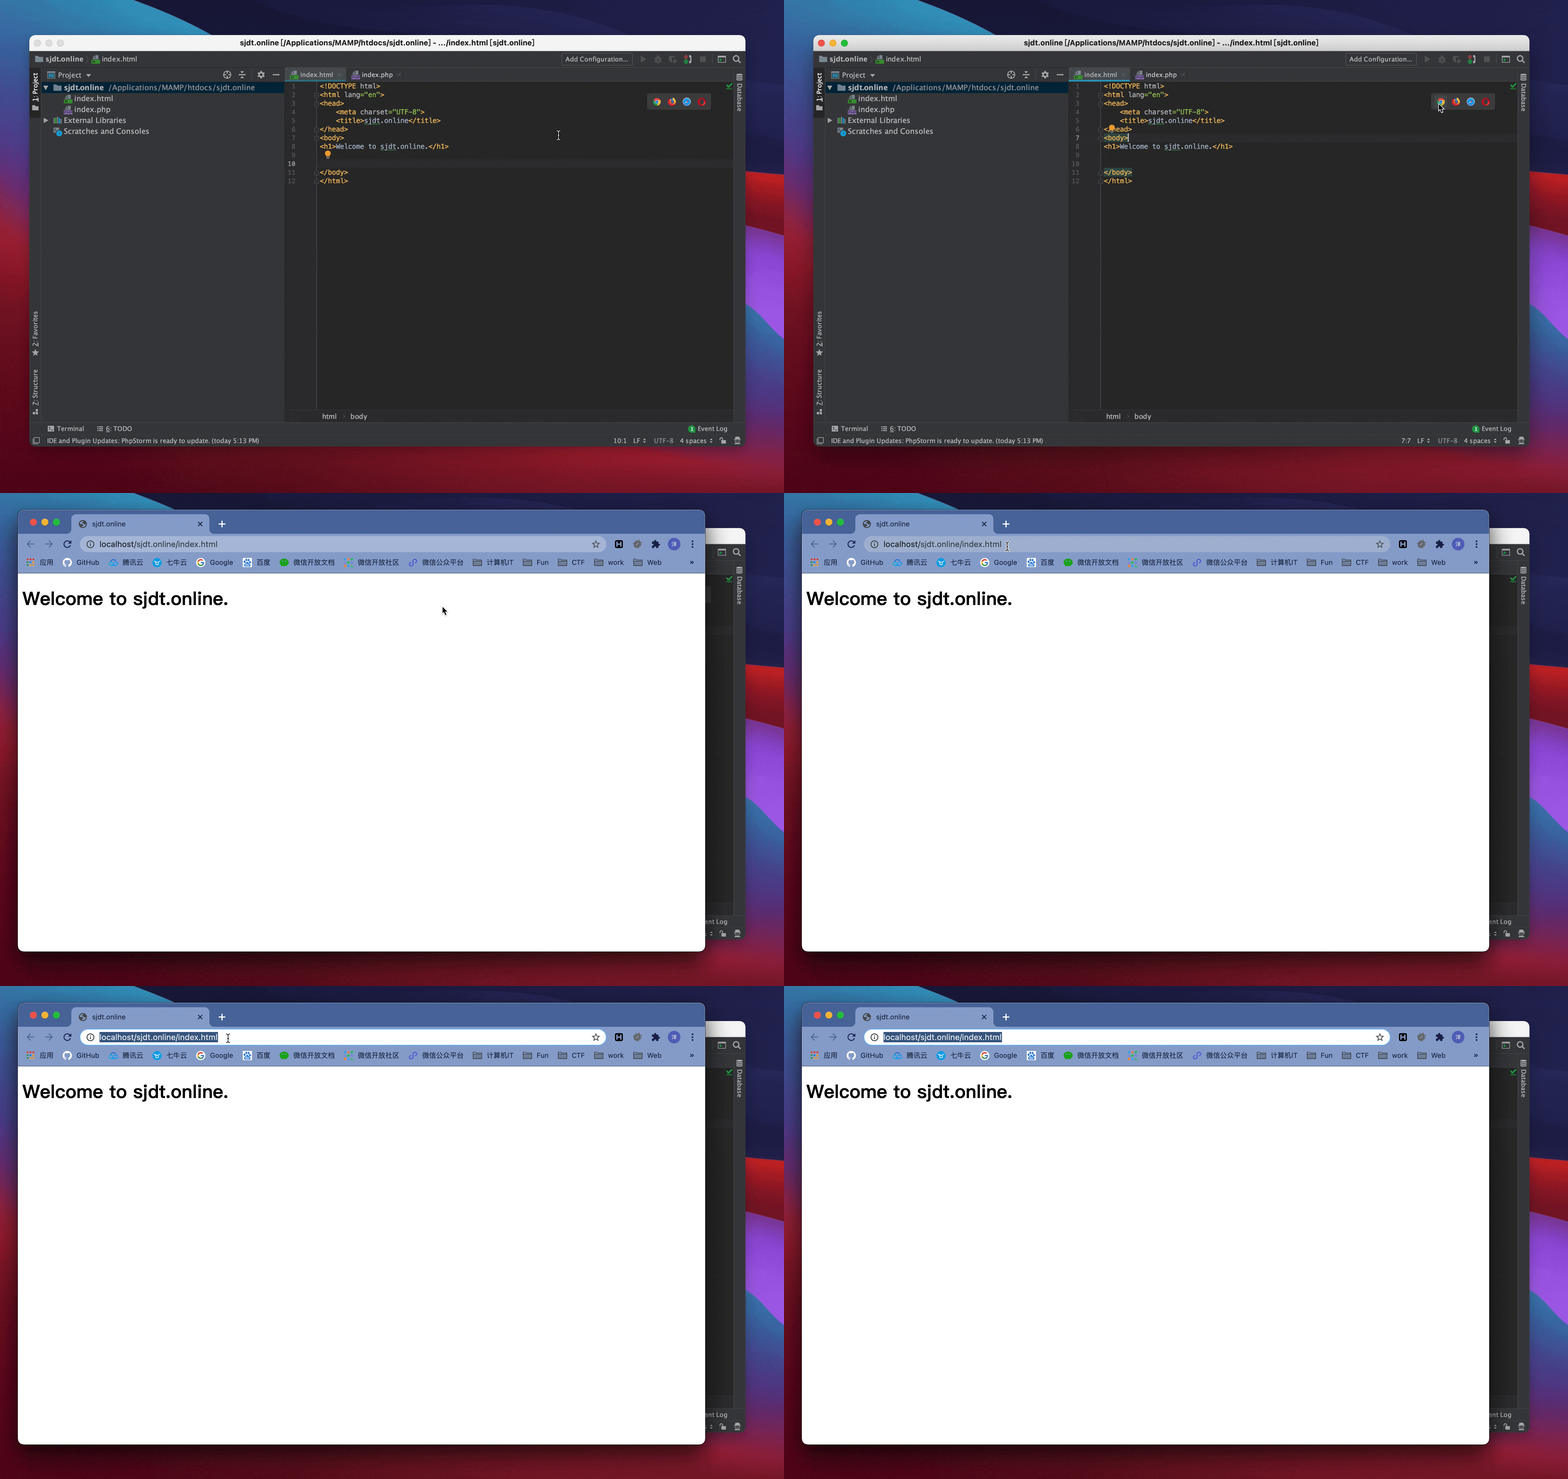
这样在phpstorm中就可以使用PHPStorm中的preview按钮快速在浏览器中预览页面效果了。
3 Apache 多域名配置

实际工作中经常会遇到需要同时开发多个项目或者在一个Host上配置多个域名的情况,使用VirtualHost配置可以很好的解决这个问题。

首先,修改本地/etc/hosts解析文件,添加如下内容:

1
2
127.0.0.1	localhost
127.0.0.1 sjdt.online.test

然后修改MAMP的Apache配置文件:/Applications/MAMP/conf/apache/httpd.conf ,找到Virtual hosts的配置的位置:

1
2
# Virtual hosts
#Include /Applications/MAMP/conf/apache/extra/httpd-vhosts.conf

去掉Include前面的注释,像这样,然后保存退出:

1
2
# Virtual hosts
Include /Applications/MAMP/conf/apache/extra/httpd-vhosts.conf

然后,编辑修改VirtualHosts配置文件:/Applications/MAMP/conf/apache/extra/httpd-vhosts.conf

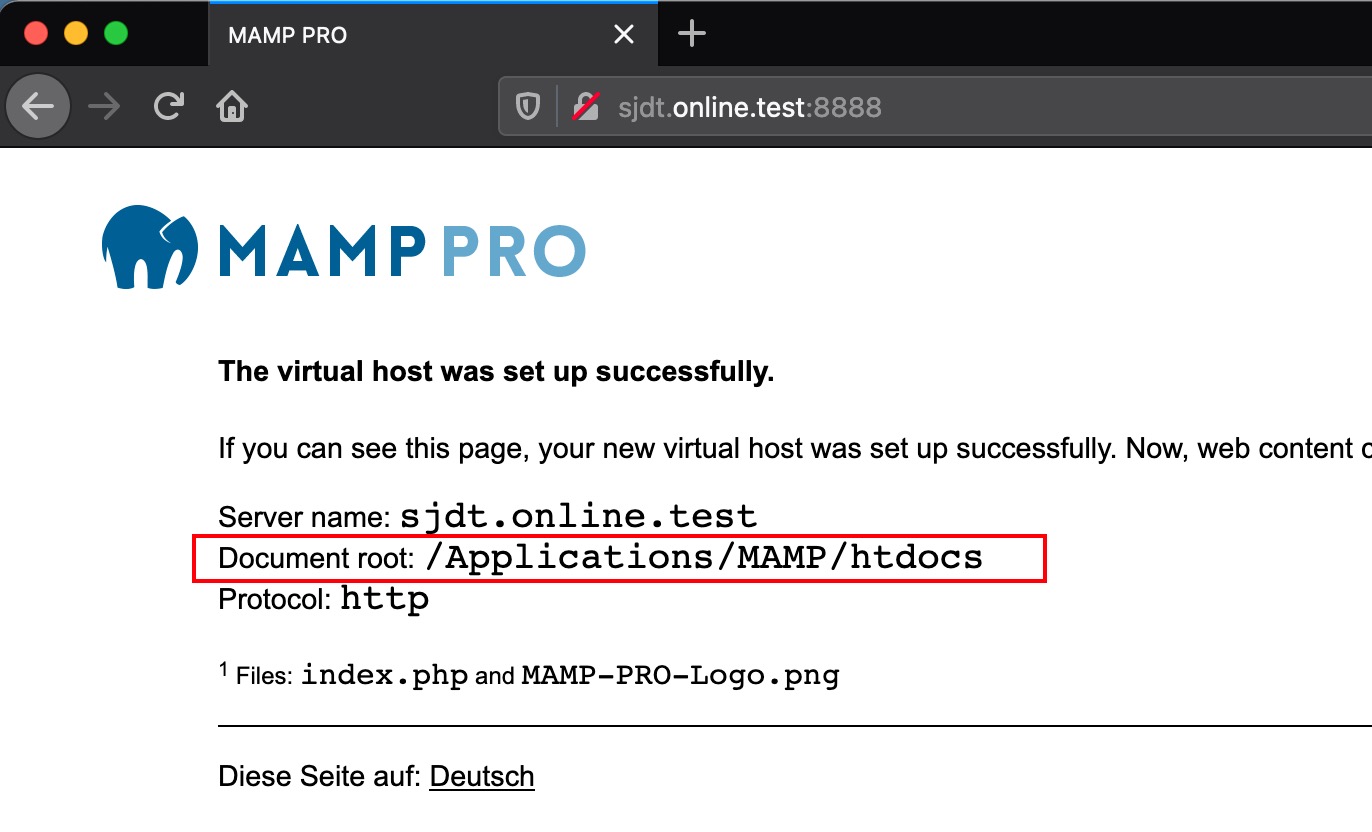
尽管显示virtual host已经生效了,但是实际上是不好用的,MAMP的Document Root一直指向了MAMP的htdoc根目录,不知道是MAMP的bug还是httpd配置有问题
于是换个思路,使用MAMP的添加Hosts来解决开发环境多个域名的问题,实际生产上线使用VirtualHost。
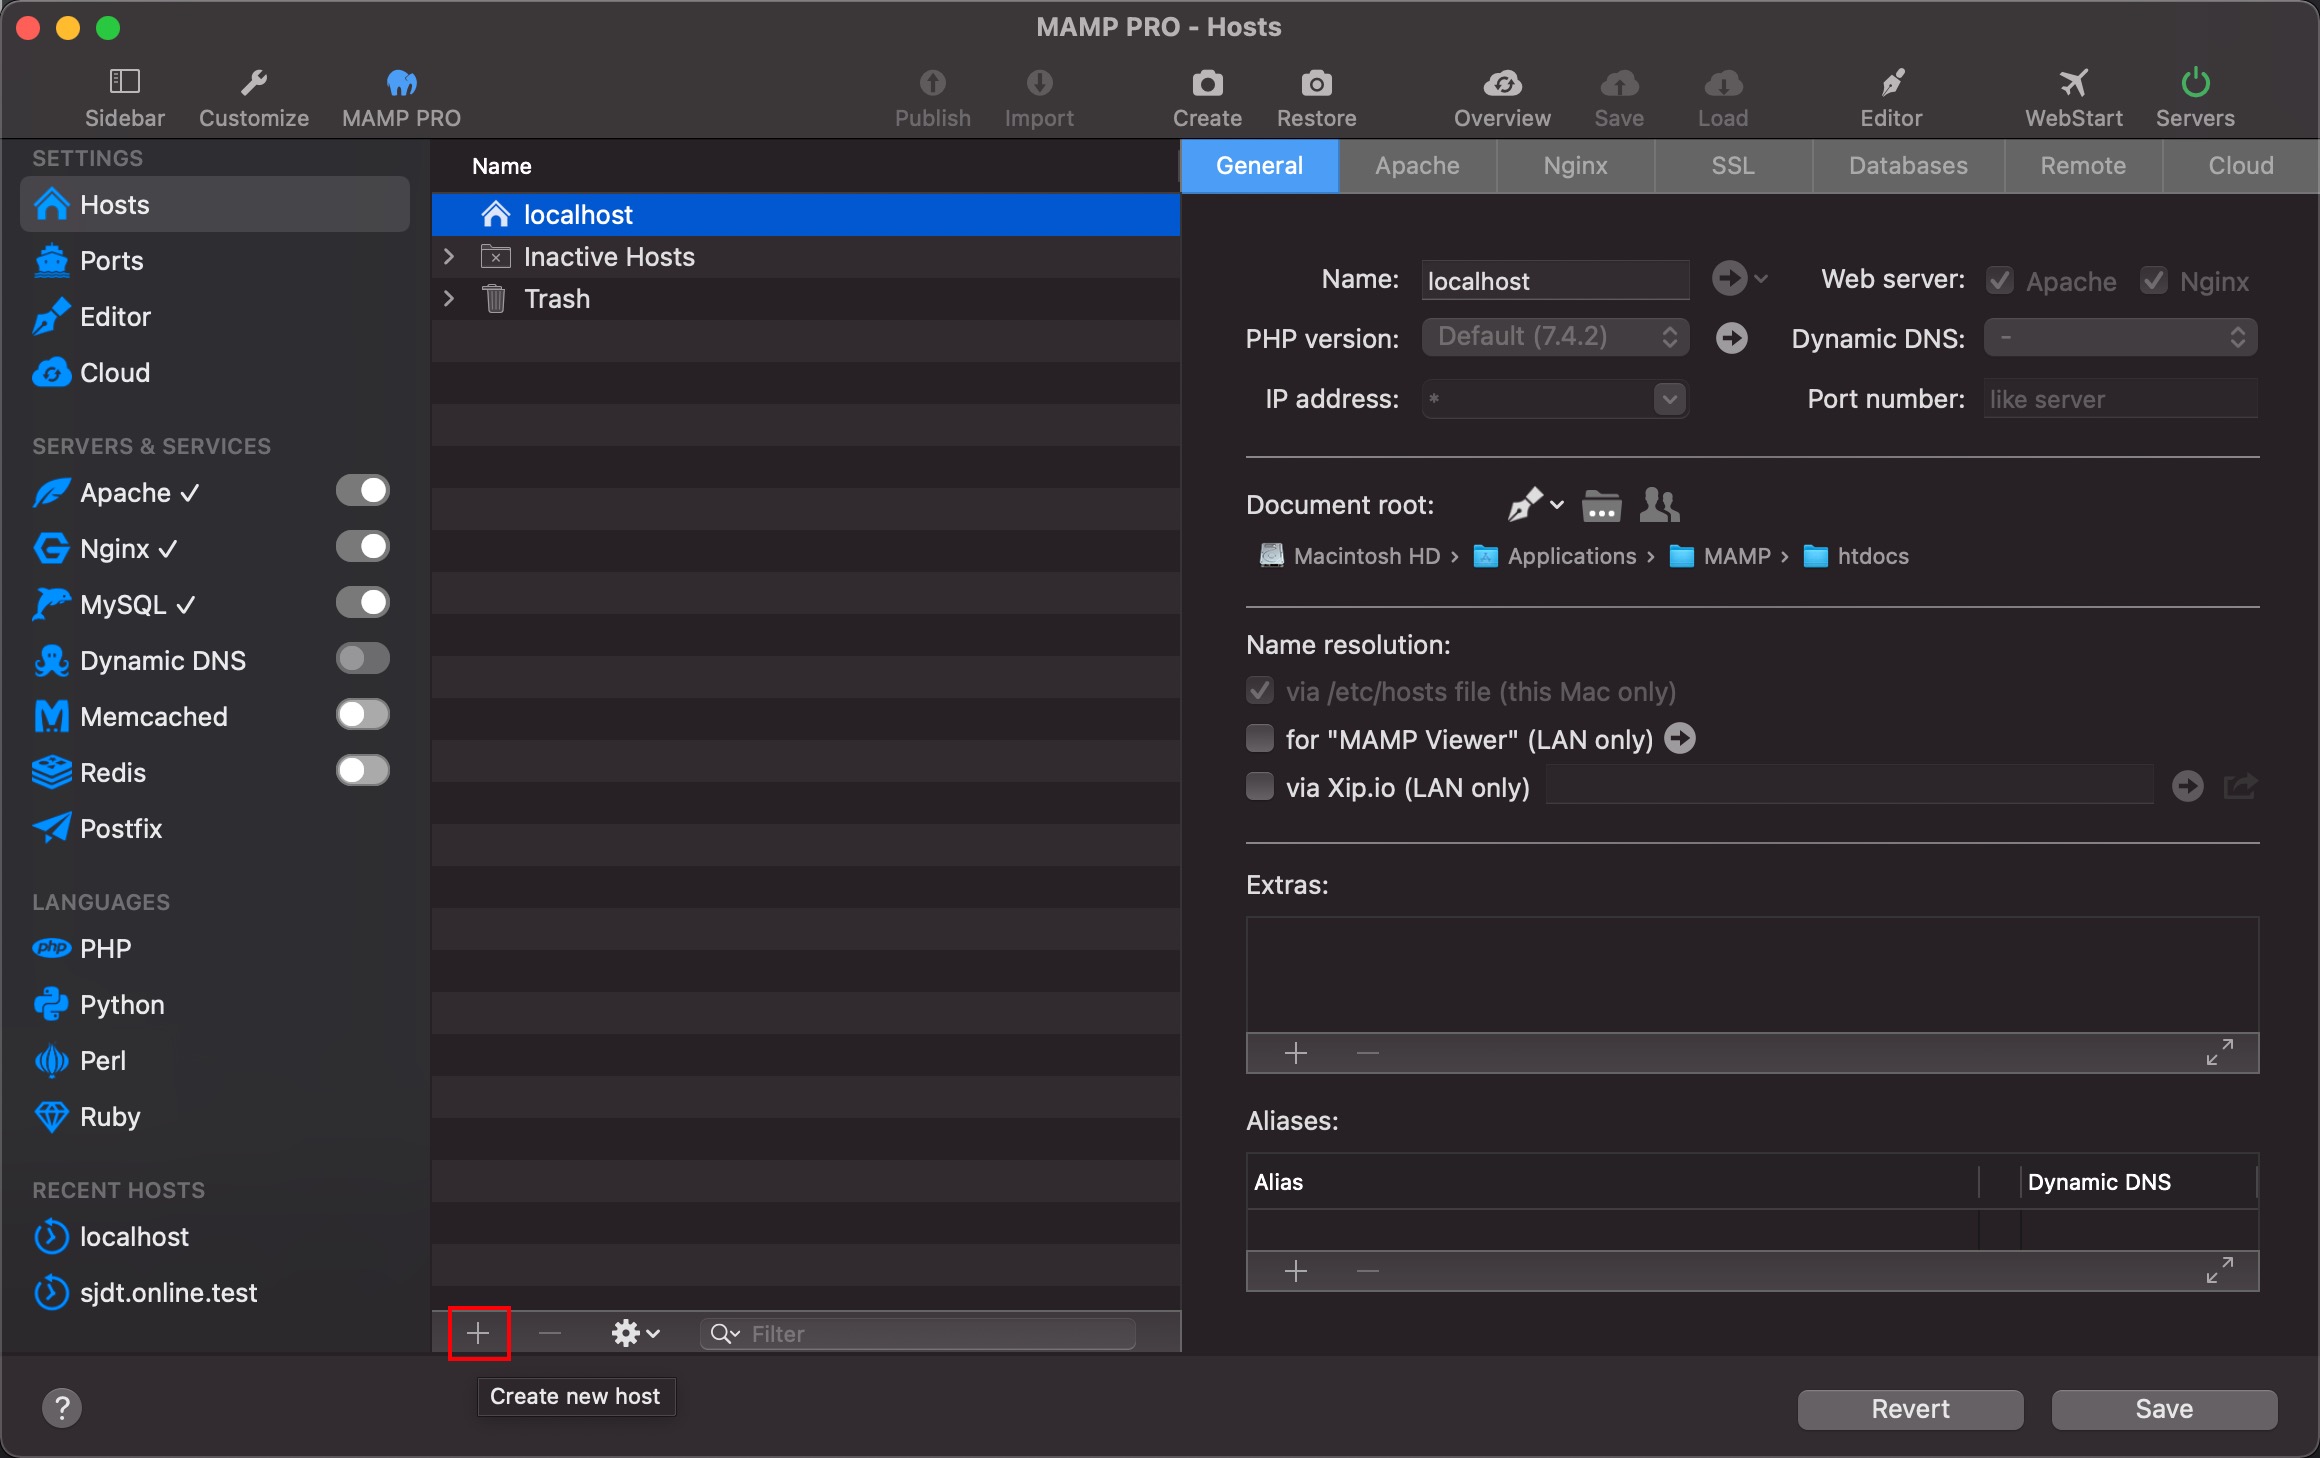
在MAMP的Hosts界面中使用左下角的”+”加号按钮新建一个Host,Hostname输入sjdt.online.test
修改DocumentRoot:/Users/yiny/Sites/sjdt.online
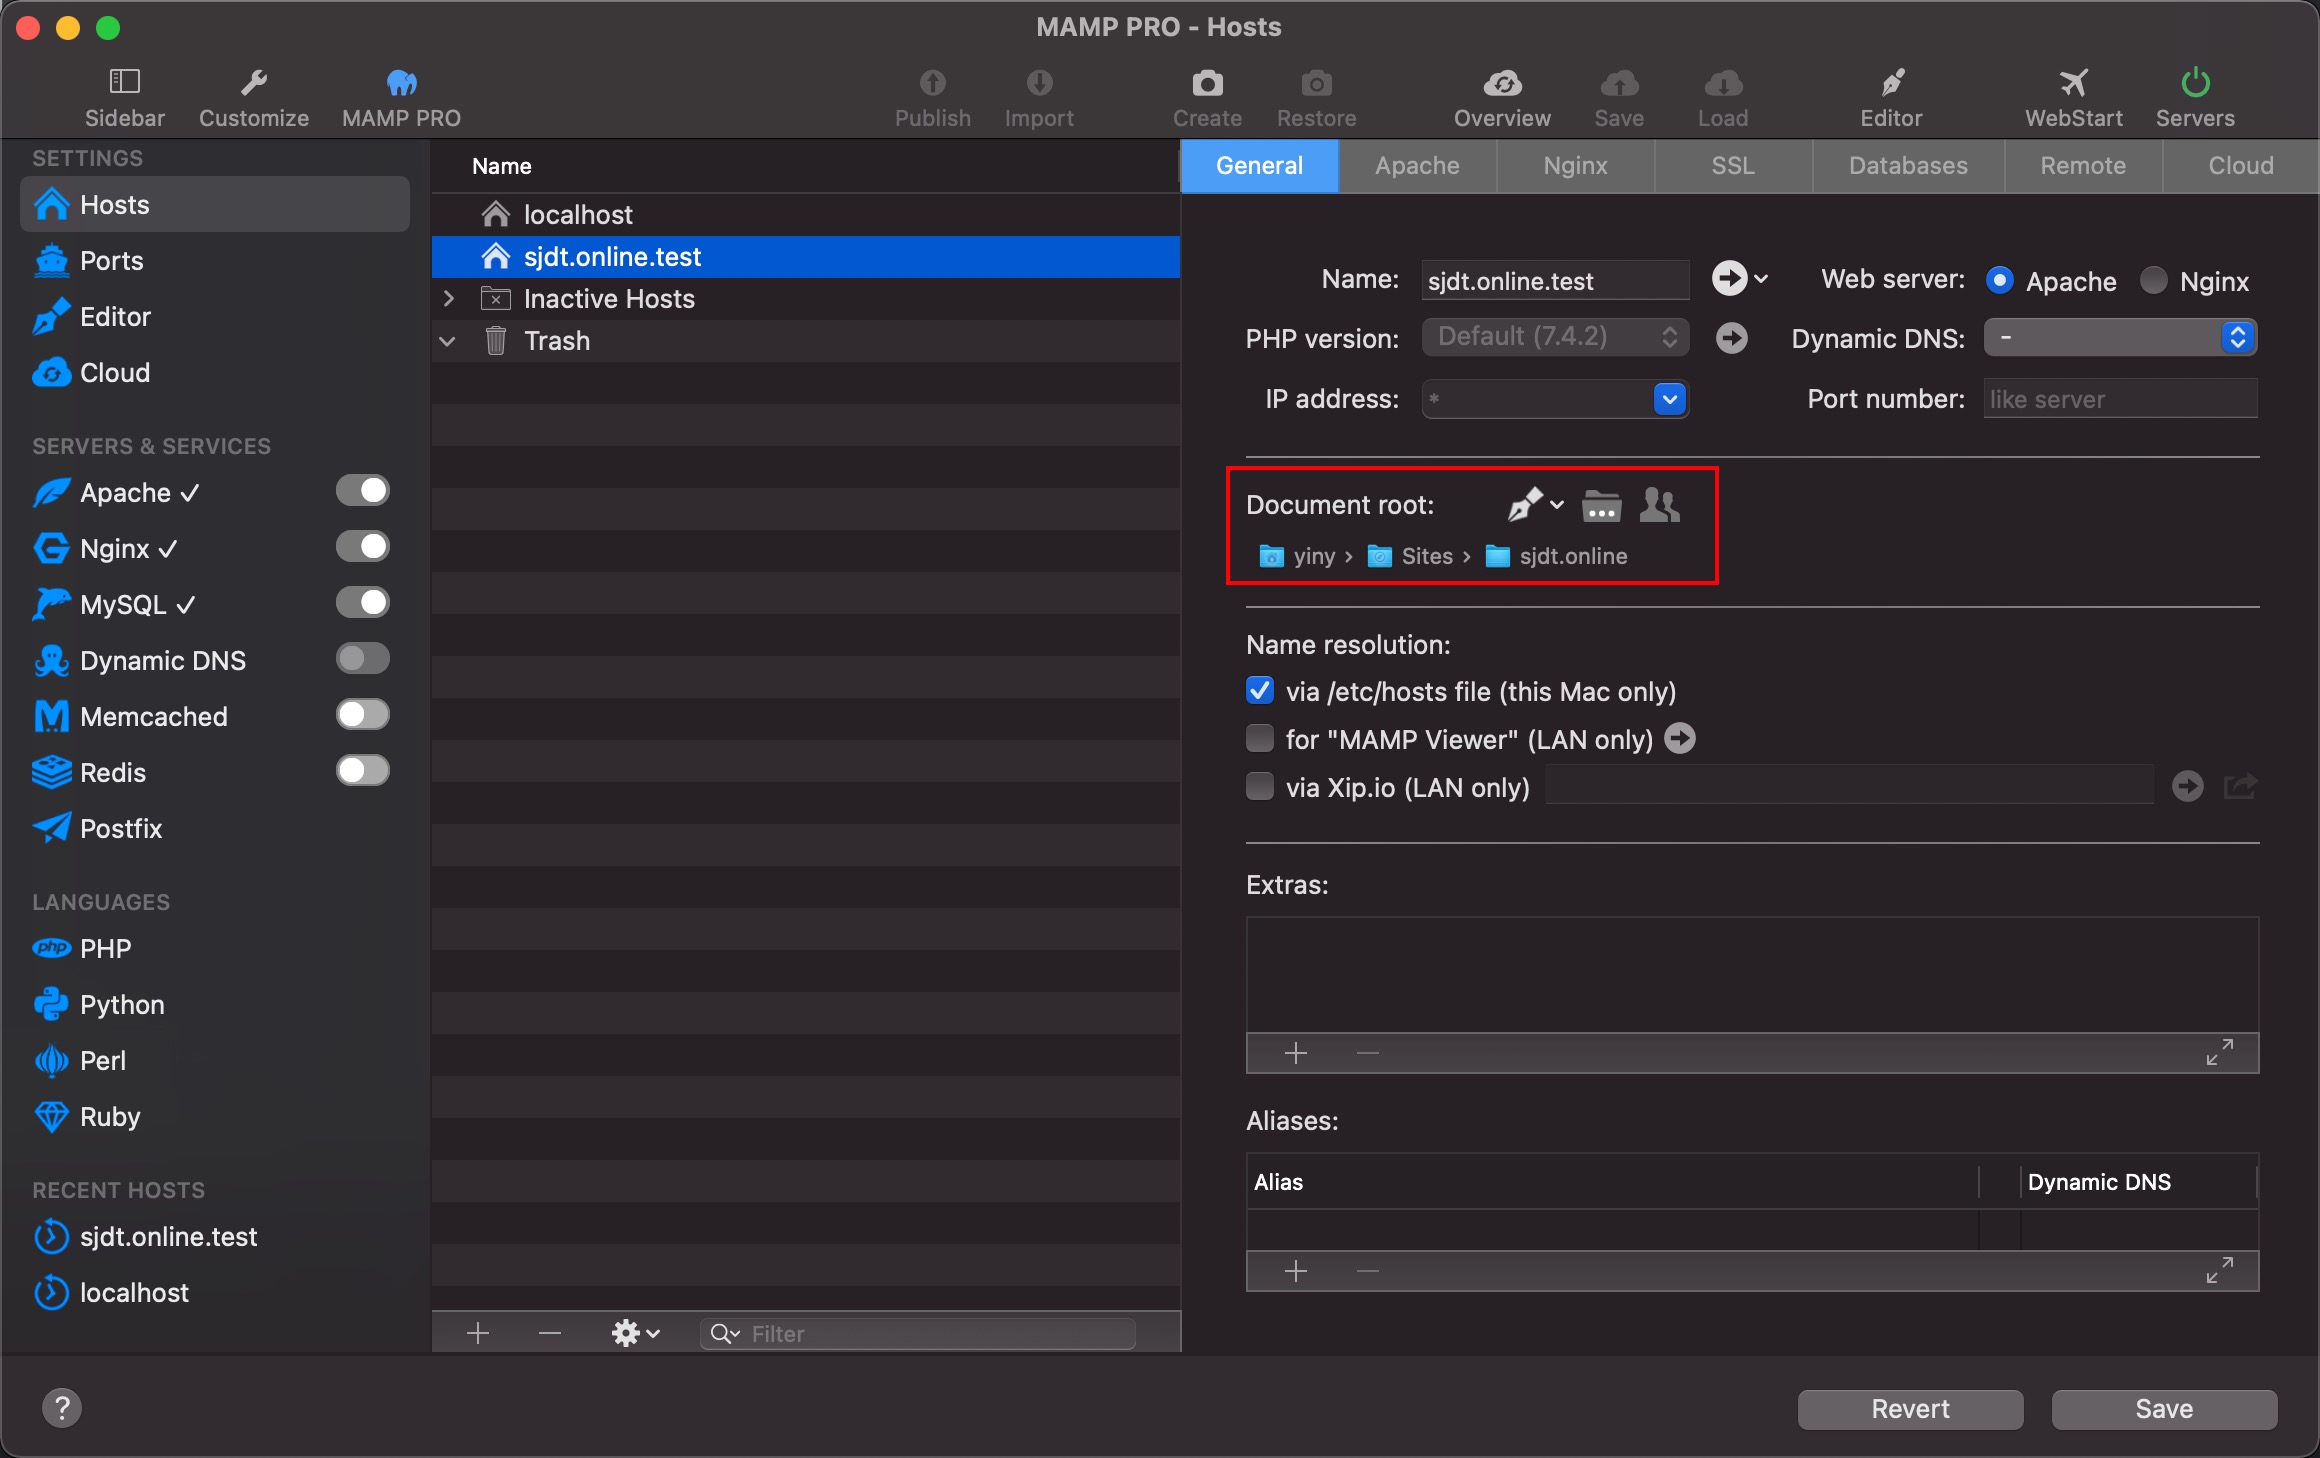
phpstorm中新建项目,项目目录选择刚刚Apache中Document Root的位置/Users/yiny/Sites/sjdt.online
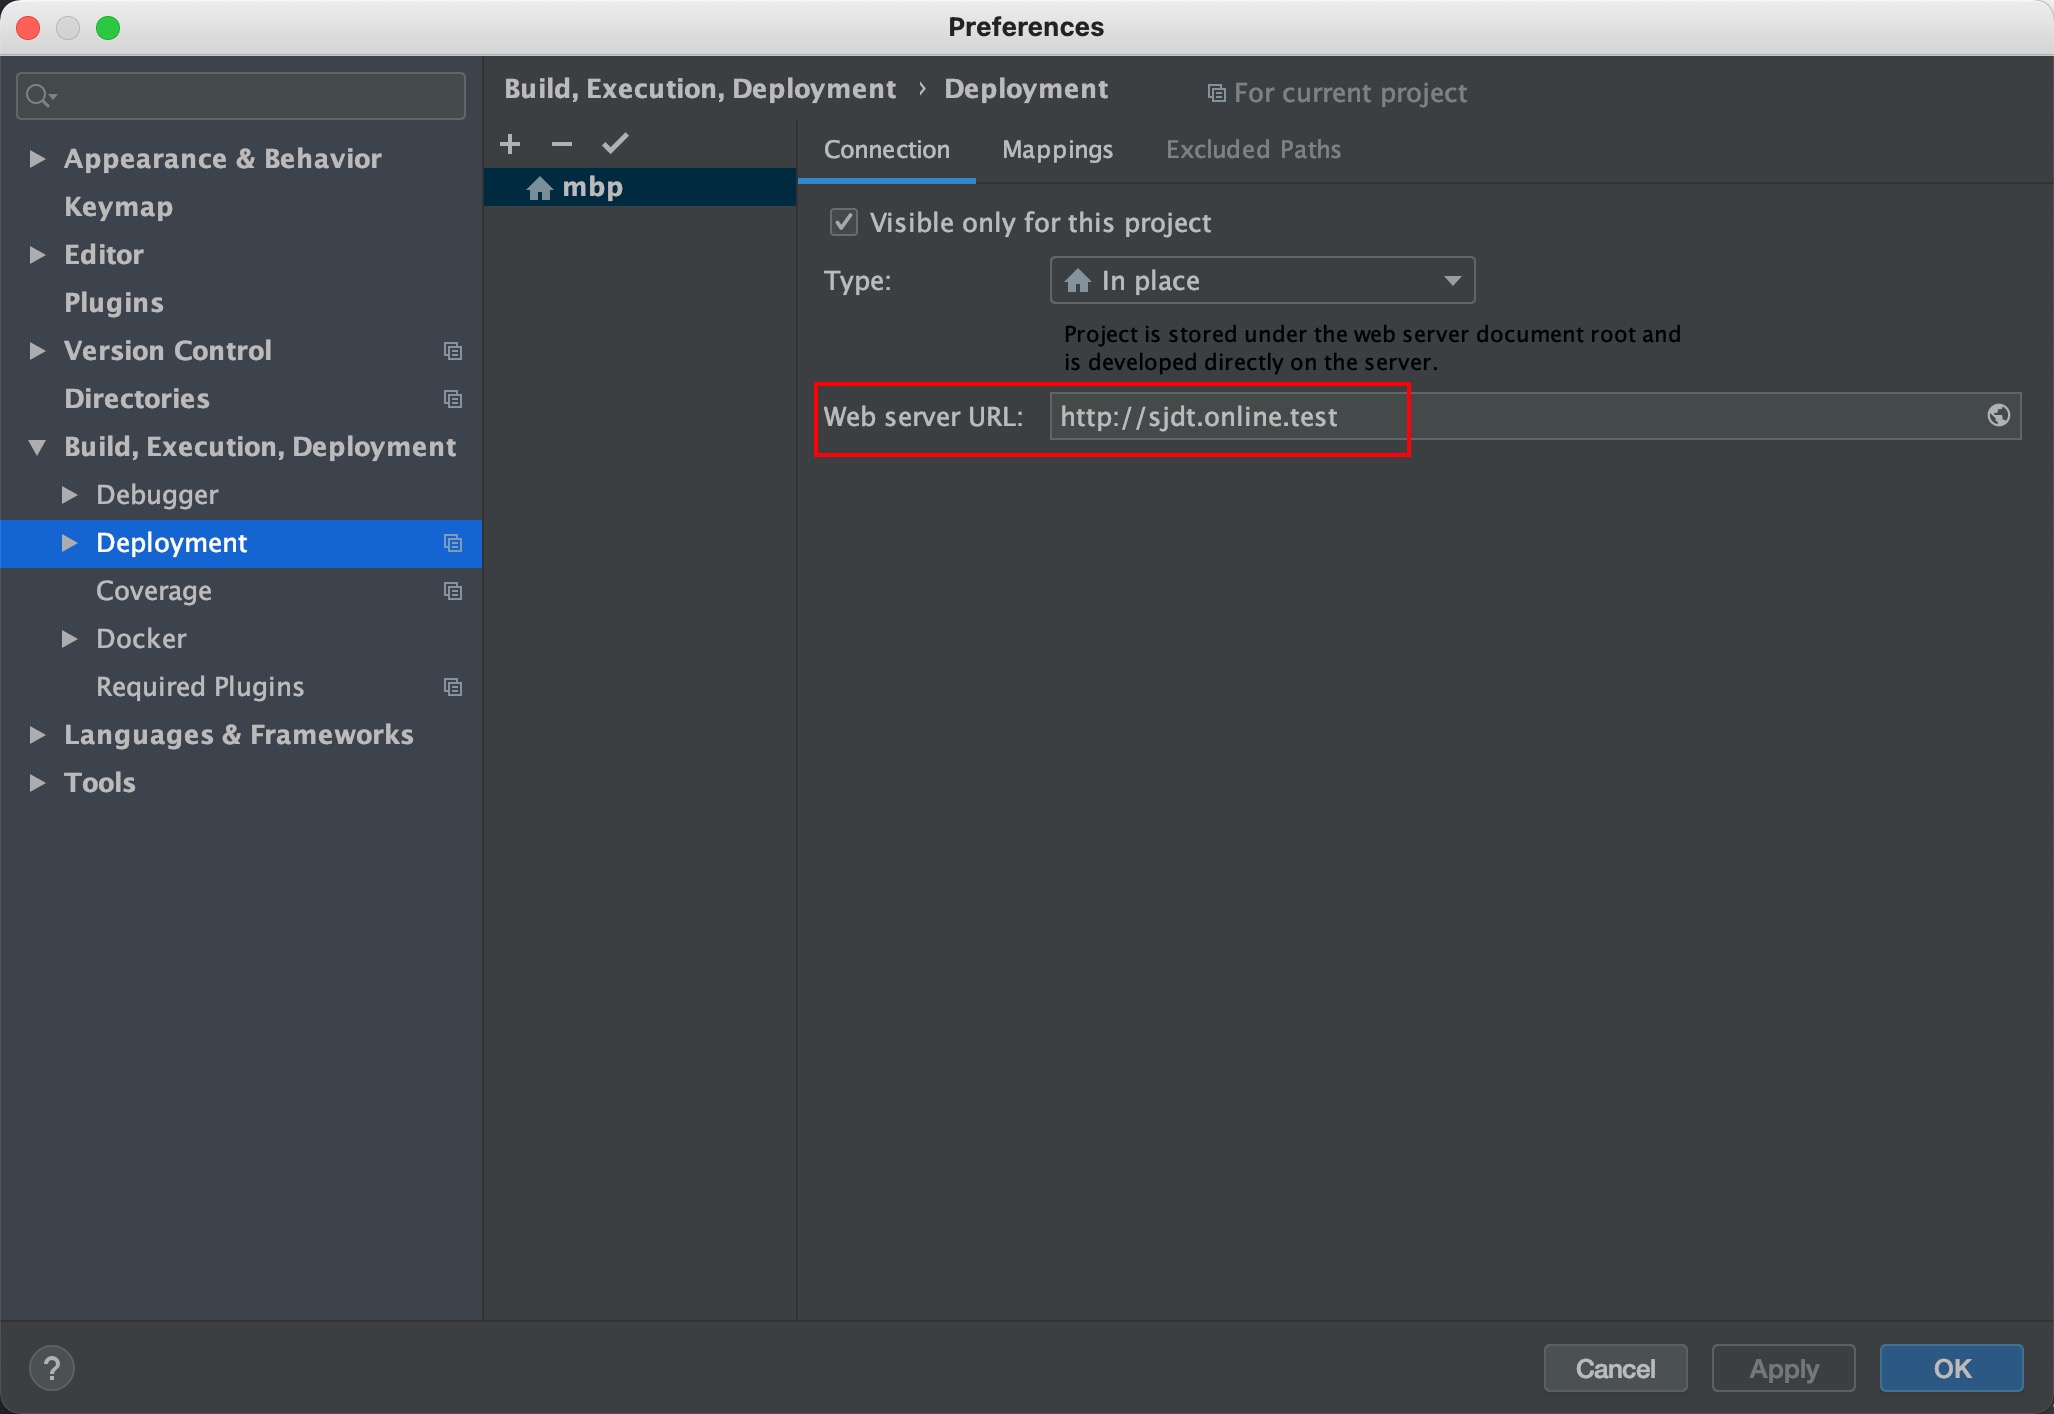
选择:phpstorm -> Preference -> Build,Execution,Deployment -> Deployment,单击右侧的 + 加号新建一个服务器mbp,Web server URL填写本地测试域名:http://sjdt.online.test
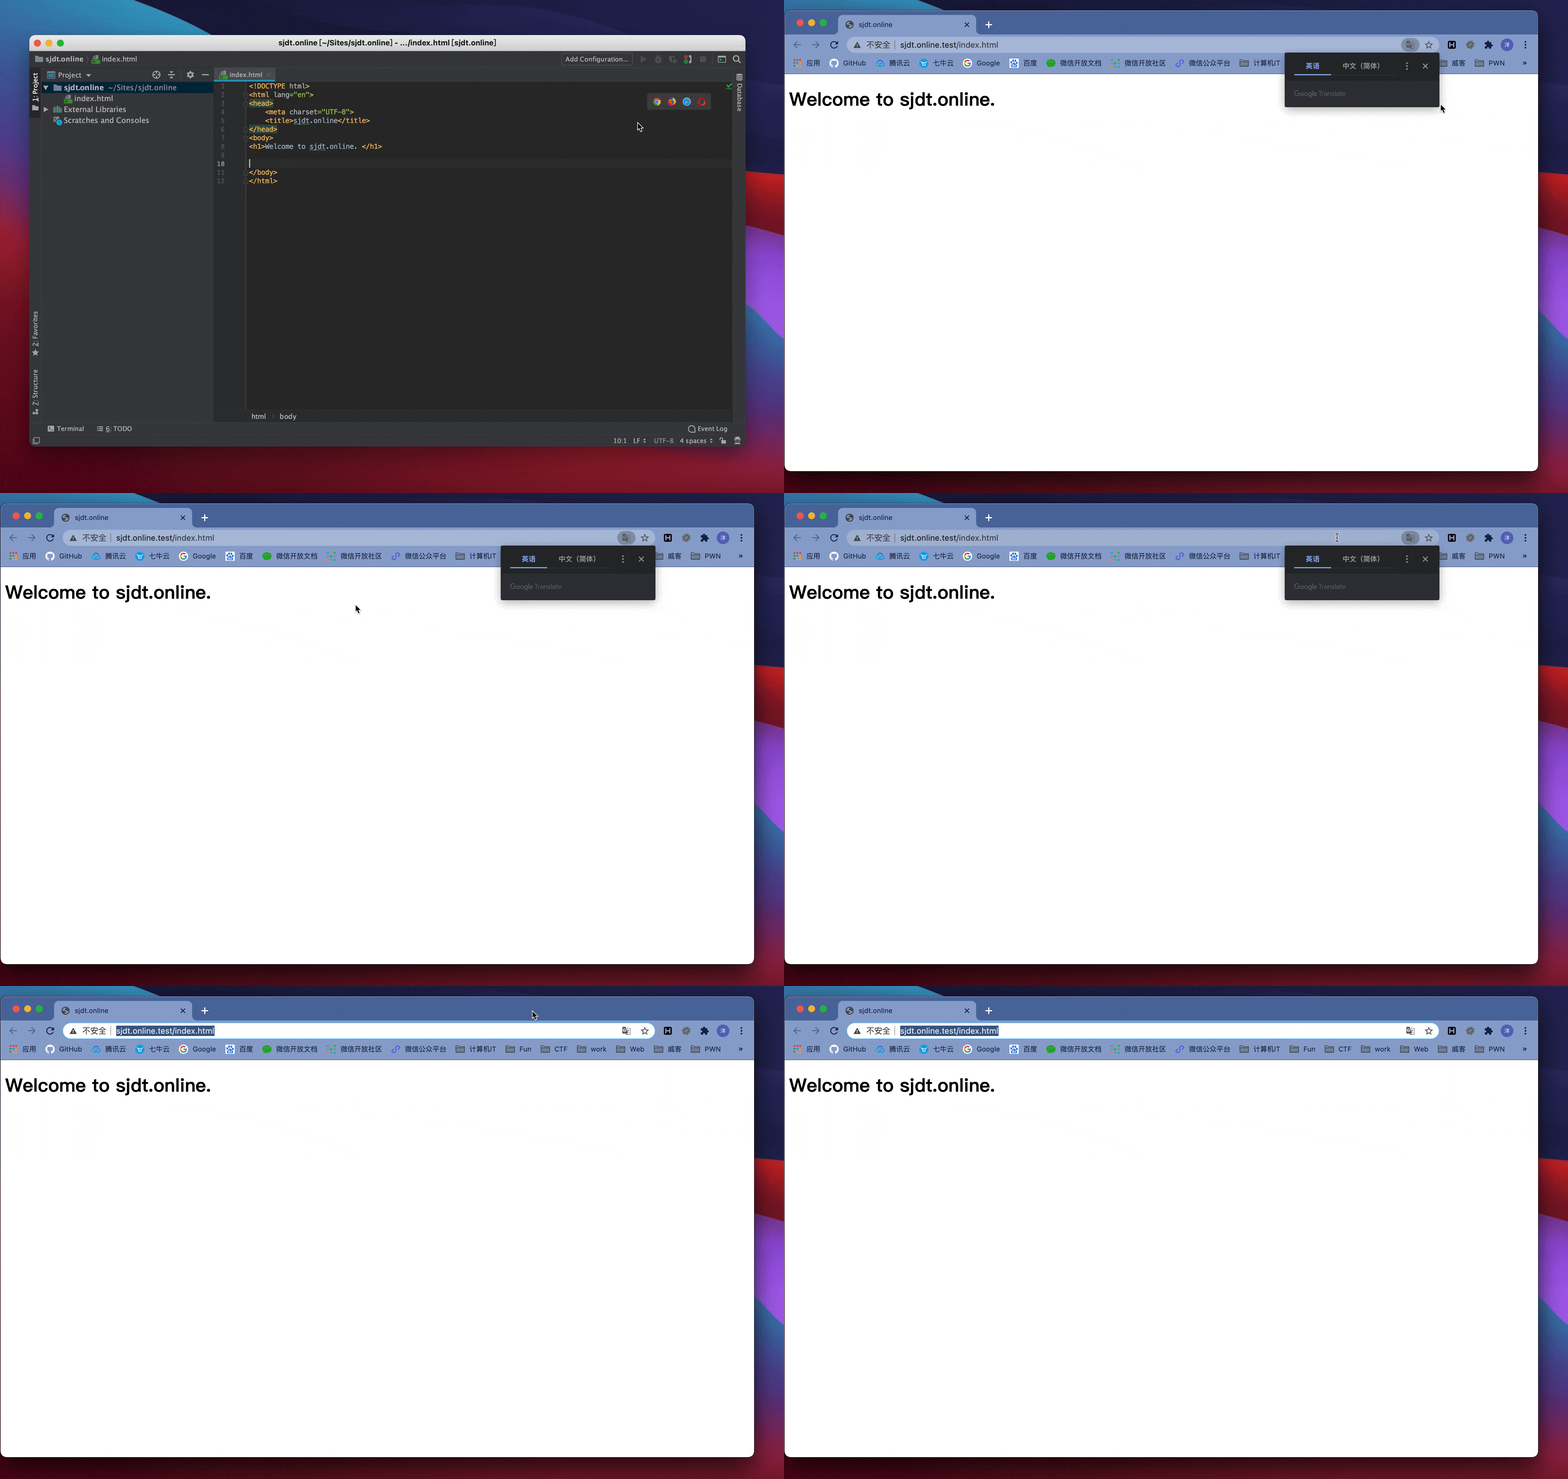
效果: