如何更改IDEA使用内存

更改启动最大最小内存

在访达中找到IDEA,右键“显示包内容”,找到bin/idea.vmoptions,编辑如下内容修改最小内存和最大内存:

1
2
-Xms4096m
-Xmx8192m

也可以在IDEA的Help-> Edit Custom VM Options菜单中直接修改。

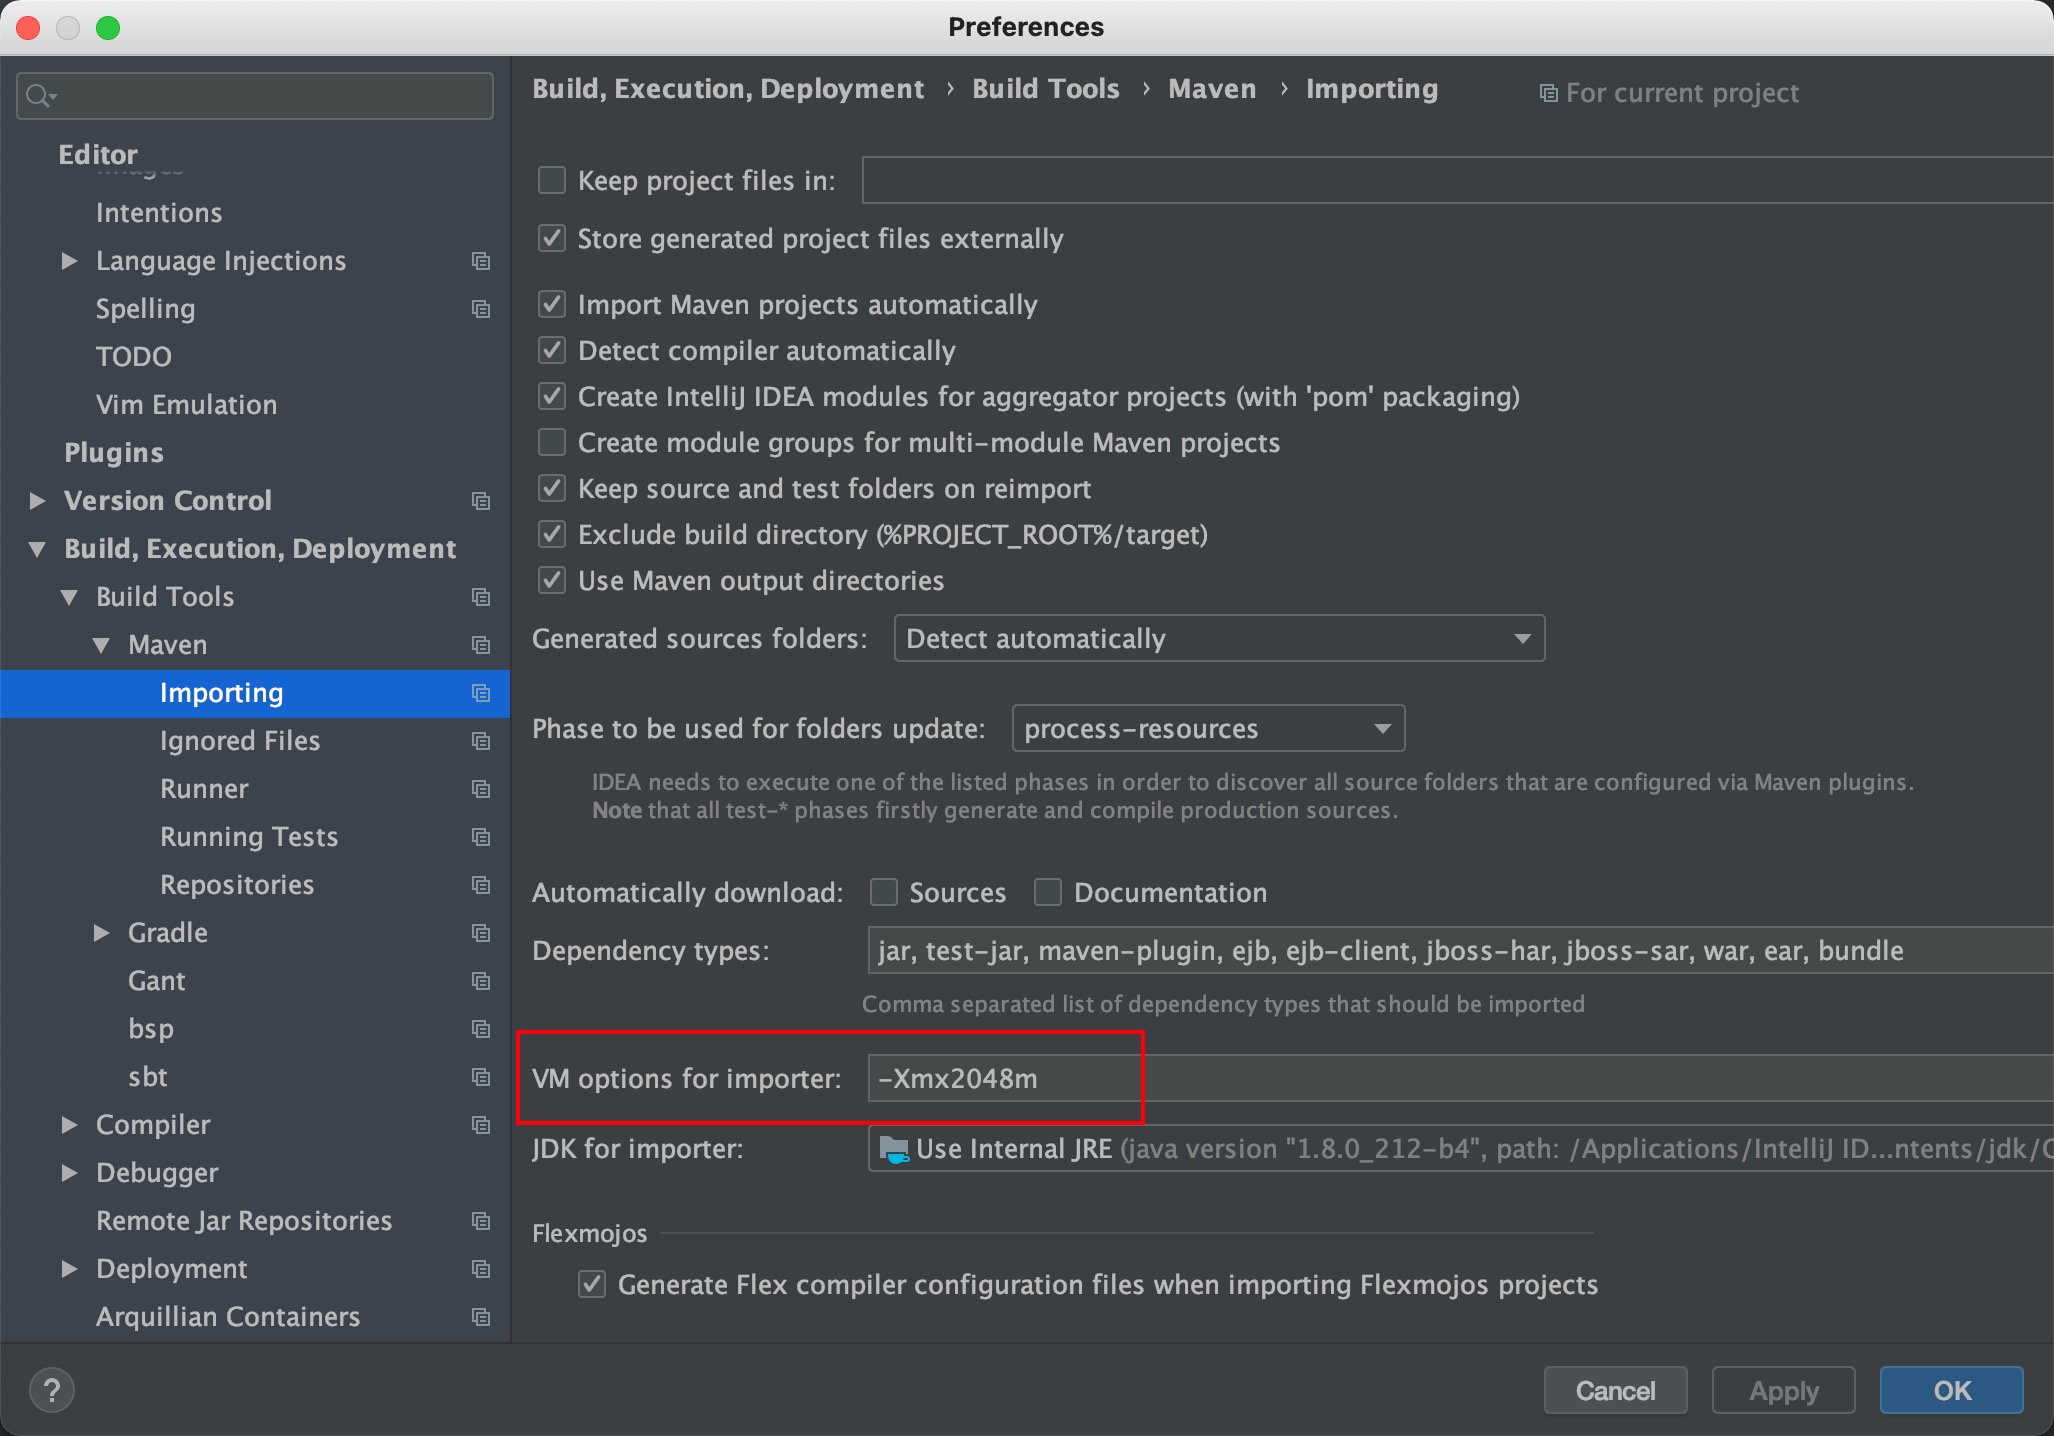
更改Maven的importer使用内存大小

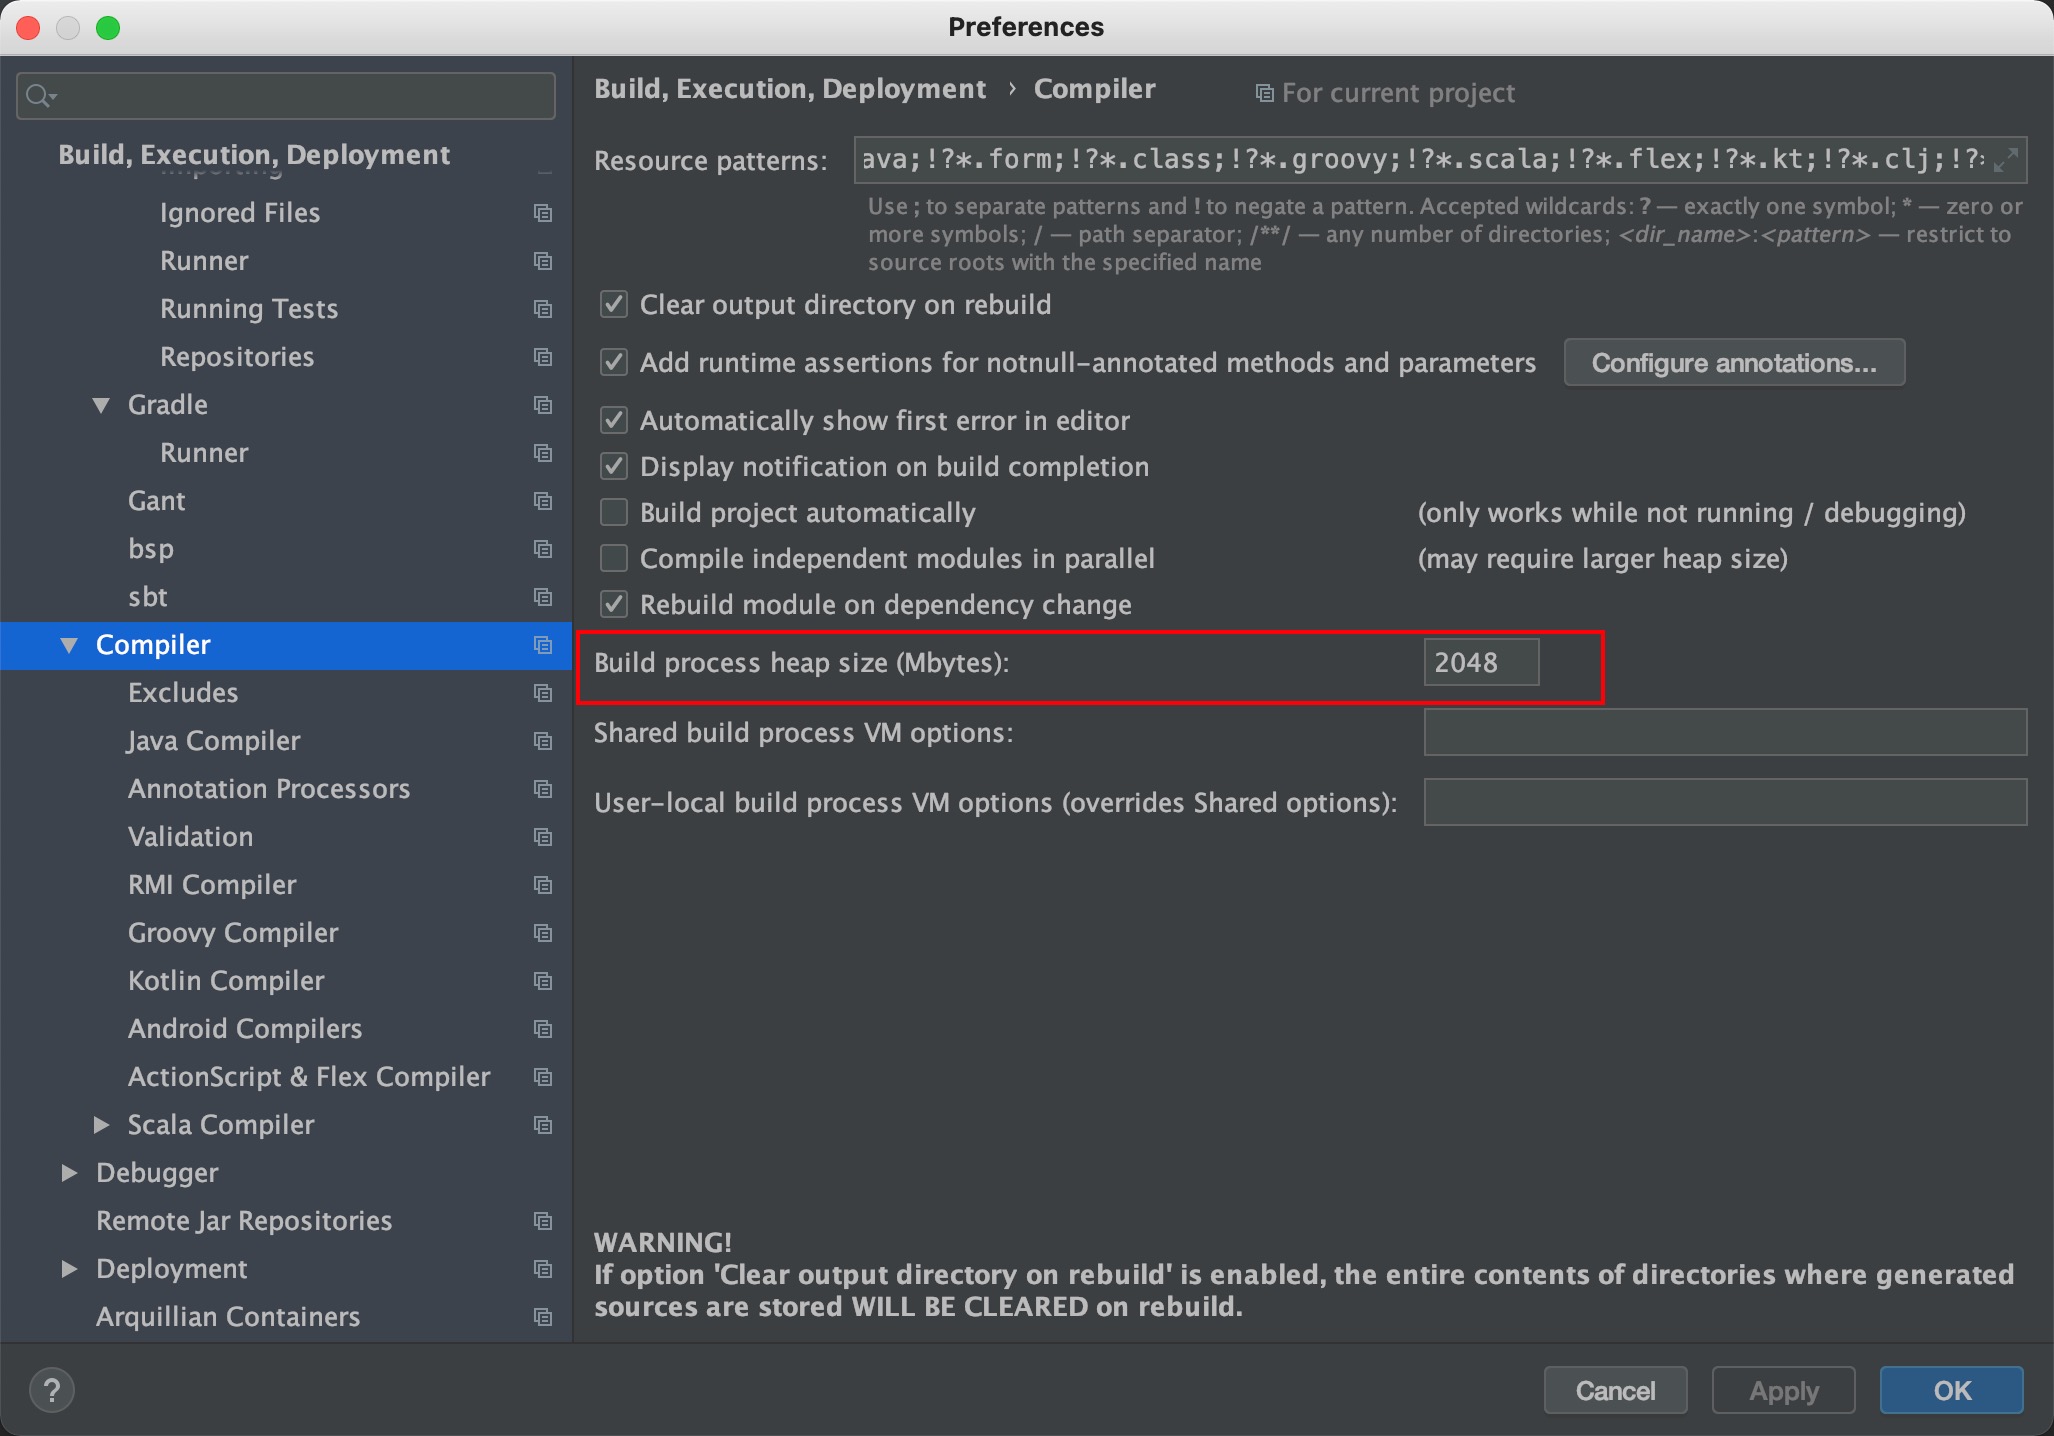
更改编译器内存大小

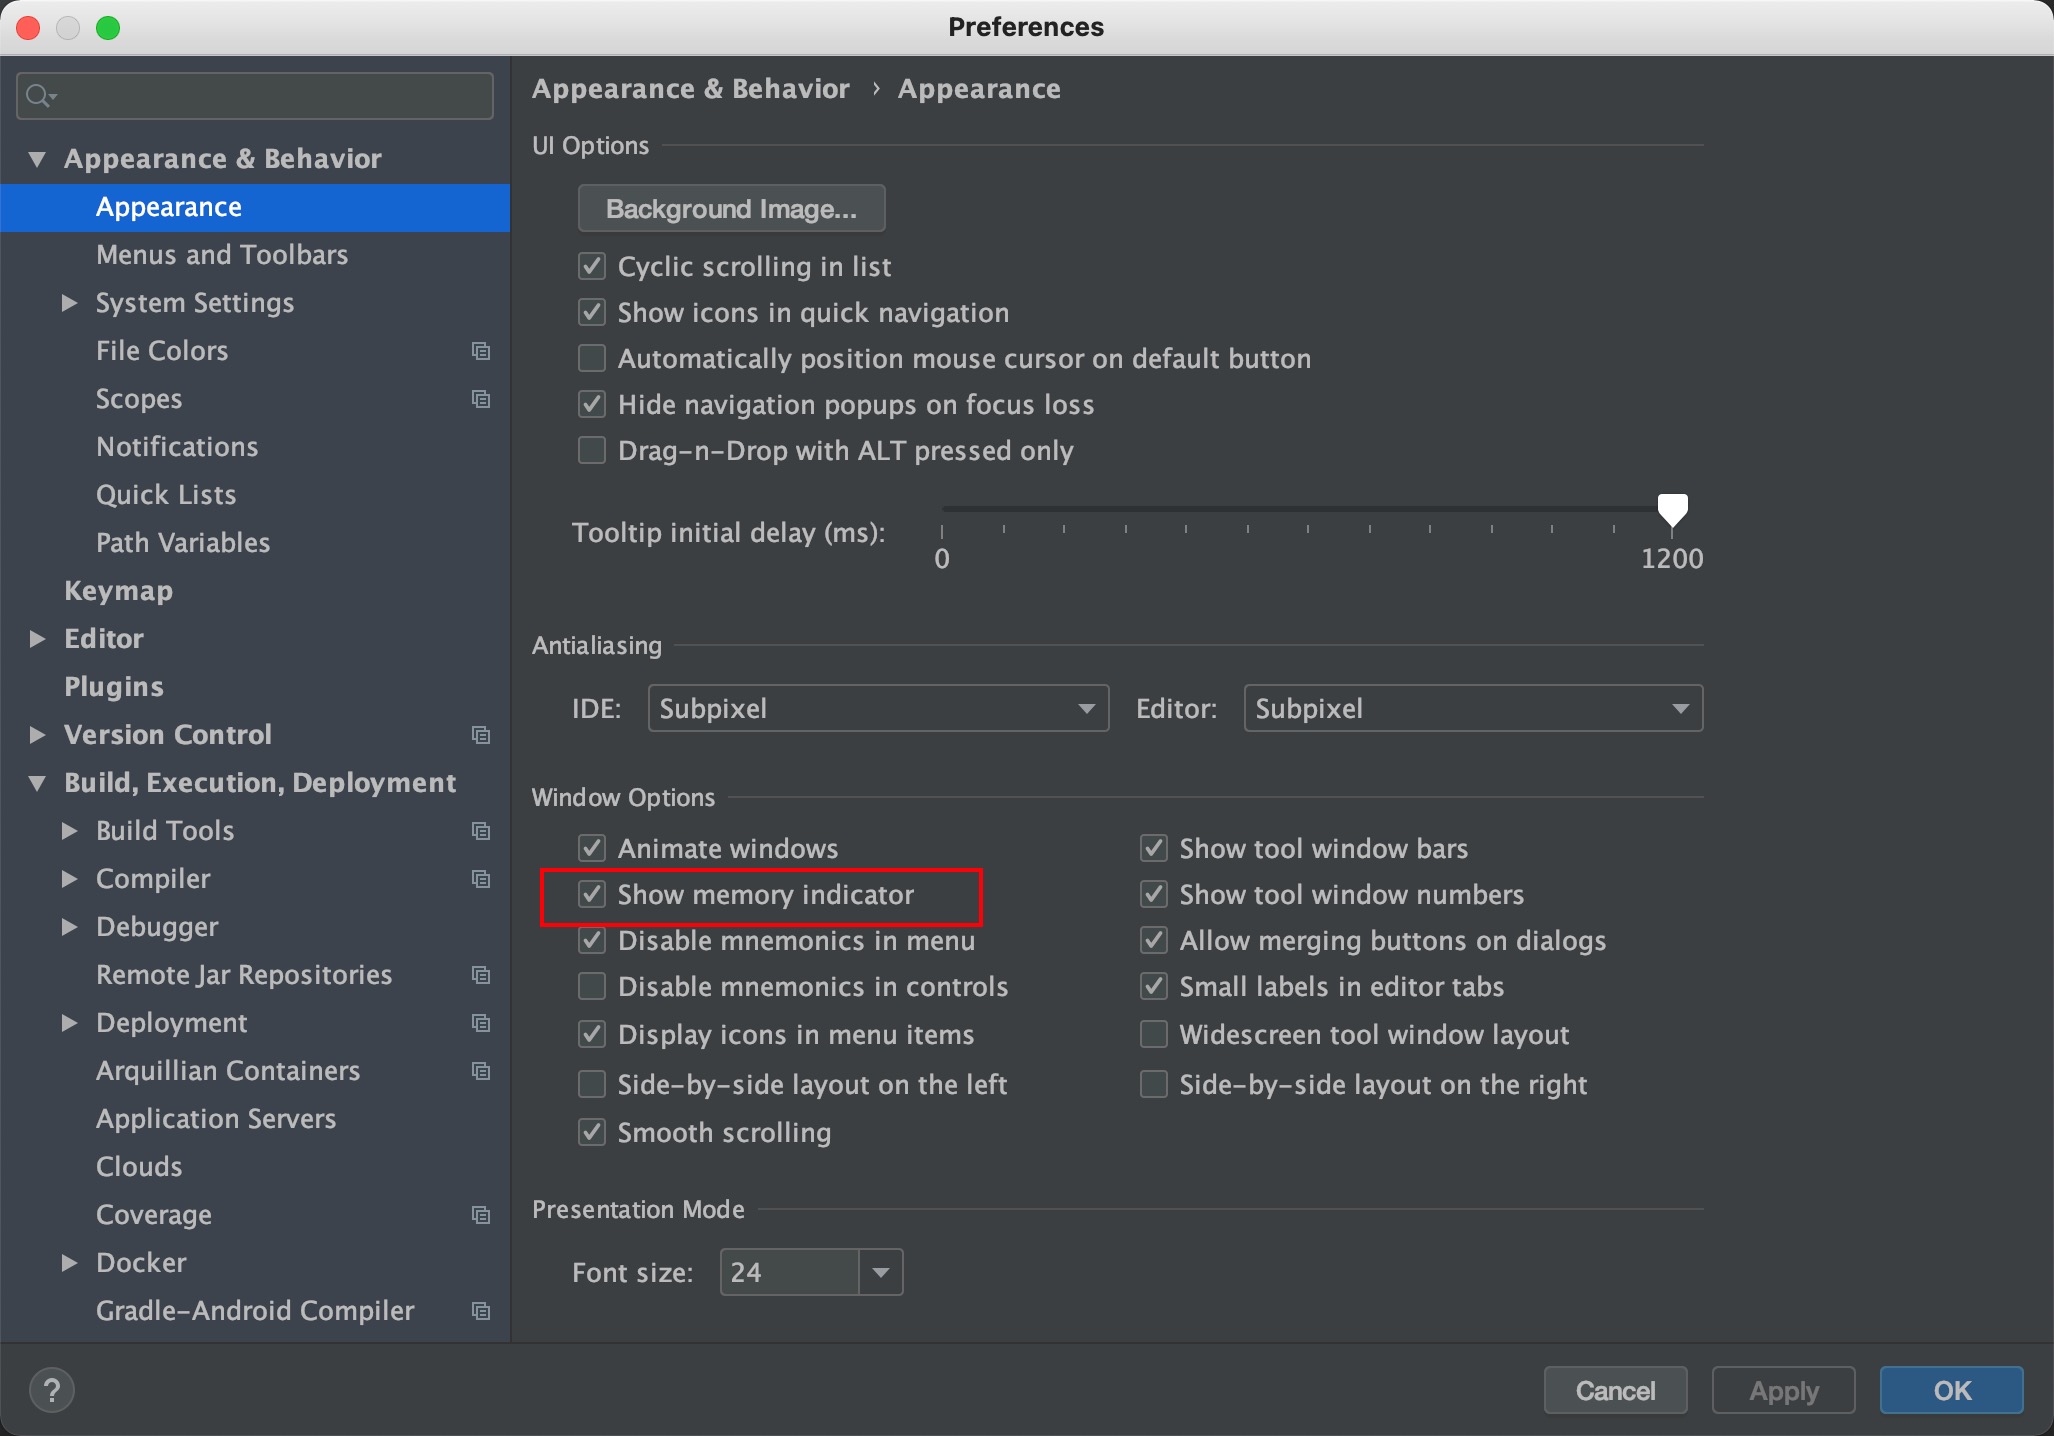
勾选Show memory indicator选项

这样在idea的右下角就可以看到当前内存的使用状况了,
重启IDEA,验证上面修改是否已经生效了

其他Pycharm等工具的修改方法基本相同。

IDEA 快捷键

快捷键(Mac版)

快捷键 作用
两次Shift 查找类等,很好用
Command+Shift+F 查找
Command+Shift+R 替换
Command+[ Back
Command+] Forward
Command+鼠标左键单击 跳转至定义处
Command+Shift+* 列编辑
Command+/ 注释/取消注释
Command+N 生成代码
Command+D 复制当前行至下一行
Command+Option+L 美化代码
Option+Shift+⬆️/⬇️ 移动当前行至上/下一行
Option+Enter 导入包/自动修改

Annotation 笔记

原生注解

Java 定义了一套注解,共有 7 个,3 个在 java.lang 中,剩下 4 个在 java.lang.annotation 中。

|注解 | 作用 |
|:—- |:—- |
|@Override |检查该方法是否是重写方法。如果发现其父类,或者是引用的接口中并没有该方法时,会报编译错误。 |
|@Deprecated |标记过时方法。如果使用该方法,会报编译警告。 |
|@SuppressWarnings |指示编译器去忽略注解中声明的警告。 |

作用在其他注解的注解(或者说 元注解)是
|注解 | 作用 |
|:—- |:—- |
|@Retention |标识这个注解怎么保存,是只在代码中,还是编入class文件中,或者是在运行时可以通过反射访问。 |
|@Documented |标记这些注解是否包含在用户文档中。 |
|@Target |标记这个注解应该是哪种 Java 成员。 |
|@Inherited |标记这个注解是继承于哪个注解类(默认 注解并没有继承于任何子类) |

Spring中的注解

|注解 | 作用 |
|:—- |:—- |
|@SpringBootApplication|表示这是一个SpringBoot的应用,可以自启动|
|@Configuration|表示这是一个配置类|
|@Component|注册Bean,把对象交给Spring管理|
|@Repository|表示存储层Bean,用在持久层的接口上,这个注解是将接口的一个实现类交给spring管理|
|@Service|表示业务层Bean,把对象交给Spring管理|
|@Controller|表示展示层Bean,把对象交给Spring管理|
|@Import|普通类导入到 IoC容器中|

想要让一个普通类接受 Spring 容器管理,有以下方法

  • 使用 @Bean 注解
  • 使用 @Controller @Service @Repository @Component 注解标注该类,然后再使用 @ComponentScan 扫描包
  • @Import 方法

JSR303校验

|Constraint | 详细信息 |
|:—- |:—- |
|@Null| 被注释的元素必须为 null|
|@NotNull| 被注释的元素必须不为 null|
|@AssertTrue| 被注释的元素必须为 true|
|@AssertFalse| 被注释的元素必须为 false|
|@Min(value)| 被注释的元素必须是一个数字,其值必须大于等于指定的最小值|
|@Max(value)| 被注释的元素必须是一个数字,其值必须小于等于指定的最大值|
|@DecimalMin(value)| 被注释的元素必须是一个数字,其值必须大于等于指定的最小值|
|@DecimalMax(value) |被注释的元素必须是一个数字,其值必须小于等于指定的最大值|
|@Size(max, min) |被注释的元素的大小必须在指定的范围内|
|@Digits (integer, fraction) |被注释的元素必须是一个数字,其值必须在可接|受的范围内
|@Past |被注释的元素必须是一个过去的日期|
|@Future| 被注释的元素必须是一个将来的日期|
|@Pattern(value) |被注释的元素必须符合指定的正则表达式|

Conditional 扩展注解

|注解 | 作用 |
|:—- |:—- |
|@ConditionalOnJava|系统的java版本是否符合要求|
|@ConditionalOnBean|容器中存在指定Bean|
|@ConditionalOnMissingBean|容器中不存在指定Bean|
|@ConditionalOnExpression|满足SpEL表达式指定|
|@ConditionalOnClass|系统中有指定的类|
|@ConditionalOnMissingClass|系统中没有指定的类|
|@ConditionalOnSingleCandidate|容器中只有一个指定的Bean,或者这个Bean是首选Bean|
|@ConditionalOnProperty|系统中指定的属性是否有指定的值|
|@ConditionalOnResource|类路径下是否存在指定资源文件|
|@ConditionalOnWebApplication|当前是Web环境|
|@ConditionalOnNotWebApplication|当前不是Web环境|
|@ConditionalOnJndi|JNDI存在指定项|

MyBatis中的注解

|注解 | 作用 |
|:—- |:—- |
|@Mapper|表示这是一个MyBatis的Mapper类,加了@Mapper注解之后接口在编译时会生成相应的实现类|
|@MapperScan(“cn.geekhall.mapper”)|扫描某个包下的所有类作为Mapper|

SpringBoot 笔记

原理初探

自动配置:

SpringBoot所有自动配置都是在启动的时候扫描并加载,spring.factories所有的自动配置类都在这里面,但是不一定生效,要判断是否成立,只要导入了对应的start,就有对应的启动器了,有了启动器,自动装配就会生效,然后就配置成功。

  1. SpringBoot在启动的时候,从类路径下/META-INF/spring.factories 获取指定的值;
  2. 将这些自动配置的类导入容器。自动配置就会生效,帮我们进行自动配置
  3. 以前我们需要自动配置的东西,现在SpringBoot帮我们做了!
  4. 整个JavaEE,解决方案和自动配置的东西都在spring-boot-autoconfigure这个包下
  5. 它会把所有需要导入的组件,以类名的方式返回,这些组件就会被添加到Spring容器中。
  6. 容器中也会存在非常多的XXXXAutoConfituration的文件,就是这些类给容器中导入了这个场景需要的所有组件,并自动配置。
  7. 有了自动配置类,免去了我们手动编写配置类的过程。

自动装配原理:

  1. SpringBoot启动会加载大量的自动装配类
  2. 我们看我们需要的功能有没有在SpringBoot默认写好的自动配置类当中;
  3. 我们再来看这个自动配置类中到底配置了哪些组件;(只要我们要使用的组件存在其中,我们就不需要再手动配置了)
  4. 给容器中自动配置类添加组件的时候,会从properties类中获取某些属性。我们只需要在配置文件中指定这些属性的值即可;

xxxxAutoConfiguration:自动配置类;给容器中添加组件
xxxxProperties:封装配置文件中相关属性(可以通过properties配置文件中跳转到对应的源码)

SpringApplication

这个类主要做了以下四件事情:

  1. 推断应用的类型是普通的项目还是Web项目。
  2. 查找并加载所有可用初始化器,设置到initializers属性中。
  3. 找出所有的应用程序监听器,设置到listeners属性中。
  4. 推断并设置main方法的定义类,找到运行的主类。

@ConfigurationProperties 的作用

将配置文件中配置的每一个属性的值,映射到这个组件中。

告诉SpringBoot将苯类中的所有属性和配置文件中的相关配置进行绑定。

参数 prefix = "person" : 将配置文件中的person下面的所有属性一一对应。

@ConfigurationProperties使用松散绑定,比如yaml中

配置文件的位置

1
2
3
4
优先级1: file: ./config/       项目根目录config下(注意不是Module下)
优先级2: file: ./ 项目根目录下(注意不是Module下)
优先级3: classpath: /config/
优先级4: classpath: /

pom.xml

  • spring-boot-dependencies: 核心依赖在这个父工程中

启动器:
普通应用版本:

1
2
3
4
<dependency>
<groupId>org.springframework.boot</groupId>
<artifactId>spring-boot-starter</artifactId>
</dependency>

Web版本:

1
2
3
4
<dependency>
<groupId>org.springframework.boot</groupId>
<artifactId>spring-boot-starter-web</artifactId>
</dependency>

多环境配置

properties方式

properties文件可以通过实现多环境配置

application-dev.properties文件:

1
server.port=8081

application-test.properties文件:

1
server.port=8082

然后在application.properties文件中指定

1
2
#指定当前生效的配置文件
spring.profiles.active=test

yaml方式

1
2
3
4
5
6
7
8
9
10
11
12
13
14
15
16
17
18
19

name: geekhall
server:
port: 8081
spring:
profiles:
active: prod

---
server:
port: 8082
spring:
profiles: test

---
server:
port: 8083
spring:
profiles: prod

JSR303校验

|Constraint | 详细信息 |
|:—- |:—- |
|@Null| 被注释的元素必须为 null|
|@NotNull| 被注释的元素必须不为 null|
|@AssertTrue| 被注释的元素必须为 true|
|@AssertFalse| 被注释的元素必须为 false|
|@Min(value)| 被注释的元素必须是一个数字,其值必须大于等于指定的最小值|
|@Max(value)| 被注释的元素必须是一个数字,其值必须小于等于指定的最大值|
|@DecimalMin(value)| 被注释的元素必须是一个数字,其值必须大于等于指定的最小值|
|@DecimalMax(value) |被注释的元素必须是一个数字,其值必须小于等于指定的最大值|
|@Size(max, min) |被注释的元素的大小必须在指定的范围内|
|@Digits (integer, fraction) |被注释的元素必须是一个数字,其值必须在可接|受的范围内
|@Past |被注释的元素必须是一个过去的日期|
|@Future| 被注释的元素必须是一个将来的日期|
|@Pattern(value) |被注释的元素必须符合指定的正则表达式|

静态资源

1. 使用webjars

导入依赖

1
2
3
4
5
<dependency>
<groupId>org.webjars</groupId>
<artifactId>jquery</artifactId>
<version>3.6.0</version>
</dependency>

导入后就可以在:http://localhost:8080/webjars/jquery/3.6.0/jquery.js
这里访问到jquery。
/webjars/目录对应了/META-INF/resources/webjars/
因为WebMvcAutoConfiguration.java文件中:

1
addResourceHandler(registry, "/webjars/**", "classpath:/META-INF/resources/webjars/");

2. 使用默认位置

  • public
  • static
  • resources

上面位置对应网站根目录: localhost:8080/

定制首页

SpringBoot默认首页为静态资源下的index.html
favicon.ico文件放在上面静态资源文件的默认根目录下就可以了

Thymeleaf

Thymeleaf模版引擎,只需要导入对应的依赖就可以了,
将Html页面放到templates目录下。

1
2
3
4
5
6
7
8
9
<!-- Thymeleaf -->
<dependency>
<groupId>org.thymeleaf</groupId>
<artifactId>thymeleaf-spring5</artifactId>
</dependency>
<dependency>
<groupId>org.thymeleaf.extras</groupId>
<artifactId>thymeleaf-extras-java8time</artifactId>
</dependency>

Thymeleaf语法

  • Simple expressions:
    • Variable : ${…}
    • Selection Variable: *{…}
    • Message : #{…}
    • Link URL : @{…}
    • Fragment : ~{…}

国际化

resources目录下新建page.properties和page_zh_CN.properties,page_en_US.properties
可以在不同的properties文件中配置多语言支持

page_zh_CN.properties

1
login.tip=欢迎

page_en_US.properties

1
login.tip=Welcome

可以在IDEA的左下角的Resource Bundle中可视化编辑。

配置文件中指定目录:

1
spring.messages.basename=i18n.index

使用:

1
Index, <span th:text="#{login.tip}"></span>

SpringBoot Data

新建项目时添加jdbc和MySQL-Driver的支持。

配置数据源(application.yml):

1
2
3
4
5
6
7
8
9
spring:
datasource:
username: mybatis
password: yy123456
# 假如时区报错了,就增加一个时区的配置就OK了,serverTimezone=UTC
url: jdbc:mysql://127.0.0.1:3316/mybatis?useSSL=true&useUnicode=true&characterEncoding=UTF-8
driver-class-name: com.mysql.cj.jdbc.Driver
# 配置数据源类型,若不加默认为HikariDataSource
type: com.alibaba.druid.pool.DruidDataSource

测试使用:

1
2
3
4
5
6
7
8
9
10
11
12
13
14
15
16
17
18
@SpringBootTest
class Springboot05DataApplicationTests {

@Autowired
DataSource dataSource;

@Test
void contextLoads() throws SQLException {

// 查看默认数据源:class com.zaxxer.hikari.HikariDataSource
System.out.println(dataSource.getClass());
Connection connection = dataSource.getConnection();
System.out.println(connection);

connection.close();
}
}

SpringBoot 中有很多XXXXTemplate类,是SpringBoot已经配置好的模板Bean,拿来即用。

注意:
SpringBoot在使用druid引入数据源之后,若使用了filters中有log4j,则需要在pom文件中加入log4j的依赖

1
2
3
4
5
<dependency>
<groupId>log4j</groupId>
<artifactId>log4j</artifactId>
<version>1.2.17</version>
</dependency>

注意这里不能配置成下面的这个,否则会报ClassNotFoundException:

1
2
3
4
5
<dependency>
<groupId>org.apache.logging.log4j</groupId>
<artifactId>log4j</artifactId>
<version>2.14.1</version>
</dependency>

SpringBoot整合MyBatis

使用MyBatis Spring Boot Stater

1
2
3
4
5
<dependency>
<groupId>org.mybatis.spring.boot</groupId>
<artifactId>mybatis-spring-boot-starter</artifactId>
<version>2.2.0</version>
</dependency>
  1. 导入包
  2. 配置文件
  3. mybatis配置
  4. 编写Sql
  5. service层调用dao层
  6. controller调用service层

SpringSecurity & Shiro

解决安全(Security)、认证(Authentication)、授权(Authorization)问题,是Spring-AOP思想的应用,
SpringSecurity是针对Spring项目的安全框架,也是SpringBoot底层安全模块默认的技术选型,可以实现强大的web安全控制,对于安全控制,我们仅仅需要引入spring-boot-starter-security模块,进行少量配置,即可实现强大的安全管理。

记住几个类:

  • WebSecurityConfigurerAdapter:自定义Security策略
  • AuthenticationManagerBuilder: 自定义认证策略
  • @EnableWebSecurity:开启WebSecurity模式

配置:

1
2
3
4
5
6
7
8
9
10
11
12
13
14
15
16
17
18
19
20
21
22
23
24
25
@EnableWebSecurity
public class SecurityConfig extends WebSecurityConfigurerAdapter {
protected void configure(HttpSecurity http) throws Exception{
// 首页所有人可以访问,功能页只有对应的人可以访问、
http.authorizeRequests()
.antMatchers("/").permitAll()
.antMatchers("/level1/**").hasRole("vip1")
.antMatchers("/level2/**").hasRole("vip2")
.antMatchers("/level3/**").hasRole("vip3");
http.formLogin();
}

// SpringSecurity 5.0+增加了很多加密方法
@Override
protected void configure(AuthenticationManagerBuilder auth) throws Exception {
// super.configure(auth);
auth.inMemoryAuthentication()
.withUser("moonwhite").password("123456").roles("vip2","vip3")
.and()
.withUser("root").password("123456").roles("vip1","vip2","vip3")
.and()
.withUser("guest").password("123456").roles("vip1");

}
}

Swagger 简介

号称世界上最流行的API框架

RestFul API文档在线自动生成工具,API与定义同步更新

使用Swagger

导入依赖

1
2
3
4
5
<dependency>
<groupId>io.springfox</groupId>
<artifactId>springfox-boot-starter</artifactId>
<version>3.0.0</version>
</dependency>

配置类:

1
2
3
4
5
6
7
8
9
10
11
12
13
14
15
16
17
18
19
20
21
22
23
24
25
@Configuration
@EnableOpenApi
public class SwaggerConfig {
@Bean
public Docket docket(){
return new Docket(DocumentationType.OAS_30)
.apiInfo(apiInfo()).enable(true)
.select()
//apis: 添加swagger接口提取范围
.apis(RequestHandlerSelectors.basePackage("cn.geekhall"))
//.apis(RequestHandlerSelectors.withMethodAnnotation(ApiOperation.class))
.paths(PathSelectors.any())
.build();
}

private ApiInfo apiInfo(){
return new ApiInfoBuilder()
.title("Swagger-demo项目接口文档")
.description("Swagger-demo项目描述")
.contact(new Contact("MoonWhite", "作者URL", "作者Email"))
.version("1.0")
.build();
}
}

Controller代码:

1
2
3
4
5
6
7
8
9
10
11
12
@Api(tags="用户管理")
@RestController
@RequestMapping("/user")
public class UserController {

@ApiOperation("使用ID获取用户")
@GetMapping("/{id}")
public User getUserById(@PathVariable("id") int id) throws Exception{
return new User();
}
}

访问:http://localhost:8080/swagger-ui/index.html 即可看到生成的接口页面。

Spring整合Redis

SpringData是和SpringBoot同级的Spring项目,在SpringBoot2.x之后,原来使用的jedis被替换成了lettuce

  • jedis : 采用的直连,多个线程操作的话,是不安全的,如果想要避免不安全,使用jedis pool连接池!更像BIO模式
  • lettuce: 采用Netty,实例可以在多个线程中进行共享,不存在线程不安全的情况。可以减少线程数据了,更像NIO模式。

源码分析:

1
2
3
4
5
6
7
8
9
10
11
12
13
14
15
16
17
18
19
20
21
22
23
24
25
26
27
@Configuration(proxyBeanMethods = false)
@ConditionalOnClass(RedisOperations.class)
@EnableConfigurationProperties(RedisProperties.class)
@Import({ LettuceConnectionConfiguration.class, JedisConnectionConfiguration.class })
public class RedisAutoConfiguration {

@Bean
@ConditionalOnMissingBean(name = "redisTemplate") // 我们可以自己定义一个redisTemplate来替换这个默认的
@ConditionalOnSingleCandidate(RedisConnectionFactory.class)
public RedisTemplate<Object, Object> redisTemplate(RedisConnectionFactory redisConnectionFactory) {
// 默认的RedisTemplate没有过多的设置,redis对象都是需要序列化!
// 两个范型都是Object,我们使用时需要强制转换为<String, Object>
RedisTemplate<Object, Object> template = new RedisTemplate<>();
template.setConnectionFactory(redisConnectionFactory);
return template;
}

// 由于String是redis中最常使用的类型,所以单独提出来一个Bean
@Bean
@ConditionalOnMissingBean
@ConditionalOnSingleCandidate(RedisConnectionFactory.class)
public StringRedisTemplate stringRedisTemplate(RedisConnectionFactory redisConnectionFactory) {
StringRedisTemplate template = new StringRedisTemplate();
template.setConnectionFactory(redisConnectionFactory);
return template;
}
}

SpringBoot 所有的配置类和属性类,都有一个自动配置类 ,
自动配置类都会绑定一个properties配置文件
如:RedisAutoConfiguration 和 RedisProperties

配置

导入依赖:

1
2
3
4
<dependency>
<groupId>org.springframework.boot</groupId>
<artifactId>spring-boot-starter-data-redis</artifactId>
</dependency>
1
2
3
4
5
6
7
8
@Data
@AllArgsConstructor
@NoArgsConstructor
@Component
public class User implements Serializable {
private String name;
private int age;
}

如果对象没有实现Serializable接口,会抛出SerializationFailedException异常。

1
2
3
4
5
6
7
8
9
10
@Test
public void test() throws JsonProcessingException {
User user = new User("极客堂", 3);
// 真实的开发一般都使用Json来传递对象,不会抛出SerializationFailedException
// String jsonUser = new ObjectMapper().writeValueAsString(user);
// redisTemplate.opsForValue().set("user", jsonUser);
redisTemplate.opsForValue().set("user", user);
Object user1 = redisTemplate.opsForValue().get("user");
System.out.println(user1);
}

微服务架构的4个核心问题

  1. 服务很多,客户端该怎么访问?
  2. 这么多服务,服务之间如何通信?
  3. 这么多服务,如何治理?
  4. 服务挂了怎么办?

解决方案:

  1. Spring Cloud NetFlix : 一站式解决方案(2018年12月停止维护)
    API:api网关,zuul组件
    通信:Feign — HttpClient : Http通信方式,同步,阻塞
    服务注册发现: Eureka
    熔断机制: Hystrix

  2. Spring Cloud Alibaba : 一站式解决方案,更简单。

  3. Dubbo + ZooKeeper : 半自动,需要整合别人的。
    API: 没有,找第三方组件,或者自己实现
    通信:Dubbo:高性能的基于Java的RPC通信框架
    服务注册发现:ZooKeeper
    熔断机制:没有,借助Hystrix

新概念:服务网格(Server Mesh)istio

常见面试题

  1. 什么是微服务?
  2. 微服务之间是如何独立通讯的?
  3. SpringCloud和Dubbo有哪些区别?
  4. SpringBoot和SpringCloud,请你谈谈对他们的理解
  5. 什么是服务熔断?什么是服务降级?
  6. 微服务的优缺点分别是什么?说下你在项目开发中遇到的坑。
  7. 你所知道的微服务技术栈有哪些?请列举一二
  8. Nacos、Erueka和ZooKeeper都可以提供服务注册与发现的功能,请说说两个的区别。

微服务技术栈

微服务条目 落地技术
服务开发 SpringBoot,Spring,SpringMVC
服务配置与管理 Netflix公司的Archaius,阿里的Diamond等
服务注册与发现 Eureka、Consul、ZooKeeper、Nacos等
服务调用 Rest、RPC、gRPC
服务熔断器 Hystrix、Envoy等
负载均衡 Ribbon、Nginx等
服务接口调用(客户端调用服务的简化工具) Feign等
消息队列 Kafka、RabbitMQ、ActiveMQ
服务配置中心管理 SpringCloudConfig、Chef等
服务路由(API网关) Zuul等
服务监控 Zabbix、Nagios、Metrics、Specatator等
全链路追踪 Zipkin、Brave、Dapper等
服务部署 Docker、OpenStack、Kubernetes
数据流操作开发包 SpringCloudStream(封装与Redis、Rabbit、Kafka等发送接收消息)
时间消息总线 SpringCloudBus

spring.factories

在spring-boot项目中pom文件里面添加的依赖中的bean是如何注册到spring-boot项目的spring容器中的呢?

不难得出spring.factories文件是帮助spring-boot项目包以外的bean(即在pom文件中添加依赖中的bean)注册到spring-boot项目的spring容器的。

由于@ComponentScan注解只能扫描spring-boot项目包内的bean并注册到spring容器中,因此需要@EnableAutoConfiguration注解来注册项目包外的bean。

而spring.factories文件,则是用来记录项目包外需要注册的bean类名。
SSM 整合

1. 配置

1
2
3
4
5
6
7
8
9
10
11
12
13
14
15
16
17
create database `mybatis`
use `mybatis`
drop table if exists `book`;
create table `book` (
`id` int(10) not null unique auto_increment comment '书id',
`name` varchar(100) not null comment '书名',
`count` int(11) not null comment '数量',
`detail` varchar(200) not null comment '描述',
primary KEY `id` (`id`)
) engine=innodb default charset=utf8;
insert into `book` (`id`, `name`, `count`, `detail`) values (1,'红楼梦', 10, '四大名著1');
insert into `book` (`id`, `name`, `count`, `detail`) values (2,'西游记', 20, '四大名著2');
insert into `book` (`id`, `name`, `count`, `detail`) values (3,'水浒传', 30, '四大名著3');
insert into `book` (`id`, `name`, `count`, `detail`) values (4,'三国演义', 40, '四大名著4');
insert into `book` (`id`, `name`, `count`, `detail`) values (5,'Java', 50, '从入门到放弃');
insert into `book` (`id`, `name`, `count`, `detail`) values (6,'MySQL', 60, '从删库到跑路');
insert into `book` (`id`, `name`, `count`, `detail`) values (7,'Linux', 70, '从入门到入狱');

to be continue.

JavaWeb 笔记

1. 配置

web.xml配置Sample

1
2
3
4
5
6
7
8
9
10
11
12
13
14
15
16
17
18
19
20
21
22
23
24
25
<?xml version="1.0" encoding="UTF-8"?>
<web-app xmlns="http://xmlns.jcp.org/xml/ns/javaee"
xmlns:xsi="http://www.w3.org/2001/XMLSchema-instance"
xsi:schemaLocation="http://xmlns.jcp.org/xml/ns/javaee http://xmlns.jcp.org/xml/ns/javaee/web-app_4_0.xsd"
version="4.0">
<listener-class>org.springframework.web.context.ContextLoaderListener</listener-class>
<context-param>
<param-name>ContextConfigLocation</param-name>
<param-value>/WEB-INF/app-context.xml</param-value>
</context-param>

<servlet>
<servlet-name>app</servlet-name>
<servlet-class>org.springframework.web.servlet.DispatcherServlet</servlet-class>
<init-param>
<param-name>contextConfigLocation</param-name>
<param-value></param-value>
</init-param>
<load-on-startup>1</load-on-startup>
</servlet>
<servlet-mapping>
<servlet-name>app</servlet-name>
<url-pattern>/app/*</url-pattern>
</servlet-mapping>
</web-app>

Spring MVC配置步骤

1. 新建一个Module,添加Web支持

2. 确定导入了SpringMVC的依赖

3. 配置web.xml, 注册DispatcherServlet

1
2
3
4
5
6
7
8
9
10
11
12
13
14
15
16
17
18
19
20
21
22
23
<?xml version="1.0" encoding="UTF-8"?>
<web-app xmlns="http://xmlns.jcp.org/xml/ns/javaee"
xmlns:xsi="http://www.w3.org/2001/XMLSchema-instance"
xsi:schemaLocation="http://xmlns.jcp.org/xml/ns/javaee http://xmlns.jcp.org/xml/ns/javaee/web-app_4_0.xsd"
version="4.0">
<servlet>
<servlet-name>springmvc</servlet-name>
<servlet-class>org.springframework.web.servlet.DispatcherServlet</servlet-class>
<!-- 关联一个SpringMVC的配置文件:[servlet-name]-servlet.xml -->
<init-param>
<param-name>contextConfigLocation</param-name>
<param-value>classpath:springmvc-servlet.xml</param-value>
</init-param>
<!-- 启动级别:1-->
<load-on-startup>1</load-on-startup>
</servlet>
<!-- / 表示匹配所有的请求,(不包括.jsp) -->
<!-- * 表示匹配所有的请求,(包括.jsp) -->
<servlet-mapping>
<servlet-name>springmvc</servlet-name>
<url-pattern>/</url-pattern>
</servlet-mapping>
</web-app>

4. 编写SpringMVC的配置文件!名称:springmvc-servlet.xml,这里的名称要求是按照官方来的

1
2
3
4
5
6
7
8
9
10
11
12
13
14
15
16
17
18
19
20
21
22
23
24
25
<?xml version="1.0" encoding="UTF-8" ?>
<beans xmlns="http://www.springframework.org/schema/beans"
xmlns:xsi="http://www.w3.org/2001/XMLSchema-instance"
xsi:schemaLocation="http://www.springframework.org/schema/beans
http://www.springframework.org/schema/beans/spring-beans.xsd">


<!-- 处理器映射器 HandlerMapping -->
<bean class="org.springframework.web.servlet.handler.BeanNameUrlHandlerMapping"/>
<!-- 处理器适配器 HandlerAdapter -->
<bean class="org.springframework.web.servlet.mvc.SimpleControllerHandlerAdapter"/>

<!-- 视图解析器 -->
<bean class="org.springframework.web.servlet.view.InternalResourceViewResolver" id="internalResourceViewResolver">
<!-- 前缀 -->
<property name="prefix" value="/WEB-INF/jsp/"/>
<!-- 后缀 -->
<property name="suffix" value=".jsp"/>
</bean>

<!-- Handler -->
<bean id="/hello" class="cn.geekhall.controller.HelloController"/>

</beans>

5. SpringMVC配置文件中添加处理器映射器

1
<bean class="org.springframework.web.servlet.handler.BeanNameUrlHandlerMapping"/>

6. SpringMVC配置文件中添加处理器适配器

1
<bean class="org.springframework.web.servlet.mvc.SimpleControllerHandlerAdapter"/>

7. SpringMVC配置文件中添加视图解析器

1
2
3
4
5
6
7
<bean class="org.springframework.web.servlet.view.InternalResourceViewResolver" id="internalResourceViewResolver">
<!-- 前缀 -->
<property name="prefix" value="/WEB-INF/jsp/"/>
<!-- 后缀 -->
<property name="suffix" value=".jsp"/>
</bean>

8. 编写我们要去操作业务的Controller,要么实现Controller接口,要么增加注解;需要返回一个ModelAndView,装数据,封视图

1
2
3
4
5
6
7
8
9
10
11
12
13
14
15
16
17
18
19
20
21
22
23
24
package cn.geekhall.controller;

import org.springframework.web.servlet.ModelAndView;
import org.springframework.web.servlet.mvc.Controller;

import javax.servlet.http.HttpServletRequest;
import javax.servlet.http.HttpServletResponse;

public class HelloController implements Controller {

public ModelAndView handleRequest(HttpServletRequest request, HttpServletResponse response) throws Exception {
// ModelAndView 视图
ModelAndView mv = new ModelAndView();

// 封装对象,放在ModelAndView中,Model
mv.addObject("msg", "HelloSpringMVC!");

// 封装要跳转的视图,放在ModelAndView。
mv.setViewName("hello"); // : /WEB-INF/jsp/hello.jsp
return mv;
}
}


9. 将自己的类交给SpringIOC容器,注册bean

1
2
<!-- Handler -->
<bean id="/hello" class="cn.geekhall.controller.HelloController"/>

10. 编写要跳转的jsp页面,显示ModelandView存放的数据,以及我们的正常页面

hello.jsp

1
2
3
4
5
6
7
8
9
10
11
12
13
<%@ page contentType="text/html;charset=UTF-8" language="java" %>
<html>
<head>
<title>Title</title>
</head>
<body>

${msg}

</body>
</html>


11. 配置Tomcat启动测试

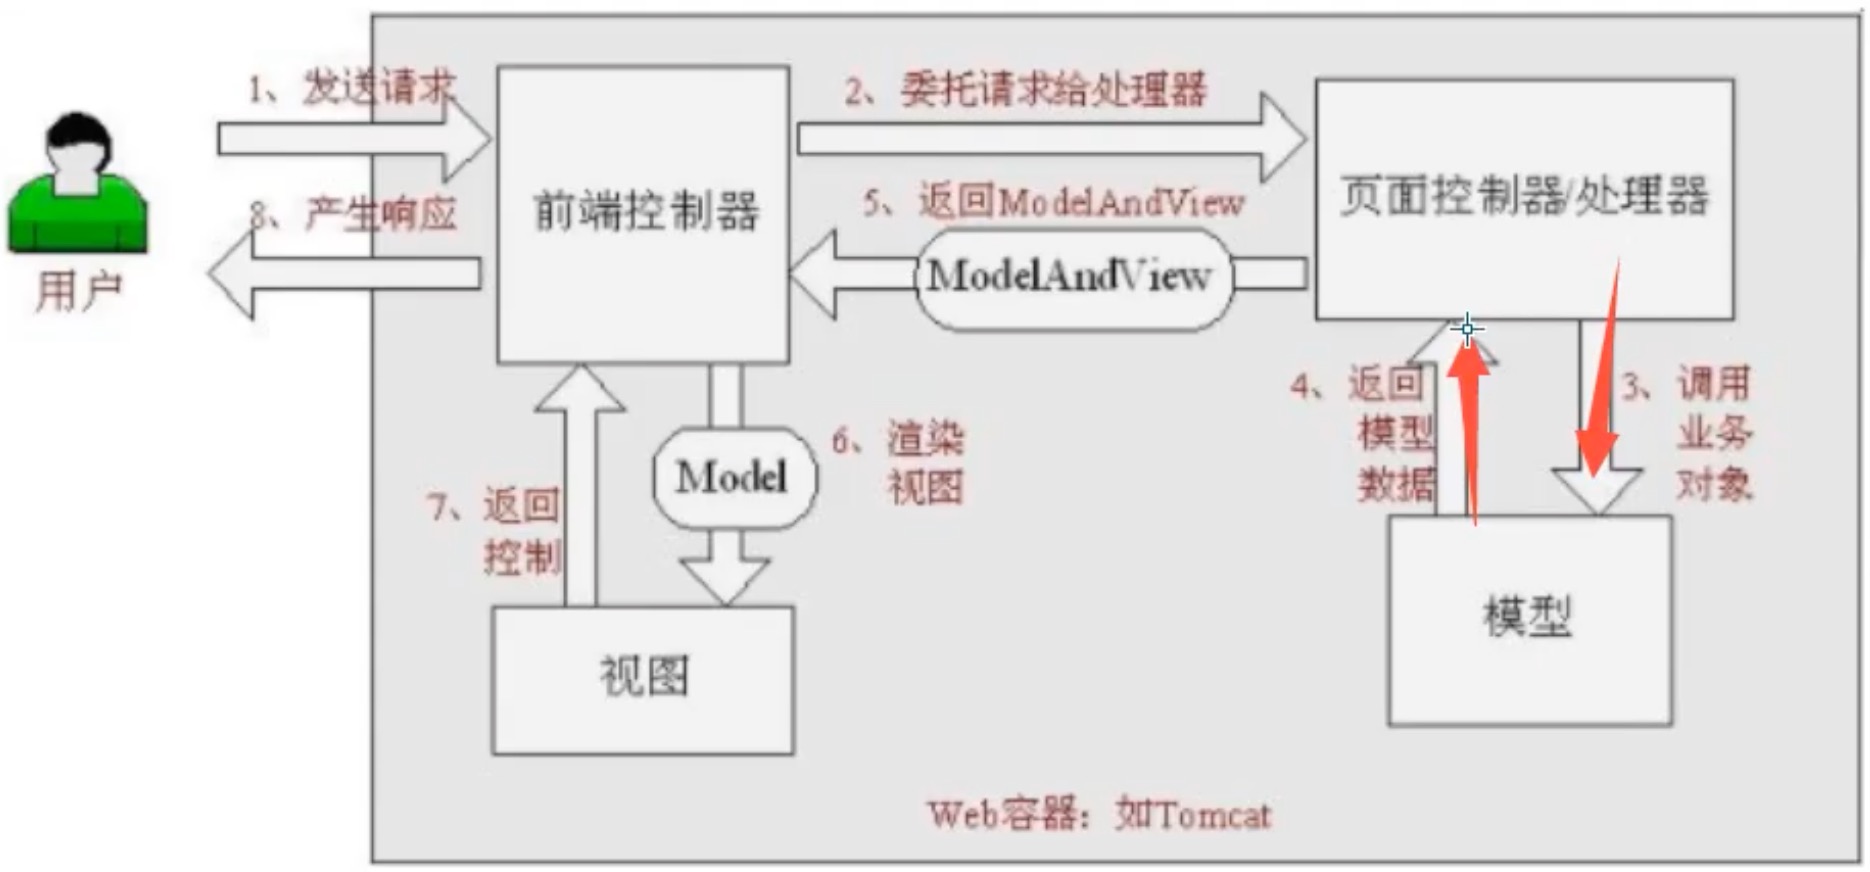
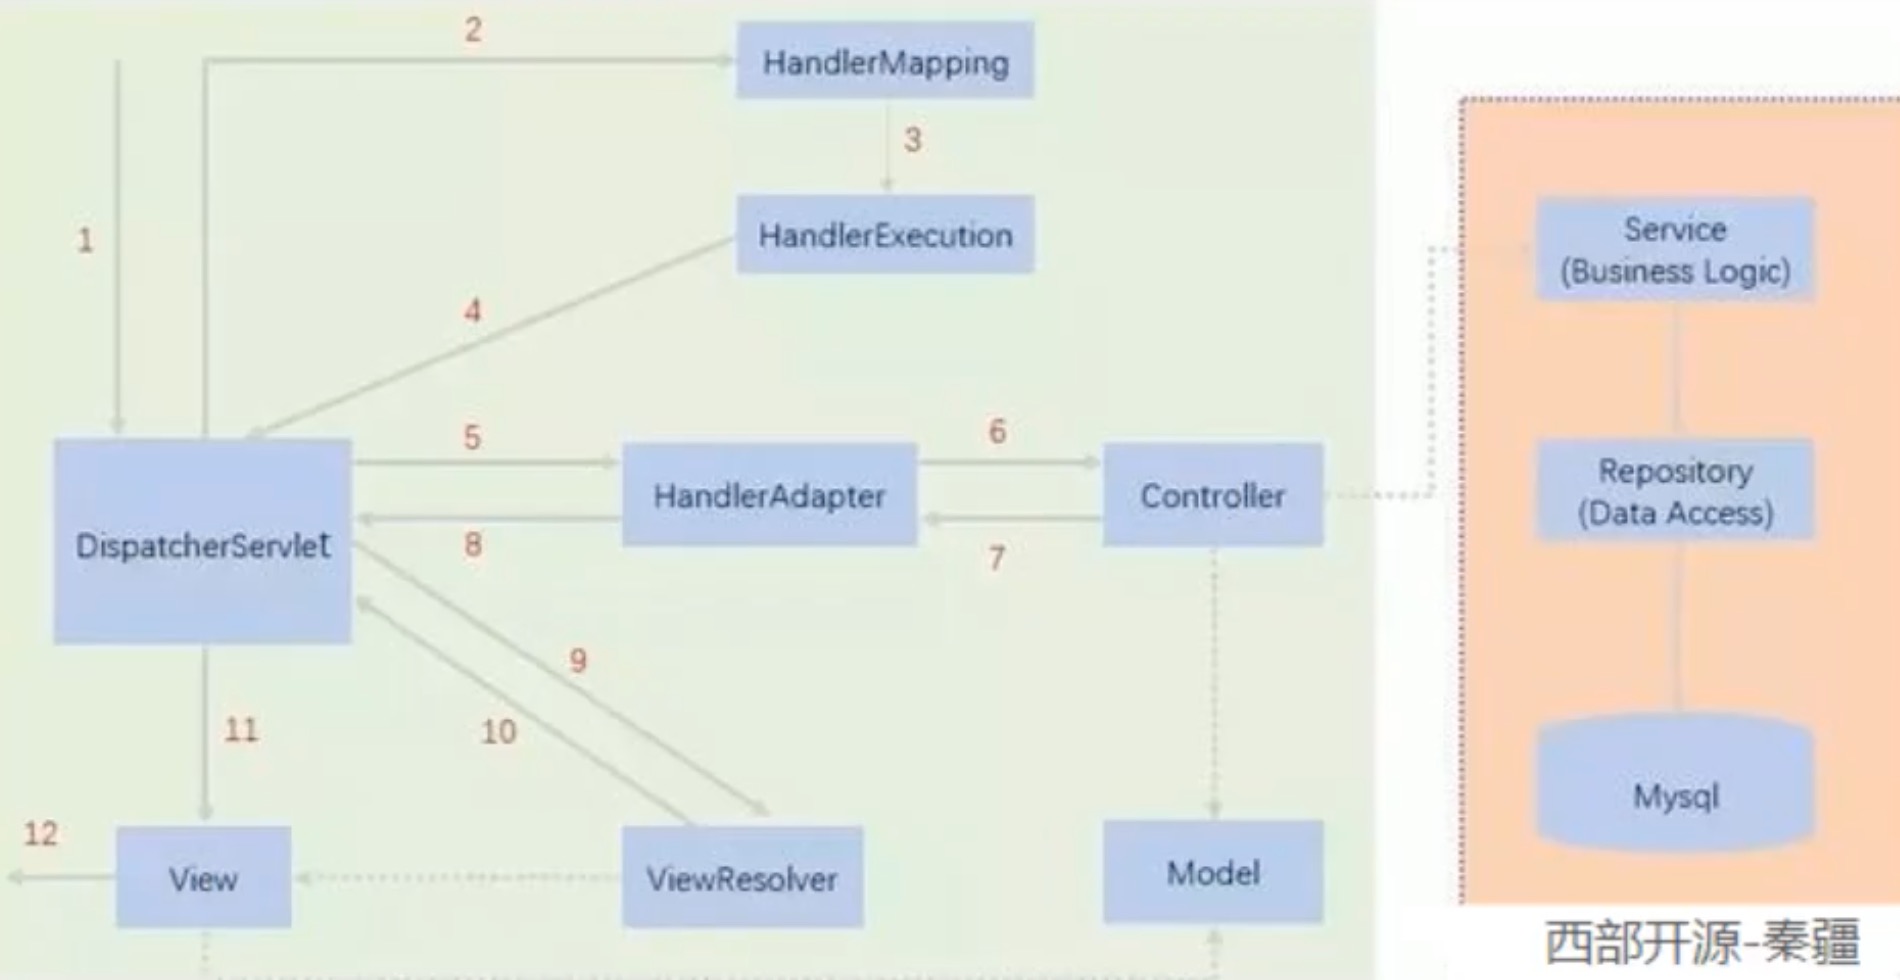
SpringMVC的执行流程

  1. 解析URL
    • 我们假设请求的url为:http://localhost:8080/SpringMVC/hello
    • 如上url拆分成三部分:
      • localhost:8080 表示服务器域名
      • SpringMVC表示部署在服务器上的web站点
      • hello表示控制器
    • 通过分析,如上URL表示为:请求位于服务器localhost:8080上的SpringMVC站点的hello 控制器。
  2. HandleMapping为处理器映射器,DispatcherServlet调用HandlerMapping,HandlerMapping根据请求URL查找Handler。
  3. HandlerExecution表示具体的Handler,其主要作用是根据URL查找控制器,如上URL被查找控制器为:hello。
  4. HandlerExecution将解析后的信息传递给DispatcherServlet,如解析控制器映射等。
  5. HandlerAdapter表示处理器适配器,其按照特定的规则去执行Handler。
  6. Handler让具体的Controller执行。
  7. Controller将具体的执行信息封装在ModelAndView中返回给HandlerAdapter。
  8. HandlerAdapter将视图逻辑名或模型传递给DispatcherServlet。
  9. DispatcherServlet调用视图解析起(ViewResolver)来解析HandlerAdapter传递的逻辑视图名。
  10. 视图解析器将解析的逻辑视图名传给DispatcherServlet。
  11. DispatcherServlet根据视图解析器解析的视图结果,调用具体的视图。
  12. 最终视图呈现给用户。

注解方式

1
2
3
4
@Component      组件
@Service service
@Controller controller
@Repository dao

改了Java代码 => 重新发布
改了配置文件 => 需要Reload
改了前端页面 => 刷新浏览器即可

方法级别的注解变体有如下几个:组合注解

1
2
3
4
5
6
7
@GetMapping
等价于@RequestMapping(method=RequestMethod.GET)
@PostMapping
等价于@RequestMapping(method=RequestMethod.POST),下同
@PutMapping
@DeleteMapping
@PatchMapping

json

  • JSON字符串转换为JavaScript对象:
1
2
var obj = JSON.parse('{"a": "Hello", "b": "Json"}');

  • JavaScript 对象转换为Json字符串:
1
var json = JSON.stringify({a: 'Hello', b:'Json'});

SpringMVC 处理拦截器

SpringMVC的处理器拦截器类似于Servlet开发中的过滤器Filter,用于对处理器进行预处理和后处理,开发者可以自己定义一些拦截器来实现特定的功能。

  • 过滤器
    • servlet规范中的一部分,任何java web工程都可以使用。
    • 在url-pattern中配置了/* 之后,可以对所有要访问的资源进行拦截。
  • 拦截器
    • 拦截器是SpringMVC框架自己的,只有使用了SpringMVC框架的工程才能使用。
    • 拦截器只会拦截访问的控制器方法,如果访问的是jsp/html/css/image/js是不会进行拦截的。

拦截器是AOP思想的具体实现。

如何实现拦截器

想要自定义拦截器,必须实现HandlerInterceptor接口。

MyBatis 笔记

1. 配置

获取SqlSessionFactory对象

resources 文件夹下新建mybatis-config.xml配置文件,内容如下:

1
2
3
4
5
6
7
8
9
10
11
12
13
14
15
<?xml version="1.0" encoding="UTF-8" ?>
<!DOCTYPE configuration PUBLIC "-//mybatis.org//DTD Config 3.0//EN" "http://mybatis.org/dtd/mybatis-3-config.dtd">
<configuration>
<environments default="development">
<environment id="development">
<transactionManager type="JDBC"></transactionManager>
<dataSource type="POOLED">
<property name="driver" value="com.mysql.jdbc.Driver"/>
<property name="url" value="jdbc:mysql://127.0.0.1:3316/mybatis?useSSL=true&amp;useUnicode=true&amp;characterEncoding=UTF-8"/>
<property name="username" value="mybatis"/>
<property name="password" value="yy123456"/>
</dataSource>
</environment>
</environments>
</configuration>

代码中初始化获取SqlSessionFactory对象:

1
2
3
4
5
6
7
8
9
10

try {
// 获取SqlSessionFactory对象
String resource = "mybatis-config.xml";
InputStream inputStream = Resources.getResourceAsStream(resource);
SqlSessionFactory sqlSessionFactory = new SqlSessionFactoryBuilder().build(inputStream);
} catch (IOException e) {
e.printStackTrace();
}

从SqlSessionFactory中获取SqlSession:

1
2


常见错误

  1. org.apache.ibatis.binding.BindingException: Type interface cn.geekhall.dao.UserMapper is not known to the MapperRegistry.

大多数原因都是应为没有添加mappers或者mapper配置的不对,添加即可:

1
2
3
<mappers>
<mapper class="cn.geekhall.dao.UserMapper"/>
</mappers>

配置解析

核心配置文件:mybatis-config.xml

  • configuration(配置)
  • properties(属性)
  • settings(设置)
  • typeAliases(类型别名)
1
2
3
4
5
6
<!--    类型别名是为Java类型设置一个短的名字,只和XML配置有关,存在的意义仅在于用来减少类完全限定名的冗余-->
<typeAliases>
<typeAlias type="cn.geekhall.pojo.User" alias="User"/>
<!-- 也可以指定一个包名, MyBatis会在包名下面搜索需要的JavaBean。-->
<package name="cn.geekhall.pojo"/>
</typeAliases>

也可以使用注解来定义别名

1
2
@Alias("use")
public class User {}
  • typeHandlers(类型处理器)
  • objectFactory(对象工厂)
  • plugins(插件)
  • environments(环境配置)
  • environment(环境变量)
  • transactionManager(事务管理器)
  • dataSource(数据源)
  • databaseIdProvider(数据库厂商标识)
  • mappers(映射器)

日志

注意配置文件中的logImpl和STDOUT_LOGGING必须完全正确才可以,否则配置会出错不生效。

1
2
3
4
<!-- mybatis 日志功能  -->
<settings>
<setting name="logImpl" value="STDOUT_LOGGING"/>
</settings>
  • STDOUT_LOGGING : 标准日志工厂实现

使用Log4j

分页

Mybatis默认分页

使用RowBounds实现分页

使用注解开发

1
2
3
4
5
@Select("select * from user")
List<User> getUserList();

@Select("select * from user where id = #{uid}")
User getUserById(@Param("uid") int id);

配置mybatis-config.xml绑定接口

1
2
3
<mappers>
<mapper class="cn.geekhall.dao.UserMapper"/>
</mappers>

@Param() 注解

  • 基本类型的参数或者String类型,需要加上
  • 引用类型不需要加
  • 如果只有一个基本类型的话可以忽略,但是建议都加上
  • SQL中使用的就是@Param中设定的属性名

关于#{} 和 ${}

{} 可以防止SQL注入,${}不可以

Lombok

常用注解

1
2
3
4
5
6
7
8
9
10
11
12
13
14
15
16
17
18
19
20
21
22
23
24
@Getter and @Setter
@FieldNameConstants
@ToString
@EqualsAndHashCode
@AllArgsConstructor, @RequiredArgsConstructor and @NoArgsConstructor
@Log, @Log4j, @Log4j2, @Slf4j, @XSlf4j, @CommonsLog, @JBossLog, @Flogger, @CustomLog
@Data
@Builder
@SuperBuilder
@Singular
@Delegate
@Value
@Accessors
@Wither
@With
@SneakyThrows
@val
@var
experimental @var
@UtilityClass

Lombok config system
Code inspections
Refactoring actions (lombok and delombok)

一对多和多对一

  1. 关联 - association (多对一)
  2. 集合 - collection (一对多)
  3. JavaType & ofType
    • JavaType用来制定实体类中的属性的类型
    • ofType用来指定映射到List或者集合中的pojo的类型,(范型中的约束类型)

动态SQL

使用绑定变量根据不同的条件生成不同的SQL

  • if
1
2
3
4
5
6
7
8
9
<select id="queryBlogIF" parameterType="map" resultType="blog">
select * from mybatis.blog where 1=1
<if test="title != null">
and title = #{title}
</if>
<if test="author != null">
and author = #{author}
</if>
</select>
  • where

where 标签只会在至少有一个子元素的条件返回SQL子句的情况下才去插入WHERE子句。例如,上面的if可以不用where 1=1而改写为

1
2
3
4
5
6
7
8
9
10
11
<select id="queryBlogIF" parameterType="map" resultType="blog">
select * from mybatis.blog
<where>
<if test="title != null">
and title = #{title}
</if>
<if test="author != null">
and author = #{author}
</if>
</where>
</select>
  • choose

choose有点类似与java中的switch和case语句。

1
2
3
4
5
6
7
8
9
10
11
12
13
14
15
16
<select id="queryBlogChoose" parameterType="map" resultType="blog">
select * from mybatis.blog
<where>
<choose>
<when test="title != null">
title = #{title}
</when>
<when test="author != null">
and author = #{author}
</when>
<otherwise>
and views = #{views}
</otherwise>
</choose>
</where>
</select>
  • set

set语句会动态包含需要更新的列,而舍去其他的,同时会删除无关的逗号。

1
2
3
4
5
6
7
8
9
10
11
12
<update id="updateBlog" parameterType="map">
update mybatis.blog
<set>
<if test="title != null">
title = #{title},
</if>
<if test="author != null">
author = #{author}
</if>
</set>
where id = #{id}
</update>
  • foreach
1
select * from user where 1=1 and (id=1 or id=2 or id=3)

变成

1
2
3
4
<foreach item="item" index="index" collection="list"
open="(" separator="or" close=")">
#{item}
</foreach>

动态SQL的一个常用操作需求是对一个集合进行遍历,通常是在构建IN条件语句的时候。

1
2
3
4
5
6
7
8
9
<select id="selectPostIn" resultType="domain.blog.Post">
select *
from post p
where id in
<foreach item="item" index="index" collection="list"
open="(" separator="," close=")">
#{item}
</foreach>
</select>
  • sql片段

使用sql标签抽取公共的部分

1
2
3
4
5
6
7
8
<sql id="if-title-author">
<if test="title != null">
title = #{title}
</if>
<if test="author != null">
and author = #{author}
</if>
</sql>

在需要使用的地方使用include标签引用即可。

1
2
3
4
5
6
<select id="queryBlogIF2" parameterType="map" resultType="blog">
select * from mybatis.blog
<where>
<include refid="if-title-author"/>
</where>
</select>

MySQL面试高频

  • MySQL引擎
  • InnoDB底层原理
  • 索引
  • 索引优化

缓存

  • 映射语句文件中所有select语句的结果将会被缓存;
  • 映射语句文件中所有insert、update和delete语句将会刷新缓存;
  • 缓存会默认使用最近最少使用算法(LRU,Least Recently Used)算法来清除不需要的缓存。
  • 缓存会不定时进行刷新。
  • 缓存会保存列表或者对象的1024个引用。
  • 一级缓存(本地的会话缓存)默认开启的,只在sqlsession有效。

开启全局缓存:

1
2
3
<settings>
<setting name="cacheEnabled" value="true"/>
</settings>

在需要使用二级缓存的mapper.xml文件中开启,也可以自定义一些参数。

1
2
3
<mapper namespace="sample">
<cache/>
</mapper>

Spring 笔记

IoC本质

控制反转IoC(Inversion of Control) 是一种设计思想,DI(依赖注入)是实现IoC的一种方法。

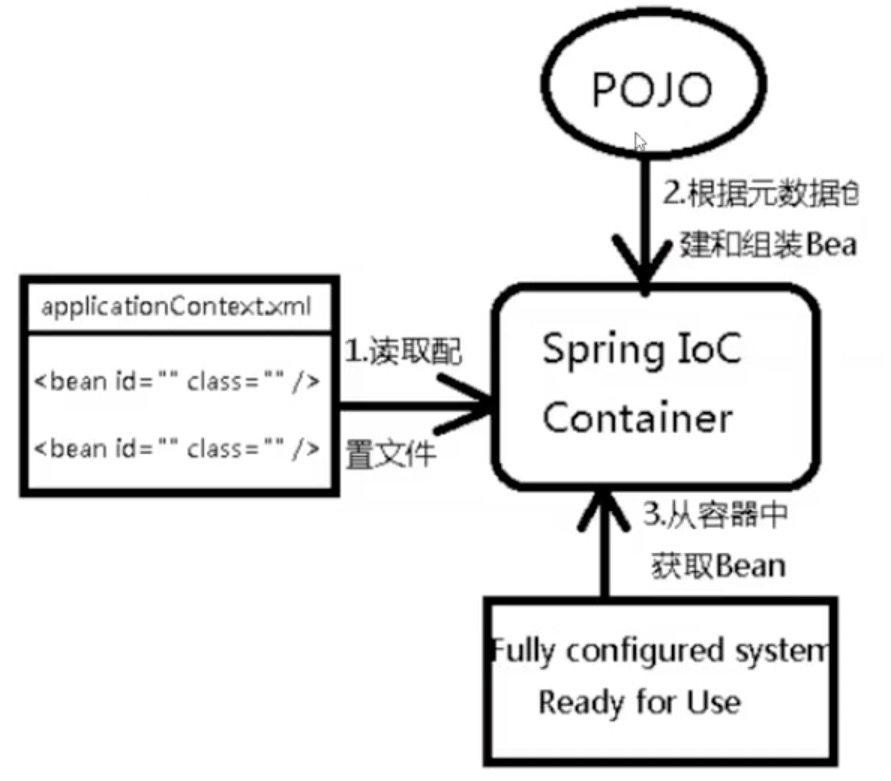
控制反转是一种通过描述(XML或注解)并通过第三方去生产或获取特定对象的方式。在Spring中实现控制反转的是IoC容器,其实现方法是依赖注入(Dependency Injection,DI)。

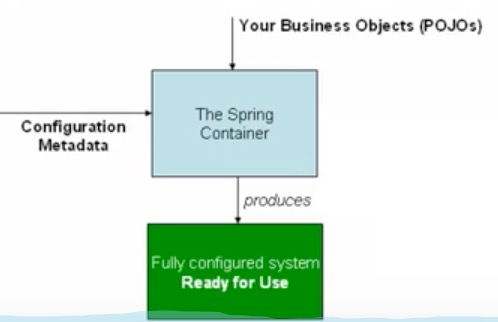
Spring 容器在初始化时先读取配置文件,根据配置文件或元数据创建与组织对象存入容器中,程序使用时再从IoC容器中取出需要的对象。

Spring官方配图:

Bean的自动装配

自动装配是Spring满足bean依赖的一种方式!

Spring会在上下文中自动寻找,并自动给bean装配属性!

在Spring中有三种装配的方式:

  1. 在xml中显示的配置
  2. 在java中显示配置
  3. 隐式的自动装配bean【重要】

Spring4之后,如果要使用注解开发,必须要倒入aop的包和context的约束和注解支持。

常用注解

@Autowired

1
2
<!-- 自动装配需要这一行,否则注解@Autowired会报空指针异常。-->
<context:annotation-config/>

@Nullable

标记了字段可以为null,例如:

1
2
3
public Person(@Nullable String name) {
this.name = name;
}

@Qualifier

可以使用Qualifier注解来指定自动装配的bean。

1
2
3
4
5
6
7
@Autowired
@Qualifier(value = "cat222")
private Cat cat;
@Autowired
@Qualifier(value = "dog111")
private Dog dog;

@Resource

也可以使用java原生的@Resource注解,先通过名字进行自动绑定,再通过类型进行自动绑定

1
2
3
4
5
@Resource(name = "cat111")
private Cat cat;

@Resource
private Dog dog;

@Resource 和 @Autowired 的区别

  • 都是用来自动装配的,都可以放在属性字段;
  • @Autowired通过bytype方式实现,而且必须要求对象存在,否则报空指针;
  • @Resource默认通过byname方式实现,如果找不到名字,则通过bytype实现!如果两个都找不到的情况下,就报错!【常用】
  • 执行顺序不同:@Autowired通过byType方式实现。

@Component

组件,放在类上,说明这个类被Spring管理了,就是bean!

1
2
3
4
@Component
public class User {
private String name;
}

Component 还有一些衍生的注解 :

  • @Repository:一般用于Dao层
  • @Service:一般用于service层
  • @Controller:一般用于Controller层
    上面三个注解与Component的左右基本相同,都是代表把某个类装配到Spring中。

@Value

用于属性注入的方法

@Scope

作用域。等价于配置文件中的scope

@Configuration

java类的方式配置Spring

XML与注解

  • XML:更加万能,适用于任何场合,维护方便简单。
  • 注解:不是自己的类使用补了,维护相对复杂。

最佳实践:

  • xml用来管理bean
  • 注解只负责完成属性的注入;

使用Java的方式配置Spring

JavaConfig是Spring的一个子项目,可以完全不适用Spring的xml配置。

AOP

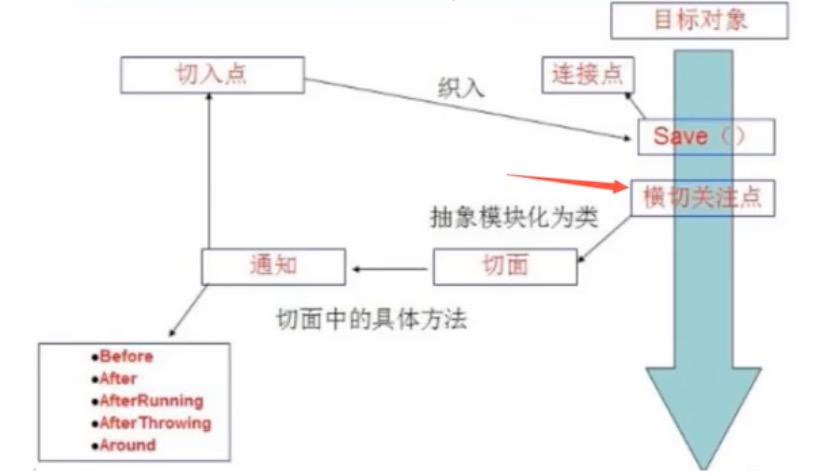
  • 横切关注点:跨越应用程序多个模块的方法或者功能。即,与我们业务逻辑无关的,但是我们都需要关注的部分,如:日志、缓存、安全、事务等等。
  • 切面(Aspect):横切关注点被模块化的特殊对象。即,它是一个类。
  • 通知(Advice):切面必须要完成的工作。即:类中的方法。
  • 目标(Target):被通知的对象。
  • 代理(Proxy):向目标对象应用通知之后创建的对象。
  • 切入点(PointCut):切面通知执行的“地点”的定义。
  • 连接点(JointPoint):与切入点匹配的执行点。

需要倒入aspectj依赖包

1
2
3
4
5
6
<!-- 使用Spring的AOP需要倒入下面的依赖 -->
<dependency>
<groupId>org.aspectj</groupId>
<artifactId>aspectjweaver</artifactId>
<version>1.9.6</version>
</dependency>
  • 方式一:使用Spring的API接口,【主要SpringAPI接口实现】
1
2
3
4
5
6
7
8
9
10
11
12
13
<aop:config>
<!--
切入点 :
expression:表达式;
execution(要执行的位置! * * * * *)
-->
<aop:pointcut id="pointcut" expression="execution(* cn.geekhall.service.UserServiceImpl.*(..))"/>

<!-- 执行环绕增加 -->
<aop:advisor advice-ref="log" pointcut-ref="pointcut"/>
<aop:advisor advice-ref="afterLog" pointcut-ref="pointcut"/>
</aop:config>

  • 方式二:自定义类实现AOP 【主要是切面定义】
1
2
3
4
5
6
7
8
9
10
11
12
13
14
15
16
17
18
      <bean id="diy" class="cn.geekhall.diy.DiyPointCut"/>
<aop:config>
<!-- 自定义切面 , ref: 要引用的类 -->
<aop:aspect ref="diy">
<!--
切入点
第一个*号: 表示返回类型, *号表示所有的类型。
包名:表示需要拦截的包名,后面的两个据点表示当前包的所有子包,子孙包下所有类的方法。
第二个*号:表示类名:*号表示所有的类
*.(..): 表示方法名,*号表示所有的方法,后面括号里面表示方法的参数,两个点表示任何参数。
-->
<aop:pointcut id="point" expression="execution(* cn.geekhall.service.UserServiceImpl.*(..))"/>
<!-- 通知-->
<aop:before method="before" pointcut-ref="point"/>
<aop:after method="after" pointcut-ref="point"/>

</aop:aspect>
</aop:config>
  • 方式三:使用注解实现
1
2
3
4
5
6
7
8
9
10
11
12
13
14
15
16
17
18
19
20
21
22
23
24
25
26
@Aspect   // 标注这个类是一个切面
public class AnnotationPointCut {

@Before("execution(* cn.geekhall.service.*.*(..))")
public void before(){
System.out.println("++++++++++++++++++ 方法执行前 ++++++++++++++++++");
}

@After("execution(* cn.geekhall.service.*.*(..))")
public void after(){
System.out.println("++++++++++++++++++ 方法执行后 ++++++++++++++++++");
}

// 在环绕增强中,我们可以给定一个参数,代表我们要获取处理切入的点。
@Around("execution(* cn.geekhall.service.*.*(..))")
public void around(ProceedingJoinPoint joinPoint) throws Throwable {
System.out.println("++++++++++++++++++ before around ++++++++++++++++++");

Signature signature = joinPoint.getSignature();
System.out.println(signature);
Object proceed = joinPoint.proceed();

System.out.println("++++++++++++++++++ after around ++++++++++++++++++");
}
}

1
2
3
4
5
6
7
8
<!--    方式三: 使用注解-->
<bean id="diy" class="cn.geekhall.diy.AnnotationPointCut"/>
<!--
开启AOP注解支持
proxy-target-class="false" 表示使用JDK实现,true表示使用cglib实现,默认为false。
-->
<aop:aspectj-autoproxy proxy-target-class="false"/>
<!-- <aop:aspectj-autoproxy/>-->

整合Mybatis

步骤:

  1. 导入相关jar包

    • junit
    • mybatis
    • mysql
    • spring
    • aop
    • mybatis-spring
  2. 编写配置文件

  3. 测试

MyBatis-Spring

什么是MyBatis-Spring

MyBatis-Spring会帮助你将MyBatis代码无缝地整合到Spring中,它将允许MyBatis参与到Spring的事务管理中,创建映射器Mapper和SqlSession并注入到Bean中,以及将MyBatis的异常转换为Spring的DataAccessException,最终,可以做到应用代码不依赖MyBatis,Spring或者MyBatis-Spring。

官方

步骤

  1. Model类
1
2
3
4
5
6
7
8
9
10
11
12
13
14
public class User {
private String id;
private String name;
private String pwd;

@Override
public String toString() {
return "User{" +
"id='" + id + '\'' +
", name='" + name + '\'' +
", pwd='" + pwd + '\'' +
'}';
}
}
  1. 编写数据源配置

使用Spring-jdbc配置数据源:

1
2
3
4
5
6
<bean id="dataSource" class="org.springframework.jdbc.datasource.DriverManagerDataSource">
<property name="driverClassName" value="com.mysql.jdbc.Driver"/>
<property name="url" value="jdbc:mysql://127.0.0.1:3316/mybatis?useSSL=true&amp;useUnicode=true&amp;characterEncoding=UTF-8"/>
<property name="username" value="mybatis"/>
<property name="password" value="yy123456"/>
</bean>

也可以使用DBCP连接池等其他方法配置:

1
2
3
4
5
6
7
8
9
10
11
<bean id="dataSourceDbcp" class="org.apache.commons.dbcp2.BasicDataSource" destroy-method="close" scope="singleton">
<property name="driverClassName" value="com.mysql.jdbc.Driver"/>
<property name="url" value="jdbc:mysql://127.0.0.1:3316/mybatis?useSSL=true&amp;useUnicode=true&amp;characterEncoding=UTF-8"/>
<property name="username" value="mybatis"/>
<property name="password" value="yy123456"/>
<property name="initialSize" value="5"/>
<property name="maxTotal" value="80"/>
<property name="maxIdle" value="50"/>
<property name="minIdle" value="45"/>
<property name="maxWaitMillis" value="7000"/>
</bean>
  1. sqlSessionFactory
1
2
3
4
5
6
<bean id="sqlSessionFactory" class="org.mybatis.spring.SqlSessionFactoryBean">
<property name="dataSource" ref="dataSource" />
<!-- 绑定Mybatis配置文件 -->
<property name="configLocation" value="classpath:mybatis-config.xml"/>
<property name="mapperLocations" value="classpath:cn/geekhall/mapper/UserMapper.xml"/>
</bean>

UserMapper.xml:

1
2
3
4
5
6
7
8
9
10
11
<?xml version="1.0" encoding="UTF-8" ?>
<!DOCTYPE mapper
PUBLIC "-//mybatis.org//DTD Config 3.0//EN"
"http://mybatis.org/dtd/mybatis-3-mapper.dtd">
<mapper namespace="cn.geekhall.mapper.UserMapper">

<select id="getUsers" resultType="user">
select * from mybatis.user
</select>

</mapper>
  1. sqlSessionTemplate

SqlSessionTemplate 是 MyBatis-Spring 的核心。作为 SqlSession 的一个实现,这意味着可以使用它无缝代替你代码中已经在使用的 SqlSession。 SqlSessionTemplate 是线程安全的,可以被多个 DAO 或映射器所共享使用。

当调用 SQL 方法时(包括由 getMapper() 方法返回的映射器中的方法),SqlSessionTemplate 将会保证使用的 SqlSession 与当前 Spring 的事务相关。 此外,它管理 session 的生命周期,包含必要的关闭、提交或回滚操作。另外,它也负责将 MyBatis 的异常翻译成 Spring 中的 DataAccessExceptions。

由于模板可以参与到 Spring 的事务管理中,并且由于其是线程安全的,可以供多个映射器类使用,你应该总是用 SqlSessionTemplate 来替换 MyBatis 默认的 DefaultSqlSession 实现。在同一应用程序中的不同类之间混杂使用可能会引起数据一致性的问题。

1
2
3
<bean id="sqlSession" class="org.mybatis.spring.SqlSessionTemplate">
<constructor-arg index="0" ref="sqlSessionFactory"/>
</bean>
  1. 需要给接口加实现类
1
2
3
4
5
6
7
8
9
10
11
12
13
14
15
16
17
18
19
20

public interface UserMapper {
List<User> getUsers();
}

public class UserMapperImpl implements UserMapper {

// 我们的所有操作,都使用sqlSession来执行,在原来,现在都使用SqlSessionTemplate。
private SqlSessionTemplate sqlSession;

public void setSqlSession(SqlSessionTemplate sqlSession) {
this.sqlSession = sqlSession;
}

public List<User> getUsers() {
UserMapper mapper = sqlSession.getMapper(UserMapper.class);
return mapper.getUsers();
}
}

  1. 将自己写的实现类,注入到Spring中
1
2
3
<bean id="userMapper" class="cn.geekhall.mapper.UserMapperImpl">
<property name="sqlSession" ref="sqlSession"/>
</bean>

也可以使UserMapperImpl 类继承SqlSessionDaoSupport类来实现:

1
2
3
4
5
6
7
8
9
10
public class UserMapperImpl2 extends SqlSessionDaoSupport implements UserMapper {

public List<User> getUsers() {
SqlSession sqlSession = getSqlSession();
UserMapper mapper = sqlSession.getMapper(UserMapper.class);
return mapper.getUsers();
}
}


  1. 测试使用
1
2
3
4
5
6
7
8
9
10
11
12
13
14
15
16
17
18
19
20
21
22
23
24
public class AppTest {

@Test
public void test() throws IOException {
ApplicationContext context = new ClassPathXmlApplicationContext("applicationContext.xml");
UserMapper userMapper = context.getBean("userMapper", UserMapper.class);
List<User> users = userMapper.getUsers();

for (User user : users) {
System.out.println(user);
}


// 继承SqlSessionDaoSupport类的测试代码
UserMapper userMapper2 = context.getBean("userMapper2", UserMapper.class);
List<User> users2 = userMapper2.getUsers();

for (User user : users2) {
System.out.println(user);
}
}
}


回顾事务

  • 把一组业务当成一个业务来做,要么都成功,要么都失败。
  • 事务在项目开发中,十分的重要,涉及到数据一致性的问题,不能马虎。
  • 确保ACID::原子性(Atomicity,或稱不可分割性)、一致性(Consistency)、隔离性(Isolation,又称独立性)、持久性(Durability)

Spring中的事务管理分为两种:

  • 声明式事物:AOP方式,交给容器去管理事务;
  • 编程式事物:需要在代码中手工进行事务管理;
1
2
3
4
5
6
7
TransactionStatus txStatus = TransactionManager.getTransaction(new DefaultTransactionDefinition());
try {
userMapper.insertUser(user);
} catch (Exception e){
transactionManager.rollback(txStatus);
throw e;
}

Propagation

在声明式的事务处理中,要配置一个切面,其中就用到了propagation,表示打算对这些方法怎么使用事务,是用还是不用,其中propagation有七种配置,REQUIRED、SUPPORTS、MANDATORY、REQUIRES_NEW、NOT_SUPPORTED、NEVER、NESTED。默认是REQUIRED。

  • REQUIRED:支持当前事务,如果当前没有事务,就新建一个事务。这是最常见的选择。

  • SUPPORTS:支持当前事务,如果当前没有事务,就以非事务方式执行。

  • MANDATORY:支持当前事务,如果当前没有事务,就抛出异常。

  • REQUIRES_NEW:新建事务,如果当前存在事务,把当前事务挂起。

  • NOT_SUPPORTED:以非事务方式执行操作,如果当前存在事务,就把当前事务挂起。

  • NEVER:以非事务方式执行,如果当前存在事务,则抛出异常。

  • NESTED:支持当前事务,如果当前事务存在,则执行一个嵌套事务,如果当前没有事务,就新建一个事务。

React 笔记

React 笔记

脚手架

1
2
3
4
5
6
7
8
9
10
11
12
13
14
15
16
17
18
# 安装
npm install -g create-react-app

# 创建React脚手架工程
create-react-app react_test

# 开启服务器
yarn start

# 前端生成静态文件
yarn build

#
yarn test

#
yarn eject

React 生成的文件

1
2
3
4
5
6
7
8
App.css
App.test.js
index.js
reportWebVitals.js
App.js
index.css
logo.svg
setupTests.js

Nacos教程

Nacos简介


Nacos 是阿里巴巴团队开源的一款动态服务发现、配置和管理平台。
项目源码地址:https://github.com/alibaba/nacos

三大注册中心对比:

名称 配置中心 注册中心 依赖 访问协议 版本迭代 集成支持 上手程度
Eureka 不支持 支持 不依赖其他组件 HTTP 无版本升级 SpringCloud集成 容易,英文界面
Consul 支持 支持 不依赖其他组件 HTTP/DNS 版本迭代中 SpringCloud、K8S 容易,英文界面
Nacos 支持 支持 不依赖其他组件 HTTP/动态DNS/UDP 版本迭代中 Dubbo、SpringCloud、K8S 容易、中文社区文档

主要特性
特性:

  • 服务发现:支持基于 DNS 和基于 RPC 的服务发现。服务提供者使用 原生SDK、OpenAPI、或一个独立的 Agent TODO 注册 Service 后,服务消费者可以使用 DNS TODO 或 HTTP&API 查找和发现服务。
  • 服务健康监测:提供对服务的实时的健康检查,阻止向不健康的主机或服务实例发送请求。
  • 动态配置服务:动态配置服务可以让您以中心化、外部化和动态化的方式管理所有环境的应用配置和服务配置。
  • 动态 DNS 服务:动态 DNS 服务支持权重路由,使用者更容易地实现中间层负载均衡、更灵活的路由策略、流量控制以及数据中心内网的简单DNS解析服务。
  • 服务及其元数据管理:Nacos 能让使用者从微服务平台建设的视角管理数据中心的所有服务及元数据,包括管理服务的描述、生命周期、服务的静态依赖分析、服务的健康状态、服务的流量管理、路由及安全策略、服务的 SLA 以及最首要的 metrics 统计数据。

Nacos的安装

可以通过源码和发行包两种方式来安装Nacos

方式一:源码安装

1
2
3
4
5
6
7
git clone https://github.com/alibaba/nacos.git
cd nacos/
mvn -Prelease-nacos -Dmaven.test.skip=true clean install -U
ls -al distribution/target/

// change the $version to your actual path
cd distribution/target/nacos-server-$version/nacos/bin

方式二:下载编译后的压缩包

1
2
unzip nacos-server-$version.zip 或者 tar -xvf nacos-server-$version.tar.gz
cd nacos/bin

服务启动停止

Linux/Unix/Mac:

1
2
3
4
5
6
cd nacos/bin
# 启动:standalone代表单机非集群模式运行
sh startup.sh -m standalone

# 停止
sh shutdown.sh

Windows:

1
2
3
4
5
6
cd nacos/bin
# standalone代表单机非集群模式运行
startup.cmd -m standalone

# 停止
shutdown.cmd

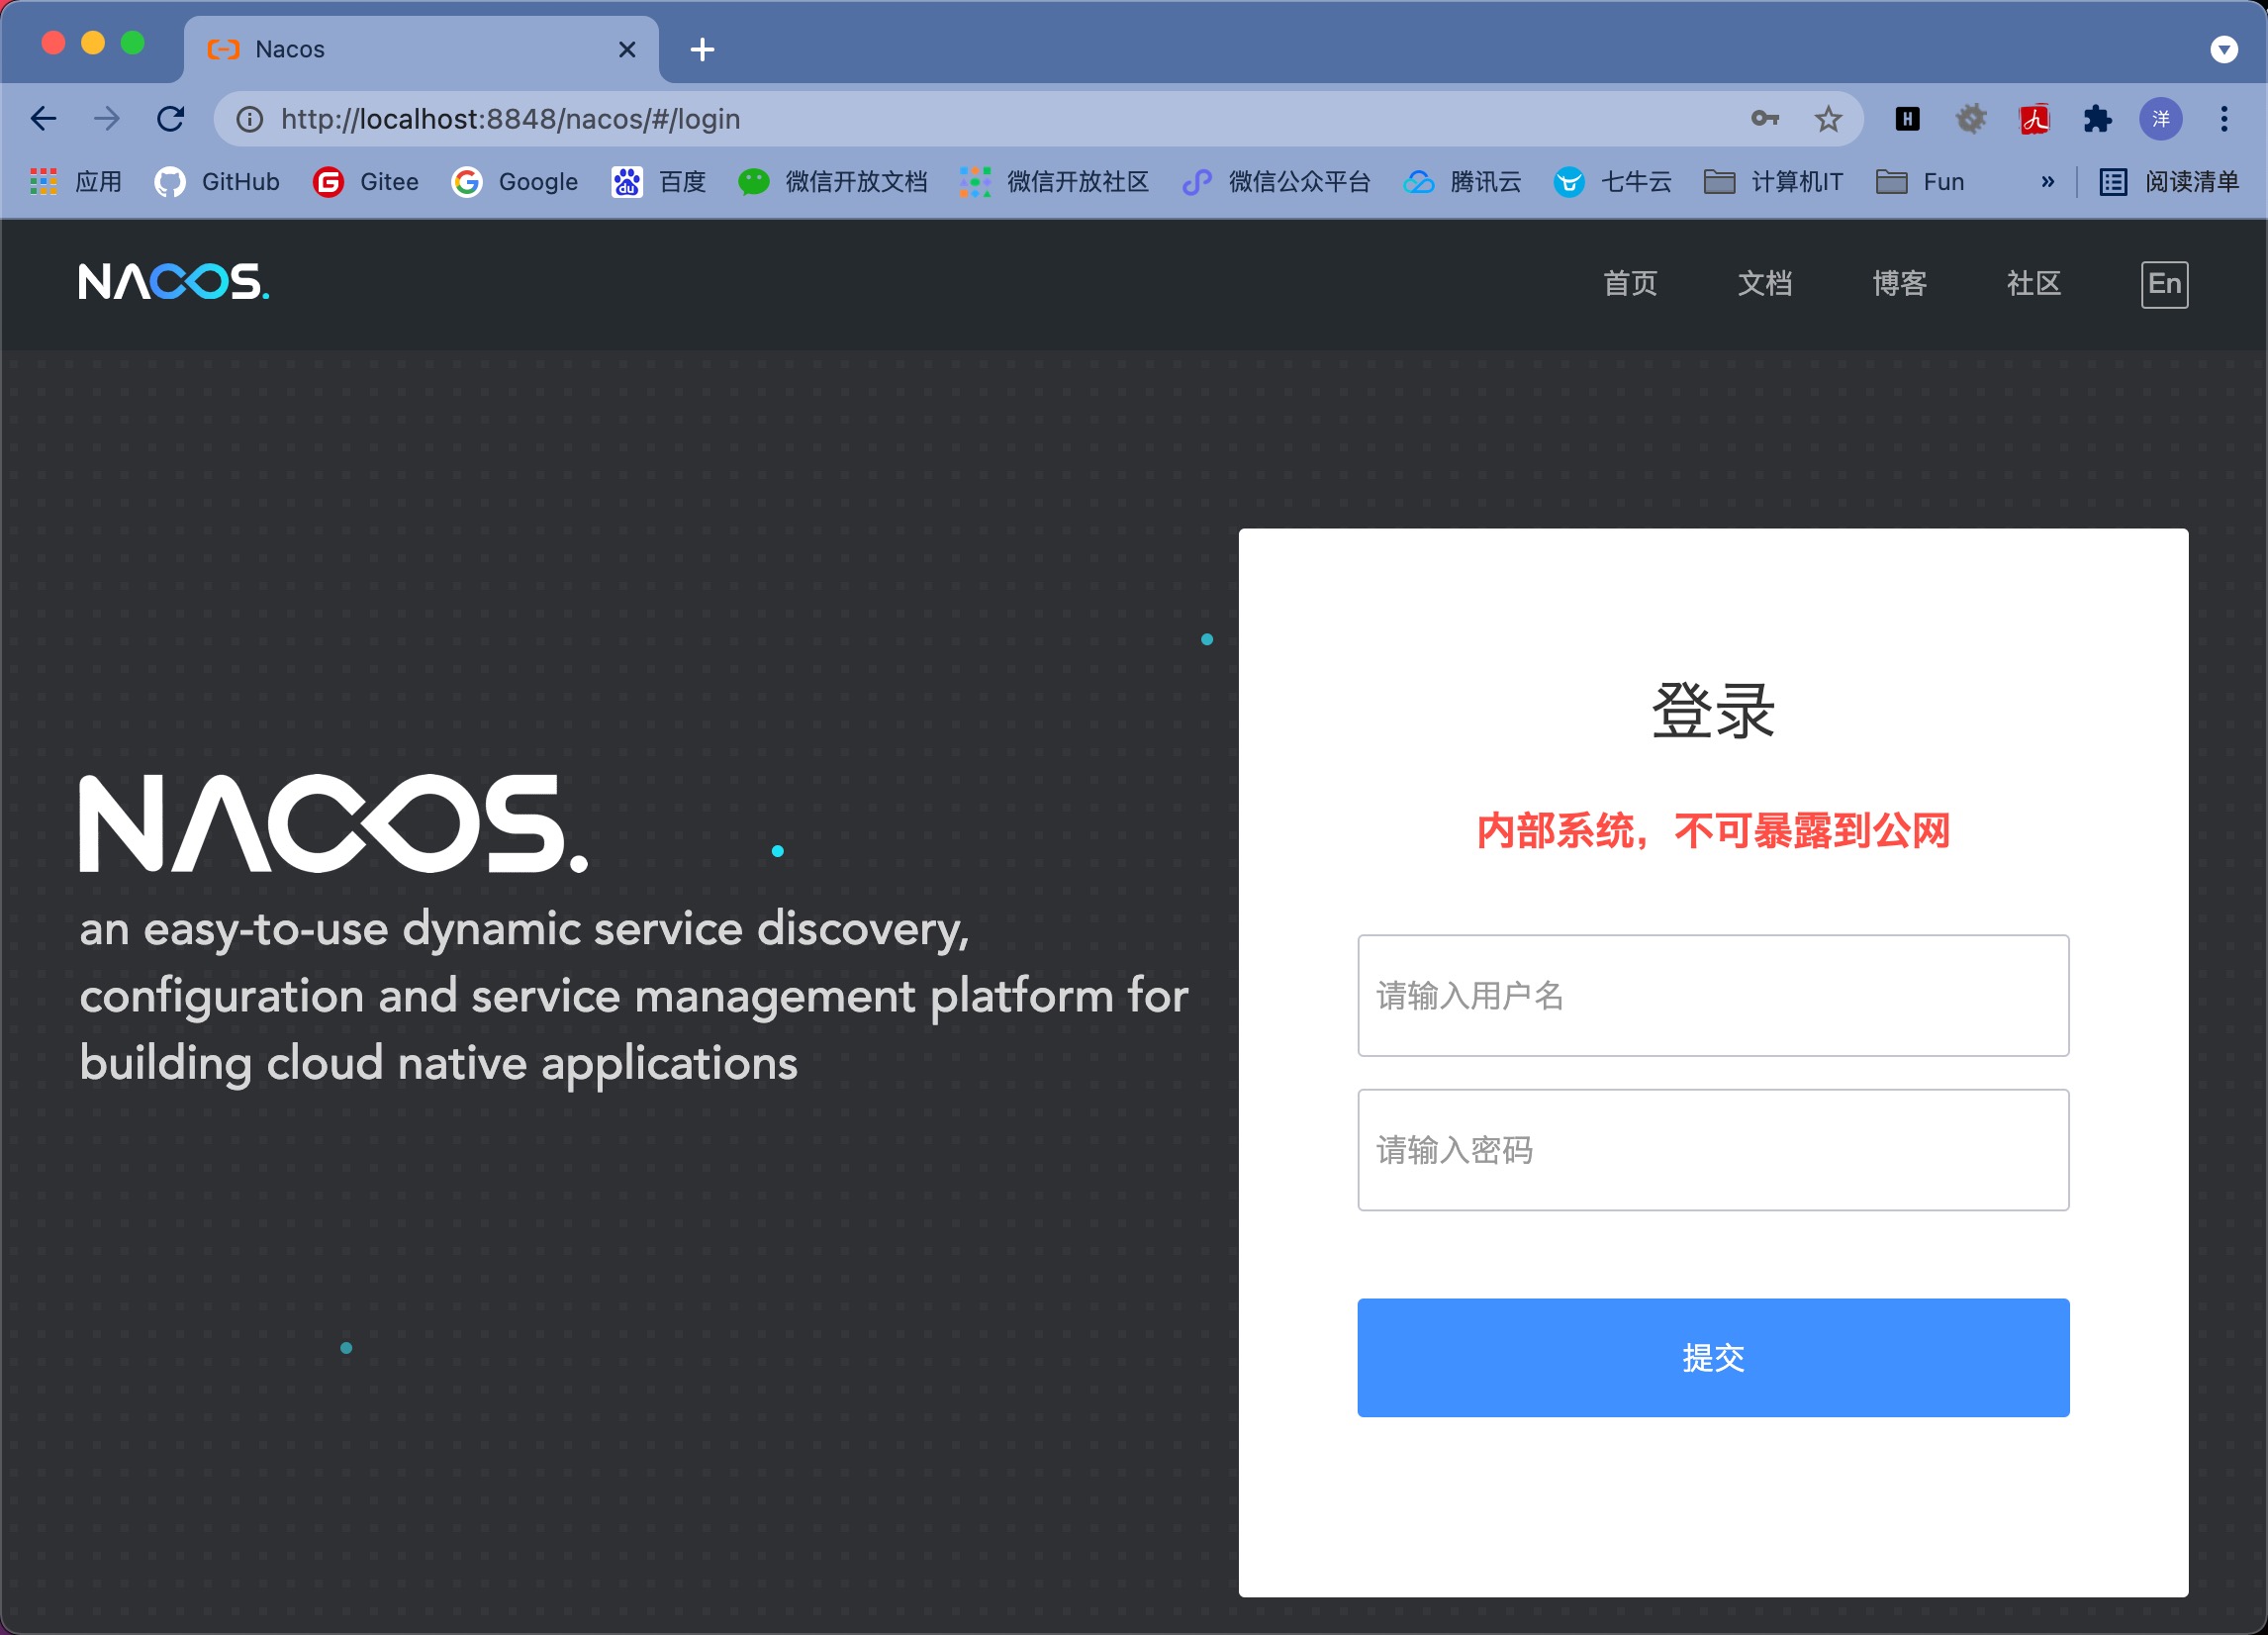
服务启动后可以通过 : http://localhost:8848/nacos/ 来访问,默认账号密码: nacos nacos

服务配置

1
2
3
4
5
6
7
8
9
10
11
# 服务注册
curl -X POST 'http://127.0.0.1:8848/nacos/v1/ns/instance?serviceName=nacos.naming.serviceName&ip=20.18.7.10&port=8080'

# 服务发现
curl -X GET 'http://127.0.0.1:8848/nacos/v1/ns/instance/list?serviceName=nacos.naming.serviceName'

# 发布配置
curl -X POST "http://127.0.0.1:8848/nacos/v1/cs/configs?dataId=nacos.cfg.dataId&group=test&content=HelloWorld"

# 获取配置
curl -X GET "http://127.0.0.1:8848/nacos/v1/cs/configs?dataId=nacos.cfg.dataId&group=test"

Nacos 服务注册实例

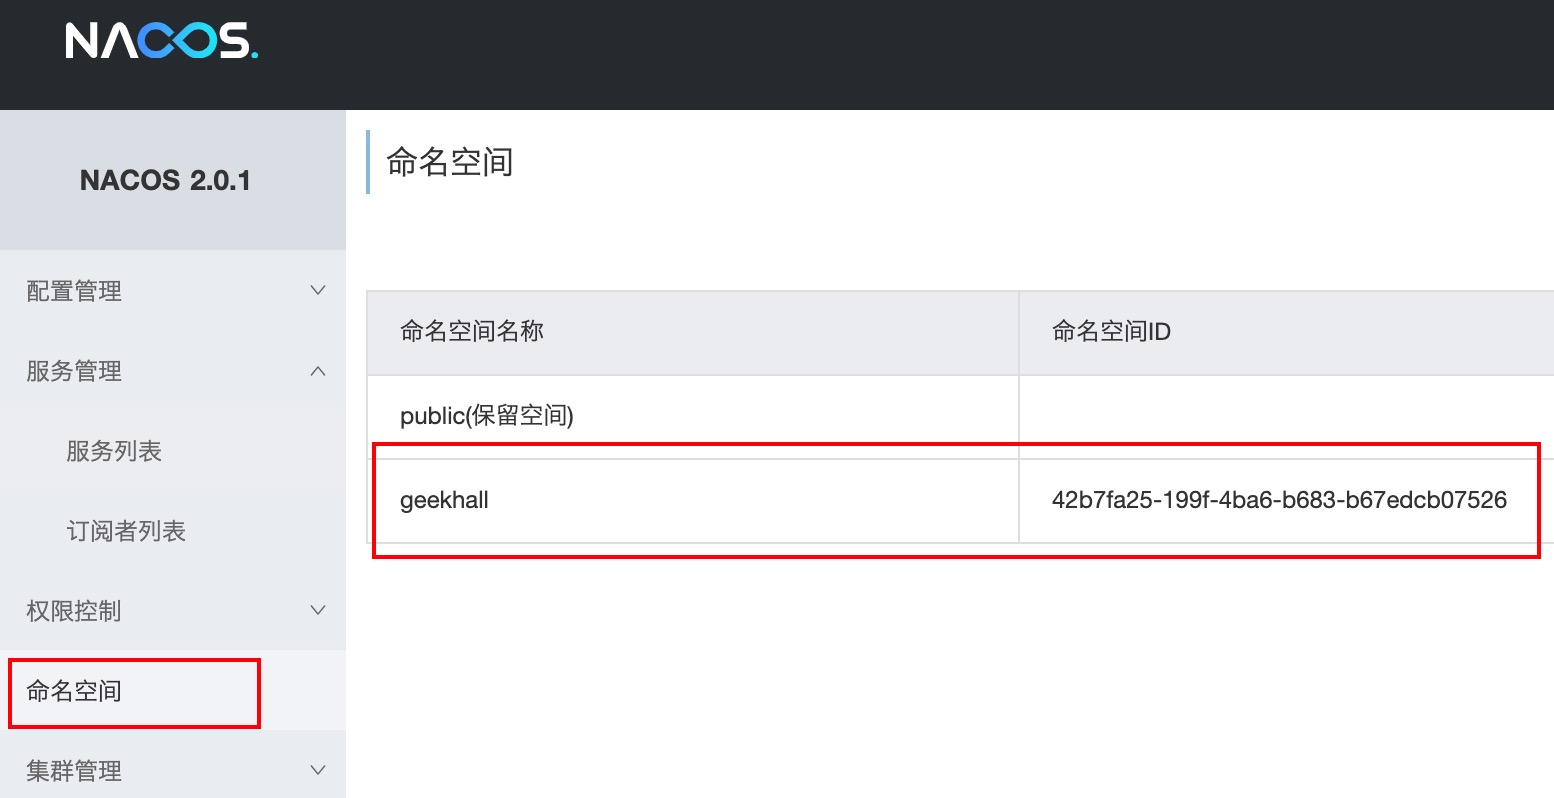
启动Nacos server,到控制台添加一个命名空间

服务注册:分别注册两个服务,服务1有两个实例。

1
2
3
4
5
6
7
8
9
10
11
12
13
14
15
16
17
18
19
20
21
22
23
24
25
26
27
28
29
30
31
32
33
34
35
36
37
38
package cn.geekhall.main;

import com.alibaba.fastjson.JSONArray;
import com.alibaba.fastjson.serializer.SerializerFeature;
import com.alibaba.nacos.api.NacosFactory;
import com.alibaba.nacos.api.exception.NacosException;
import com.alibaba.nacos.api.naming.NamingService;
import com.alibaba.nacos.api.naming.pojo.Instance;

import java.io.IOException;
import java.util.List;
import java.util.Properties;

/**
* ServerResigter.java
*
* @author yiny
*/
public class ServerResigter {
public static void main(String[] args) throws NacosException, IOException {
Properties properties = new Properties();
properties.setProperty("serverAddr", "http://localhost:8848");
// 这里使用服务控制台里的命名空间ID。
properties.setProperty("namespace", "42b7fa25-199f-4ba6-b683-b67edcb07526");
NamingService namingService = NacosFactory.createNamingService(properties);

// 同一个服务注册两个实例
namingService.registerInstance("serverProvider_1", "127.0.0.1", 8881);
namingService.registerInstance("serverProvider_2", "127.0.0.1", 8882);
namingService.registerInstance("serverProvider_2", "127.0.0.1", 8883);

// 获取服务名为serverProvider_1 的实例信息
List<Instance> serverProvider = namingService.getAllInstances("serverProvider_1");
System.out.println(JSONArray.toJSONString(serverProvider, SerializerFeature.PrettyFormat, SerializerFeature.WriteMapNullValue, SerializerFeature.WriteDateUseDateFormat));
System.in.read();

}
}

执行结果:

1
2
3
4
5
6
7
8
9
10
11
12
13
14
15
16
17
18
19
20
nacos-config-spring-boot-autoconfigure-0.2.7.jar:/Users/yiny/.m2/repository/com/alibaba/boot/nacos-spring-boot-base/0.2.7/nacos-spring-boot-base-0.2.7.jar cn.geekhall.main.ServerResigter
[
{
"clusterName":"DEFAULT",
"enabled":true,
"ephemeral":true,
"healthy":true,
"instanceHeartBeatInterval":5000,
"instanceHeartBeatTimeOut":15000,
"instanceId":"127.0.0.1#8881#DEFAULT#DEFAULT_GROUP@@serverProvider_1",
"instanceIdGenerator":"simple",
"ip":"127.0.0.1",
"ipDeleteTimeout":30000,
"metadata":{},
"port":8881,
"serviceName":"DEFAULT_GROUP@@serverProvider_1",
"weight":1.0
}
]

执行后可以在Nacos控制台看到服务注册结果:

服务订阅:获取所有服务提供者,然后进行订阅,并添加一个事件用于监听订阅成功后的实例。

1
2
3
4
5
6
7
8
9
10
11
12
13
14
15
16
17
18
19
20
21
22
23
24
25
26
27
28
29
30
31
32
33
34
35
36
37
38
39
40
41
42
43
44
package cn.geekhall.main;

import com.alibaba.fastjson.JSONArray;
import com.alibaba.fastjson.JSONObject;
import com.alibaba.fastjson.serializer.SerializerFeature;
import com.alibaba.nacos.api.NacosFactory;
import com.alibaba.nacos.api.exception.NacosException;
import com.alibaba.nacos.api.naming.NamingService;
import com.alibaba.nacos.api.naming.listener.Event;
import com.alibaba.nacos.api.naming.listener.EventListener;

import javax.naming.event.NamingEvent;
import java.io.IOException;
import java.util.List;
import java.util.Properties;

/**
* ServerCustomer.java
*
* @author yiny
*/
public class ServerCustomer {
public static void main(String[] args) throws NacosException, IOException {
Properties properties = new Properties();
properties.setProperty("serverAddr", "http://localhost:8848");
properties.setProperty("namespace", "42b7fa25-199f-4ba6-b683-b67edcb07526");
NamingService namingService = NacosFactory.createNamingService(properties);
List<String> serverList = namingService.getServicesOfServer(1, Integer.MAX_VALUE).getData();
System.out.println("得到服务提供者列表:" + JSONArray.toJSONString(serverList));
for (String server : serverList){

// 订阅serverProvider服务 并添加一个监听器用来监听服务状态
namingService.subscribe(server, new EventListener() {
public void onEvent(Event event) {
NamingEvent namingEvent = (NamingEvent) event;
System.out.println(JSONObject.toJSONString(namingEvent, SerializerFeature.PrettyFormat, SerializerFeature.WriteMapNullValue, SerializerFeature.WriteDateUseDateFormat));
}
});
}
System.in.read();

}
}

执行结果:

1
2
3
nacos-config-spring-boot-autoconfigure-0.2.7.jar:/Users/yiny/.m2/repository/com/alibaba/boot/nacos-spring-boot-base/0.2.7/nacos-spring-boot-base-0.2.7.jar cn.geekhall.main.ServerCustomer
得到服务提供者列表:["serverProvider_1","serverProvider_2"]

服务停止后:

Nacos SpringBoot

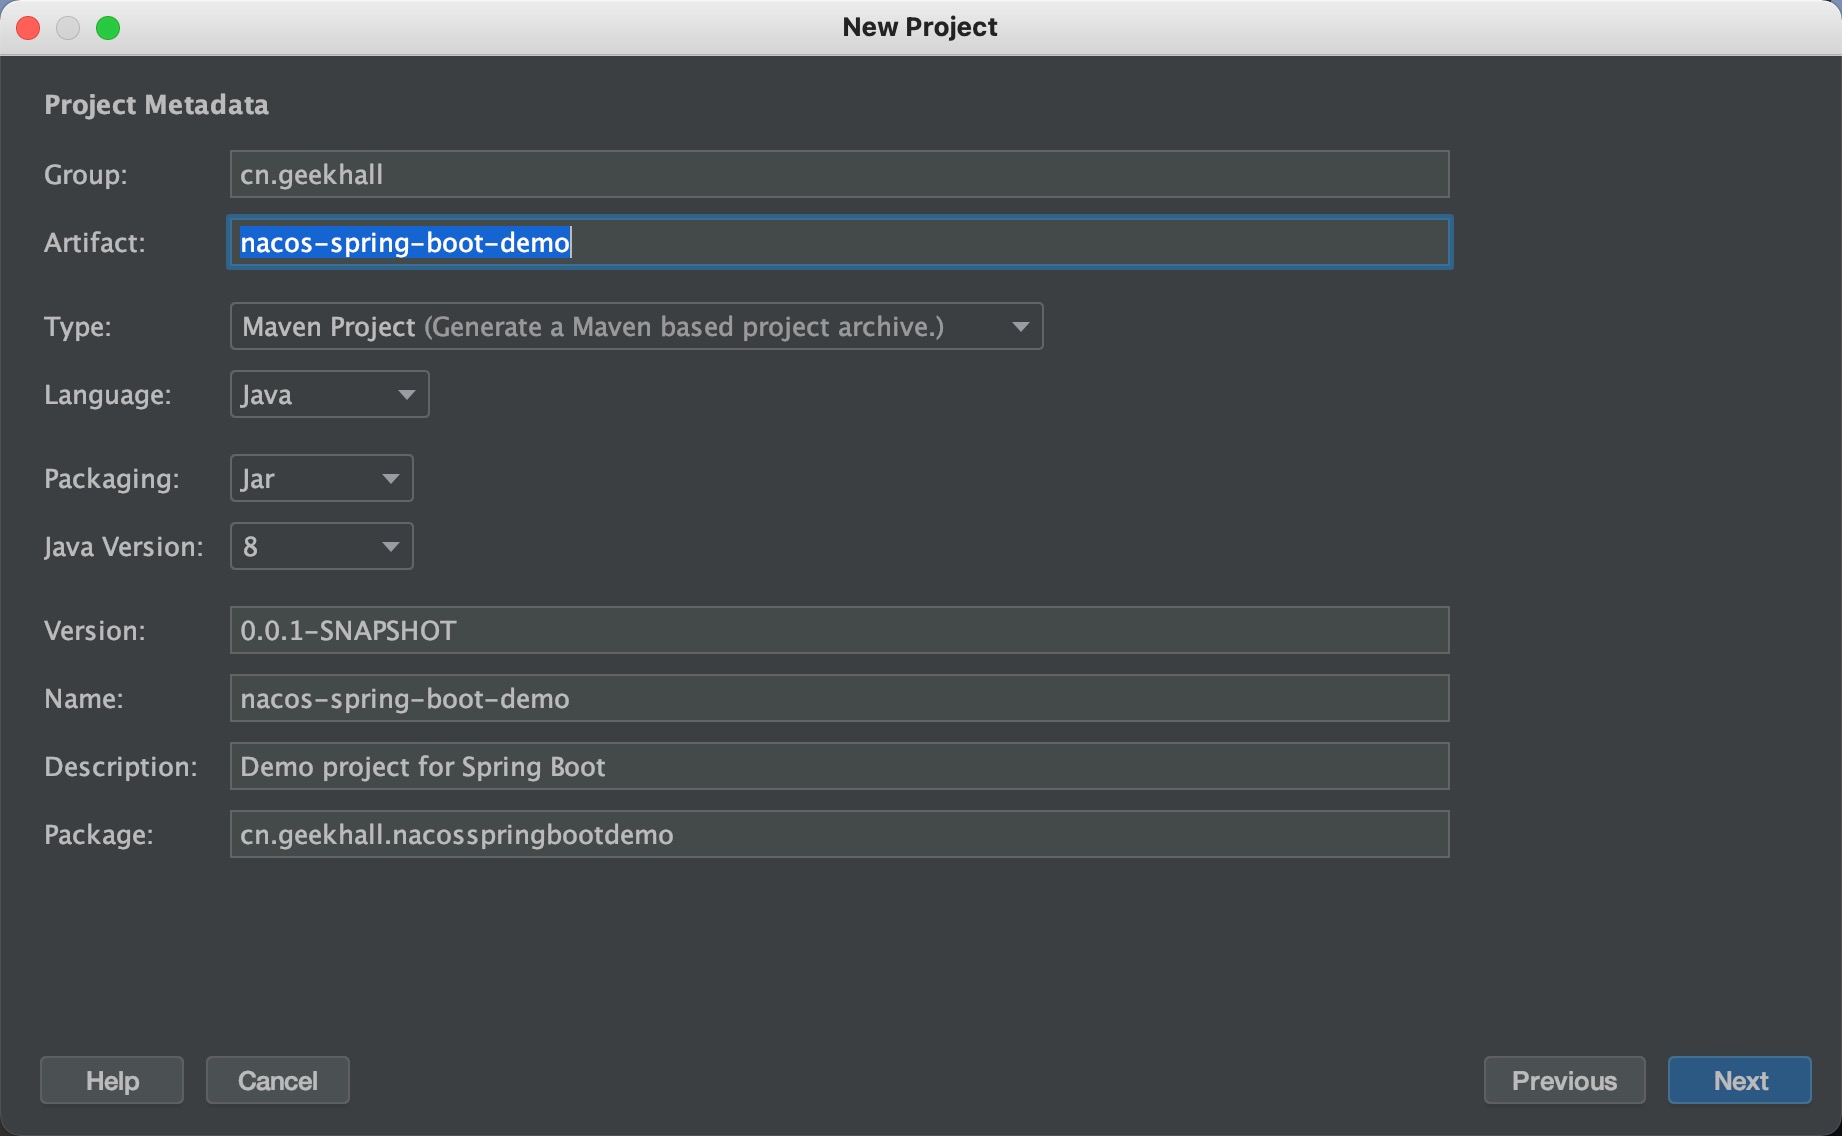
新建一个SpringBoot项目:

并添加依赖。

1
2
3
4
5
<dependency>
<groupId>com.alibaba.boot</groupId>
<artifactId>nacos-config-spring-boot-starter</artifactId>
<version>0.2.7</version>
</dependency>