ES6笔记 ES6特性 let与var的区别
使用let声明变量,不能重复声明
块儿级作用域
不存在变量提升
不影响作用域链
使用const声明常量时一定要赋初始值 解构赋值 ES6允许按照一定模式从数组和对象中提取值,对变量进行赋值,这被称为解构赋值。
数组的解构
1
2
3
const F4 =['小沈阳' ,'刘能' ,'赵四' ,'宋小宝' ]let [a,b,c,d] = F4 ;console .log (a);
对象的解构
1
2
3
4
5
6
7
8
9
10
const zhao = { name : '赵本山' , age : 60 , xiaopin : function ( console .log ("赵本山会演小品." ); } } let {xiaopin} = zhao; xiaopin ();
ES6 引入了新的声明字符串的方式:``
反引号中可以使用${}来进行变量拼接
1
2
let act="葛优" ;let msg=`${act} 是一个好演员` ;
ES6允许在大括号里面,直接写入变量和函数,作为对象的属性和方法。
1
2
3
4
5
6
7
8
9
10
11
12
13
14
15
16
17
18
19
20
21
22
23
let name = "极客堂" ; let change = function ( console .log ("我们可以改变你!" ); } const school = { name, change, origin : function ( console .log ("原来的方法定义方式。" ) }, improve ( console .log ("ES6支持的方法定义方式。" ) } } console .log (school); school.origin (); school.improve ();
ES6允许使用箭头 (=>) 定义函数。
1
2
3
4
5
6
7
8
9
10
11
let fn = function ( console .log ("function1" ); } let fn1 = (a,b ) => { console .log ("function2" ); return a + b; } fn ();fn1 (1 ,2 );
需要注意的:
this是静态的,this始终指向函数声明时所在作用域下的this的值。
1
2
3
4
5
6
7
8
9
10
11
12
13
14
15
16
17
18
19
20
21
function getName ( console .log (this .fname ); } let getName2 = ( console .log (this .fname ); } window .fname = "name in window" ; const geekA = { fname : "name in geekA" } getName (geekA); getName2 (geekA); getName.call (geekA); getName2.call (geekA);
1 2 3 4 5 6 7 8 let Person = (name, age ) => { this .name = name; this .age = age; } let me = new Person ('xiao' , 30 );console .log (me);
1 2 3 4 5 let fn = ( console .log (arguments ); } fn (1 ,2 ,3 );
1 2 3 4 5 6 7 8 9 10 11 let fn_add = n => { return n+n; } console .log (fn_add (3 ));let fn_pow = n => n*n;console .log (fn_pow (4 ));
1 2 3 4 5 6 7 8 9 10 11 12 13 14 15 16 17 18 19 20 21 22 23 24 25 26 27 28 29 30 31 32 33 34 35 36 37 38 39 40 41 42 43 44 45 <title > 箭头函数实践</title > <style > div { width : 200px ; height : 200px ; background : #58a ; margin :2rem ; } </style > </head > <body > <div id ="ad" > </div > <div id ="ad2" > </div > <script > let ad = document .getElementById ('ad' ); ad.addEventListener ("click" , function ( let self = this ; setTimeout (function ( console .log (self); console .log (this ); self.style .background = 'pink' ; }, 2000 ); }) let ad2 = document .getElementById ('ad2' ); ad2.addEventListener ("click" , function ( setTimeout (() => { console .log (self); console .log (this ); this .style .background = 'pink' ; }, 2000 ); }) </script > </body >
箭头函数可以使函数更加简洁,例如下面的取数组偶数项的函数:
1
2
3
4
5
6
7
8
const arr = [1 ,2 ,3 ,4 ,5 ,6 ];const result = arr.filter (function (item ){ if (item % 2 === 0 ){ return true ; } else { return false ; } });
可以简化为:
1 const result2 = arr.filter (item =>2 === 0 );
需要注意的是箭头函数不适合与this有关的回调,事件回调,对象的方法。
ES6 允许给函数参数赋初始值 1 2 3 4 5 function add (a,b,c=10 ){ return a+b+c; } console .log (add (1 +2 ));
参数默认值可以与解构赋值结合使用
1 2 3 4 5 6 7 8 9 10 11 12 13 function connect ({host="127.0.0.1" , username, password, port} ){ console .log (host); console .log (username); console .log (password); console .log (port); }; connect ({ host : 'localhost' , username : 'root' , password : '123456' , port : 3306 });
ES6 引入了rest参数,用于获取函数的实参,用来代替arguments 注意rest参数必须要放到参数的最后
1 2 3 4 5 6 7 8 9 10 11 12 13 14 15 function normal_fn ( console .log (arguments ); } normal_fn ('a' ,'b' ,'c' ,100 )function normal_fn2 (arg1, arg2, ...args ){ console .log (args); } normal_fn2 ('a' ,'b' ,'c' ,200 );
… 扩展运算符能将数组转换为逗号分隔的“参数序列” 1 2 3 4 5 6 7 8 const tfboys = ['易洋千玺' ,'王源' ,'王俊凯' ];function chunwan ( console .log (arguments ); } chunwan (tfboys);chunwan (...tfboys);
可以用来数组的合并或者克隆
1 2 3 4 5 6 7 8 9 10 const kuaizi = ['王太利' , '肖央' ];const fenghuang = ['曾毅' , '玲花' ];const zuixuanxiaopingguo = kuaizi.concat (fenghuang);const zxxpg = [...kuaizi, ...fenghuang]console .log (zuixuanxiaopingguo);console .log (zxxpg);const arr1 = ['a' ,'b' ,'c' ];const arr2 = [...arr1];
ES6引入了Symbol ES6引入了一种新的原始数据类型Symbol,表示一种独一无二的值,它是JavaScript语言的第七种数据类型。
Symbol的值是唯一的,用来解决命名冲突的问题
Symbol值不能与其他数据类型进行运算
Symbol定义的对象属性不能使用for...in循环遍历,但是可以使用Reflect.ownKeys来获取对象的所有键名。
1 2 3 4 5 6 7 8 9 10 11 12 13 14 let s = Symbol ();console .log (s, typeof s);let s2 = Symbol ("GeekHall" );let s3 = Symbol ("GeekHall" );console .log (s2 === s3); let s4 = Symbol .for ('GeekHall' );let s5 = Symbol .for ('GeekHall' );console .log (s4, typeof s4);console .log (s4 === s5);
JavaScript数据类型 1 2 3 4 5 6 USONB you are so niubility! u : undefined s : string symbol o : object n : null number b : boolean
可以使用Symbol安全地向对象追加方法:
1 2 3 4 5 6 7 8 9 10 11 12 13 14 15 16 17 18 19 20 21 22 23 let game = { name : '俄罗斯方块' , level :10 , up : function ( console .log ("up method" ); } } let methods = { up : Symbol (), down : Symbol () }; game[methods.up ] = function ( console .log ("改变形状" ); } game[methods.down ] = function ( console .log ("快速下降" ); } console .log (game);
给对象添加Symbol类型的属性 1 2 3 4 5 6 7 8 9 10 11 12 13 14 15 let say = Symbol ('say' );let zibao = Symbol ('zibao' );let youxi = { name : "狼人杀" , [say]: function ( console .log ("我可以发言" ); }, [zibao]: function ( console .log ("我可以自爆" ); } }; console .log (youxi);youxi[say](); youxi[zibao]();
Symbol内置值 ES6提供了11个内置的Symbol值
值
用途
Symbol.hasInstance
当其他对象使用instanceof运算符,判断是否为该对象的实例时会调用这个方法
Symbol.isConcatSpreadable
对象的Symbol.isConcatSpreadable属性等于的是一个bool值,表示该对象用于Array.prototype.concat()时,是否可以展开
Symbol.unscopables
该对象使用with关键字时,哪些属性会被with环境排除
Symbol.match
当执行str.match(myObject)时,如果该属性存在,会调用它,返回该方法的返回值
Symbol.replace
当该对象被str.replace(myObject)方法调用时,会返回该方法的返回值。
Symbol.search
当该对象被str.search(myObject)方法调用时,会返回该方法的返回值。
Symbol.split
当该对象被str.split(myObject)方法调用时,会返回该方法的返回值。
Symbol.iterator
对象进行for…of循环时,会调用Symbol.iterator方法,返回该对象的默认迭代器
Symbol.toPrimitive
该对象被转为原始类型值时,会调用这个方法,返回该对象对应的原始类型值
Symbol.toStringTag
在该对象上面调用toString方法时,返回该方法的返回值
Symbol.species
创建衍生对象时,会使用该属性
1 2 3 4 5 6 7 8 9 10 11 class Person { static [Symbol .hasInstance ](param){ console .log ("我被用来检测类型了!" ); } } let o = {};console .log (o instanceof Person );
1 2 3 4 5 const arr = [1 ,2 ,3 ]const arr2 = [4 ,5 ,6 ]arr2[Symbol .isConcatSpreadable ] = false ; console .log (arr.concat (arr2));
Object.defineProperty 1 2 3 4 5 6 7 8 9 10 let person = { name : "King" , sex : 'Male' } Object .defineProperty (person, 'age' , { value : 18 }) console .log (person);
但是注意默认情况下age是不参与遍历的(不可枚举),
1 2 3 4 5 6 Object .defineProperty (person, 'age' , { value : 18 , enumerable : true , writable : true , configurable : true , })
迭代器 迭代器(iterator)是一种接口,为各种不同数据结构提供统一的访问机制。
ES6创造了一种新的遍历命令:for…of循环,iterator接口主要供for…of消费。
原生具备iterator接口的数据包括:
Array
Arguments
Set
Map
String
TypedArray
NodeList
1 2 3 4 5 const books = ['西游' , '红楼' ,'水浒' , '三国' ];for (let book of books){ console .log (book); }
使用iterator可以自定义对象的遍历方法
1 2 3 4 5 6 7 8 9 10 11 12 13 14 15 16 17 18 19 20 21 22 23 24 25 26 27 28 29 30 31 32 const actors = { name : "四大才子" , code :[ "刘能" , "小沈阳" , "宋小宝" , "赵四" ], [Symbol .iterator ](){ let index = 0 ; let self = this ; return { next : function ( if (index < self.code .length ){ const result = { value : self.code [index], done : false }; index++; return result; } else { return {value :undefined , done : true }; } } }; } } for (let actor of actors){ console .log (actor); }
生成器 生成器其实就是一个特殊的函数,是一种异步编程的解决方案,
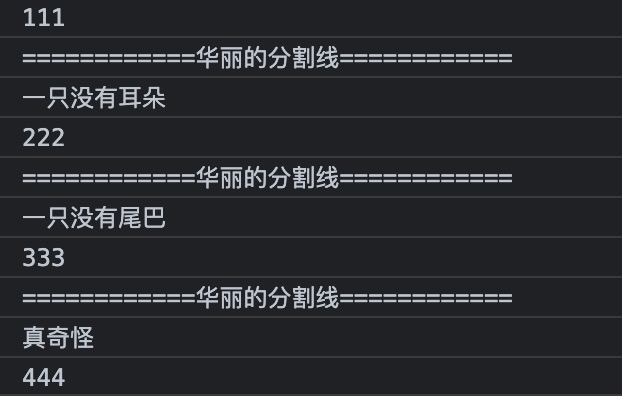
1 2 3 4 5 6 7 8 9 10 11 12 13 14 15 16 17 18 19 20 21 22 function * gen ( console .log ("111" ); yield '一只没有耳朵' ; console .log ("222" ); yield '一只没有尾巴' ; console .log ("333" ); yield '真奇怪' ; console .log ("444" ); let iter = gen (); iter.next (); console .log ("============华丽的分割线1============" ); iter.next (); console .log ("============华丽的分割线2============" ); iter.next (); console .log ("============华丽的分割线3============" ); iter.next (); }
1 2 3 4 for (let v of gen ()){ console .log ("============华丽的分割线============" ); console .log (v); }
打印结果:
可以看到每次调用next的返回值为yield后定义的值。
生成器的使用实例1: 解决回调地狱问题 可以用来解决回调地狱,比如下面的代码:
1 2 3 4 5 6 7 8 9 10 setTimeout (() => { console .log ("1111" ); setTimeout (() => { console .log ("2222" ); setTimeout (() => { console .log ("3333" ); }, 3000 ); }, 2000 ); }, 1000 );
可以优化成:
1 2 3 4 5 6 7 8 9 10 11 12 13 14 15 16 17 18 19 20 21 22 23 24 25 26 27 28 29 function one ( setTimeout (() => { console .log ("1111" ); iterator.next (); }, 1000 ) } function two ( setTimeout (() => { console .log ("2222" ); iterator.next (); }, 2000 ) } function three ( setTimeout (() => { console .log ("3333" ); iterator.next (); }, 3000 ) } function * gen ( yield one (); yield two (); yield three (); } let iterator = gen ();iterator.next ();
生成器的使用实例2: 模拟获取用户数据、订单数据、商品数据 1 2 3 4 5 6 7 8 9 10 11 12 13 14 15 16 17 18 19 20 21 22 23 24 25 26 27 28 29 30 31 32 33 34 35 function getUsers ( setTimeout (() => { let data = '用户数据' ; iterator.next (data); }, 1000 ); } function getOrders ( setTimeout (() => { let data = '订单数据' ; iterator.next (data); }, 1000 ); } function getGoods ( setTimeout (() => { let data = '商品数据' ; iterator.next (data); }, 1000 ); } function * gen ( let users = yield getUsers (); console .log (users); let orders = yield getOrders (); console .log (orders); let goods = yield getGoods (); console .log (goods); } let iterator = gen ();iterator.next ();
Promise Promise时ES6引入的异步编程的新解决方案。语法上Promise是一个构造函数,
Promise 构造函数:Promise(excutor){}
Promise.prototype.then 方法
Promise.prototype.catch 方法
resolve函数(处理成功)会调用then中的成功处理函数
1 2 3 4 5 6 7 8 9 10 11 12 13 14 const p = new Promise (function (resolve, reject ){ setTimeout (function ( let data = '数据库中的用户数据' ; resolve (data); }, 1000 ) }); p.then (function (value ){ console .log ("success." ); console .log (value); }, function (reason ){ console .log ("failed" ); console .log (reason); })
reject函数(处理失败)会调用then中的失败处理函数
1 2 3 4 5 6 7 8 9 10 11 12 13 14 const p = new Promise (function (resolve, reject ){ setTimeout (function ( let err = '数据读取失败' ; reject (err); }, 1000 ) }); p.then (function (value ){ console .log ("success." ); console .log (value); }, function (reason ){ console .log ("failed" ); console .log (reason); })
上面的实例演示了如何将异步任务封装在Promise对象中,
实例:使用Promise封装文件读取操作 不使用Promise的文件读取操作:
1 2 3 4 5 6 7 8 9 10 11 12 const fs = require ('fs' );fs.readFile ('./resources/sample6_promise.md' , (err, data ) => { if (err) throw err; console .log (data.toString ()); })
将文件保存后使用node执行:
1 2 3 4 5 6 7 ➜ es6_sample git:(main) ✗ node promise_readfile.js Promise时ES6引入的异步编程的新解决方案。语法上Promise是一个构造函数, 用来封装异步操作,并可以获取其成功或失败的结果。 * Promise 构造函数:Promise(excutor){} * Promise.prototype.then 方法 * Promise.prototype.catch 方法
通过Promise对文件读取操作进行封装:
1 2 3 4 5 6 7 8 9 10 11 12 13 14 15 16 17 18 19 20 const fs = require ('fs' );const p = new Promise ( function (resolve, reject ) { fs.readFile ("./resources/sample6_promise.md" , (err, data ) => { if (err) reject (err); resolve (data); }); }); p.then (function (value ){ console .log (value.toString ()); }, function (reason ) { console .log ("读取失败!" ); console .log (reason); })
实例: 使用Promise封装Ajax 不使用Promise:
1 2 3 4 5 6 7 8 9 10 11 12 13 14 15 16 17 18 19 20 21 22 23 const xhr = new XMLHttpRequest ();xhr.open ("GET" , "https://api.apiopen.top/getJoke" ); xhr.send (); xhr.onreadystatechange = function ( if (xhr.readyState == 4 ){ if (xhr.status >= 200 && xhr.status < 300 ){ console .log (xhr.response ); } else { console .error (xhr.status ); } } }
使用Promise:
1 2 3 4 5 6 7 8 9 10 11 12 13 14 15 16 17 18 19 20 21 22 23 24 25 26 27 28 29 const p = new Promise (function (resolve, reject ){ const xhr = new XMLHttpRequest (); xhr.open ("GET" , "https://api.apiopen.top/getJoke" ); xhr.send (); xhr.onreadystatechange = function ( if (xhr.readyState == 4 ){ if (xhr.status >= 200 && xhr.status < 300 ){ resolve (xhr.response ); } else { reject (xhr.status ); } } } }); p.then (function (value ){ console .log (value); }, function (reason ){ console .error (reason); });
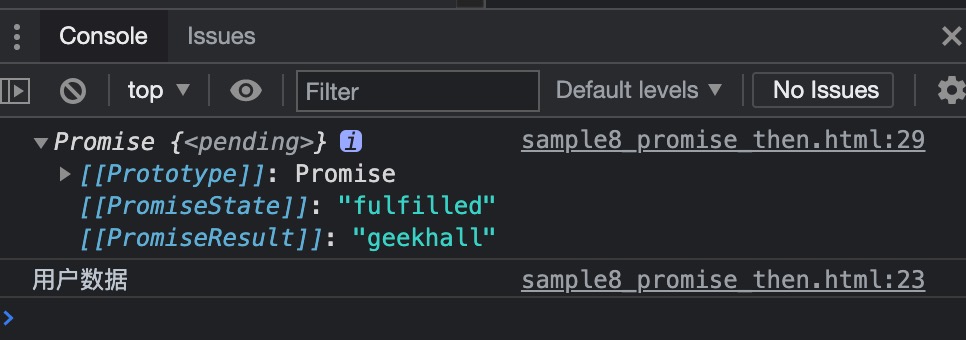
Promise 对象的then方法 调用then方法, then方法的返回结果为Promise对象,
若回调函数中返回的结果不是Promise类型的属性,则返回的Promise的状态为成功,返回值为对象的成功的值。
1 2 3 4 5 6 7 8 9 10 11 12 13 14 15 16 17 18 19 20 21 22 23 24 const p = new Promise ((resolve, reject ) => { setTimeout (() => { resolve ("用户数据" ); }, 1000 ) }); const result = p.then (value => console .log (value); return new Promise ((resolve, reject ) => { resolve ("OK" ); }) }, reason => console .error (reason); }); console .log (result);
执行结果(case 1):
执行结果(case 2):
then方法是可以链式调用的。
1 2 3 4 5 6 7 8 p.then (value => }).then (value => }).then (value => });
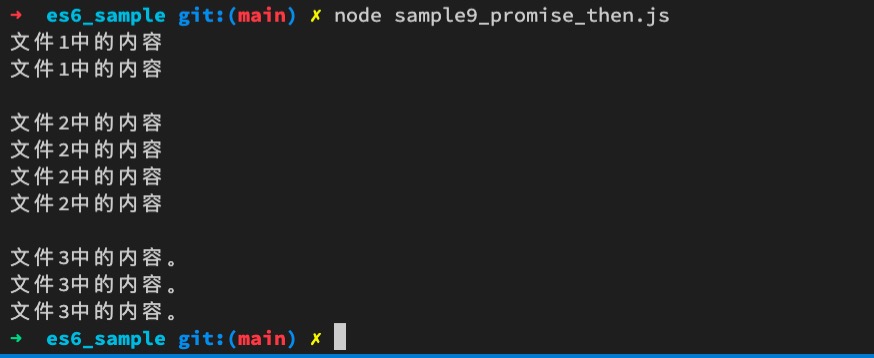
一个读取多个文件的例子
1 2 3 4 5 6 7 8 9 10 11 12 13 14 15 16 17 18 19 20 21 22 23 24 const fs = require ('fs' );const p = new Promise ((resolve, reject ) => { fs.readFile ("./resources/file1.md" , (err, data ) => { resolve (data); }); }); p.then (value => return new Promise ((resolve, reject ) => { fs.readFile ("./resources/file2.md" , (err, data ) => { resolve ([value, data]); }); }); }).then (value => return new Promise ((resolve, reject ) => { fs.readFile ("./resources/file3.md" , (err,data ) => { value.push (data); resolve (value); }); }); }).then (value => console .log (value.join ('\r\n' )); })
执行结果:
Promise 的catch处理 实际上就是then的语法糖
1 2 3 4 p.catch ((error ) => { console .error (error); });
等价于:
1 2 3 4 p.then ((value ) => {}, (error ) => { console .error (error); });
Set 1 2 3 4 5 6 7 8 9 10 11 12 13 14 15 16 17 18 19 20 21 22 let s = new Set ();let s2 = new Set (['Benz' , 'BMW' , 'Tesla' , 'Audi' , 'Tesla' ]);console .log (s2.size );s2.add ('Toyota' ); s2.delete ('Benz' ); console .log (s2.has ('BMW' ));for (let v of s2) { console .log (v); } s2.clear ();
Set 实践
1 2 3 4 5 6 7 8 9 10 11 12 13 14 15 16 17 18 19 20 21 22 23 24 25 26 27 28 29 30 31 32 let arr = [1 ,2 ,3 ,4 ,5 ,4 ,3 ,2 ,1 ];let result = [...new Set (arr)];console .log (result); let arr2 = [4 ,5 ,6 ,5 ,6 ,7 ]let result1 = [...new Set (arr)].filter (item => let s2 = new Set (arr2); if (s2.has (item)) { return true ; } else { return false ; } }); console .log (result1); let result11 = [...new Set (arr)].filter (item =>new Set (arr2).has (item)? true : false );console .log (result11); let result3 = [...new Set ([...new Set (arr)].concat ([...new Set (arr2)]))];let result33 = [...new Set ([...arr, ...arr2])]console .log (result3); console .log (result33); let result4 = [...new Set (arr)].filter (item =>new Set (arr2).has (item)? false : true );console .log (result4); let result5 = [...new Set (arr)].filter (item =>new Set (arr2).has (item))? true : false );console .log (result5);
Map ES6提供了Map数据结构。它类似于对象,也是键值对的集合。
size: 返回Map的元素个数
set: 增加一个新的元素,返回当前Map
get: 返回键名对象的键值
has: 检测Map中是否包含某个元素,返回boolean值。
clear:清空集合,返回undefined
1 2 3 4 5 6 7 8 9 10 11 12 13 14 15 16 17 18 19 20 21 22 23 24 25 26 27 28 29 30 31 32 let m = new Map ();m.set ("name" , "GeekHall" ); m.set ('change' , function ( console .log ("learn in GeekHall" ); }); let myKey = { name : "GeekHall" , age : 100 } m.set (myKey, ['beijing' , 'shanghai' , 'tokyo' ]) console .log (m.size );m.delete ('name' ); console .log (m.get (myKey));for (let v of m){ console .log (v); } m.clear ();
Class ES6 提供了更接近传统语言的写法,引入了Class的概念,作为对象的模版。
class声明类
constructor定义构造函数初始化
extends继承父类
super调用父类构造方法
static定义静态方法和属性
父类方法可以重写
ES5的方式:
1 2 3 4 5 6 7 8 9 10 11 12 13 14 15 16 17 18 19 function Car (brand, price ){ this .brand = brand; this .price = price; } Car .prototype beep = function ( console .log (this .brand + " 鸣笛了" ); } Car .prototype drive = function ( console .log ("Drive in the road." ); } let bmw = new Car ('BMW' , 300000 );console .log (bmw);bmw.beep (); bmw.drive ();
ES6的方式
1 2 3 4 5 6 7 8 9 10 11 12 13 14 15 16 17 18 19 20 21 22 23 24 25 26 27 28 29 30 31 32 33 34 35 36 37 38 class Car { static name = "汽车" ; static show ( console .log ("举办车展!" ); } constructor (brand, price ){ this .brand = brand; this .price = price; } drive ( console .log ("Drive in the road." ); } } let tesla = new Car ("TESLA" , 200000 );console .log (tesla);Car .power = '汽油车' ;Car .change = function ( console .log ("We can change the world!" ); } console .log (Car .name ); Car .show ();
对象的继承(ES5的方式):
1 2 3 4 5 6 7 8 9 10 11 12 13 14 15 16 17 18 19 20 21 22 23 24 25 26 27 28 29 30 31 32 33 34 function Car (brand, price ){ this .brand = brand; this .price = price; } Car .prototype drive = function ( console .log ("我们去兜风~" ); } function ECar (brand, price, color, power ){ Car .call (this , brand, price); this .color = color; this .power = power; } ECar .prototype new Car ;ECar .prototype constructor = ECar ;ECar .prototype charge = function ( console .log ("我可以充电。" ); } ECar .prototype autopilot = function ( console .log ("我可以自动驾驶。" ); } const tesla = new ECar ('Tesla' , 200000 , 'Black' , 'Model S' );console .log (tesla);
对象的继承(ES6的方式):
1 2 3 4 5 6 7 8 9 10 11 12 13 14 15 16 17 18 19 20 21 22 23 24 25 26 27 28 29 30 31 32 33 34 35 36 37 38 39 40 41 42 class Car { constructor (brand, price ){ this .brand = brand; this .price = price; } drive ( console .log ("我可以开" ); } } class ECar extends Car { constructor (brand, price, color, module ){ super (brand, price); this .color = color; this .module = module ; } charge ( console .log ("充电" ); } autoPilot ( console .log ("自动驾驶" ); } drive ( console .log ("我百公里加速3秒" ); } } const xiaopeng = new ECar ('小鹏' , 150000 , 'Red' , 'SUV' );console .log (xiaopeng);xiaopeng.drive ();
Class的get和set 1 2 3 4 5 6 7 8 9 10 11 12 13 14 15 16 class Car { get price (){ console .log ("价格属性被读取了" ); return 1000000 ; } set price (val ){ console .log ("价格属性被修改了" ); console .log (val); } } let tesla = new Car ();console .log (tesla.price ); tesla.price = '200000' ; console .log (tesla.price );
数值扩展
Number.EPSILON 是JavaScript表示的最小精度,接近于2.220446049E-16
1 2 3 4 5 6 7 8 9 10 function equal (a, b ){ if (Math .abs (a-b) < Number .EPSILON ){ return true ; } else { return false ; } } console .log (0.1 + 0.2 === 0.3 ); console .log (equal (0.1 + 0.2 , 0.3 ));
1 2 3 4 5 6 7 8 9 10 let a = 0b1010 ;let b = 0o77 ;let c = 0xff ;let d = 100 ;console .log (a); console .log (b); console .log (c); console .log (d);
Number.isFinite 检测一个数值是否为有限数。
1 2 3 console .log (Number .isFinite (100 )); console .log (Number .isFinite (100 /0 )); console .log (Number .isFinite (Infinity ));
Number.isNaN 检测一个数值是否为NaN
1 2 console .log (Number .isNaN (123 )); console .log (Number .isNaN (Number .NaN ));
Number.parseInt Number.parseFloat字符串转整数
1 2 3 console .log (Number .parseInt ('iloveu1314' )); console .log (Number .parseInt ('5211314loveu' )); console .log (Number .parseFloat ('3.141592653589793' ));
Number.isInteger 判断一个数是否为整数
1 2 3 console .log (Number .isInteger (0.5 )); console .log (Number .isInteger (1 ));
1 console .log (Math .trunc (3.14 ));
Math.sign 判断一个数到底为正数、负数、还是零
1 2 3 console .log (Math .sign (-10 )); console .log (Math .sign (0 )); console .log (Math .sign (20 ));
ES6中对象方法的扩展
1 2 3 4 console .log (Object .is (99 , 100 )); console .log (Object .is (100 , 100 )); console .log (Object .is (NaN , NaN )); console .log (NaN === NaN );
1 2 3 4 5 6 7 8 9 10 11 12 13 14 15 16 17 18 19 20 21 22 23 24 25 26 27 28 29 const config1 = { host : 'localhost' , port : 3306 , name : 'root' , pass : 'root' , param1 : 'param1' } const config2 = { host : 'geekhall.com' , port : 3316 , name : 'geekhall' , pass : '123456' , param2 : 'param2' } console .log (Object .assign (config1, config2));
Object.setPrototypeOf Object.getPrototypeOf
1 2 3 4 5 6 7 8 9 const site = { name : "GeekHall" } const company = { city : ['beijing' , 'shanghai' ] } Object .setPrototypeOf (site, company);console .log (site);
模块化 模块化是指将一个大的程序文件拆分成许多小的文件,然后将小文件在组合起来的方式,模块化的好处:
ES6之前的模块化规范有:
CommanJS => NodeJS、Browserify
AMD => requireJS
CMD => seaJS
模块化语法:
export方式一(分别暴露)
1 2 3 4 5 export let site = 'geekhall' export function module_function ( console .log ('module_function方法内部内容' ) }
注意这里如果直接使用file协议打开会因为同源策略限制而报错,
需要使用GoLive插件或者放到Web服务器中
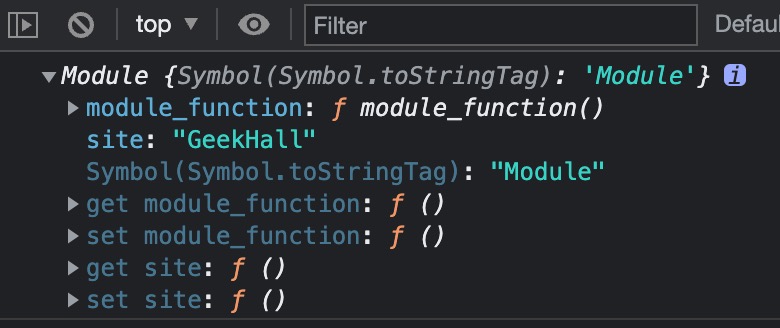
1 2 3 4 5 <script type ="module" > import * as m1 from "./src/js/m1.js" console .log (m1) </script >
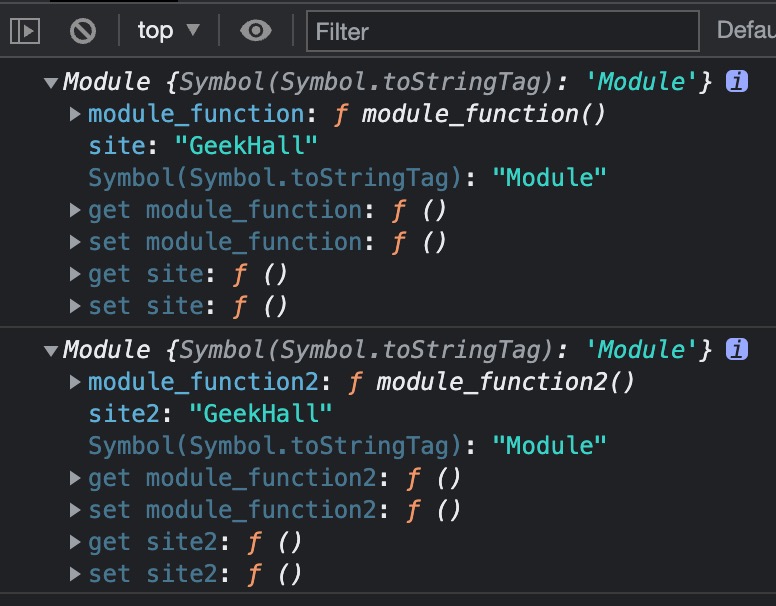
控制台查看打印结果:
export方式二(统一暴露)
1 2 3 4 5 6 7 let site2='GeekHall' function module_function2 ( console .log ("module_function方法内部内容" ) } export {site2, module_function2}
1 2 3 4 5 <script type ="module" > import * as m2 from "./src/js/m2.js" console .log (m2) </script >
控制台查看打印结果
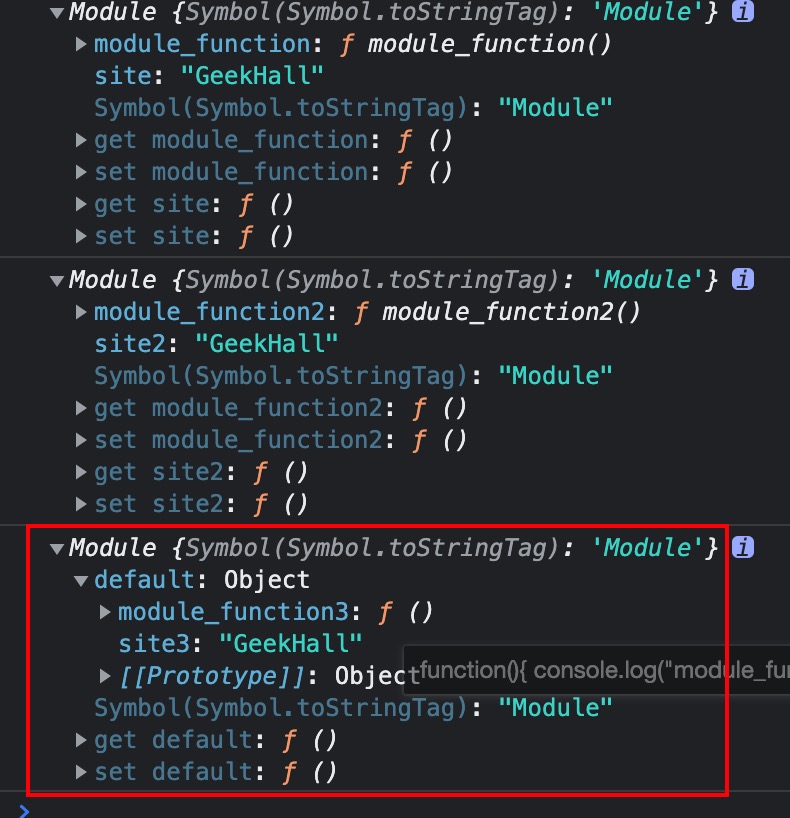
export方式三(默认暴露)
1 2 3 4 5 6 export default { site3 : 'GeekHall' , module_function3 : function ( console .log ("module_function3方法内部内容" ) } }
1 2 3 4 5 <script type ="module" > import * as m3 from "./src/js/m3.js" console .log (m3) </script >
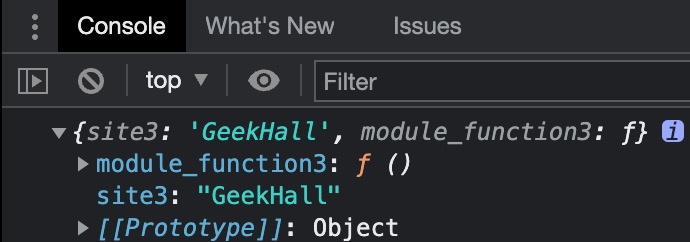
控制台查看结果:
引入方式
1 2 import * as m1 from "./m1.js" ;console .log (m1);
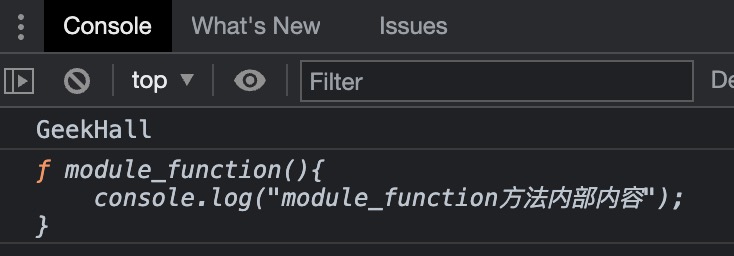
1 2 3 4 5 6 import {site, module_function} from "./src/js/m1.js" console .log (site)console .log (module_function)import {default as m1} from "./m1.js" ;
控制台查看结果:
可以使用as关键字重命名来避免冲突
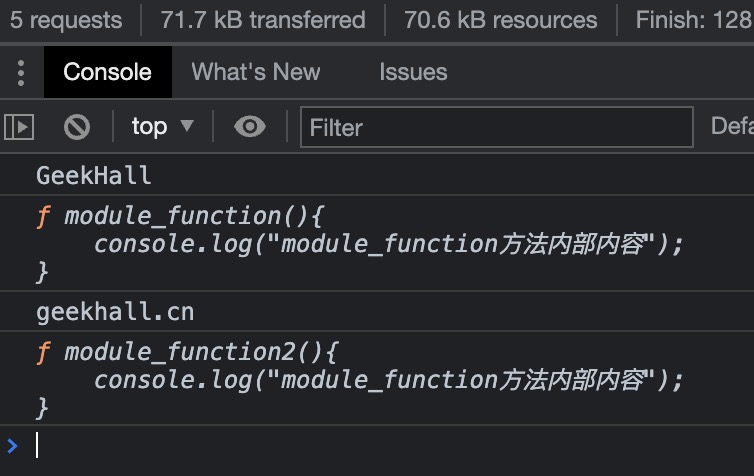
1 2 3 4 5 6 7 8 9 import {site, module_function} from "./src/js/m1.js" console .log (site)console .log (module_function)import {site2 as website, module_function2} from "./src/js/m2.js" console .log (website)console .log (module_function2)
控制台查看结果:
对于使用默认暴露的模块可以使用如下方式引入,注意default不可省略:
1 2 import {default as m3} from './src/js/m3.js' console .log (m3)
但是可以写成如下简便形式:
1 2 import m3 from './src/js/m3.js' console .log (m3);
模块化的另一种方式:
index.html 中引入一个入口文件app.js, app.js再引入m1.js、m2.js、m3.js等
index.html
1 <script src ="./src/js/app.js" type ="module" > </script >
app.js
1 2 3 4 5 6 import * as m1 from './m1.js' import * as m2 from './m2.js' import * as m3 from './m3.js' console .log (m1)console .log (m2)console .log (m3)
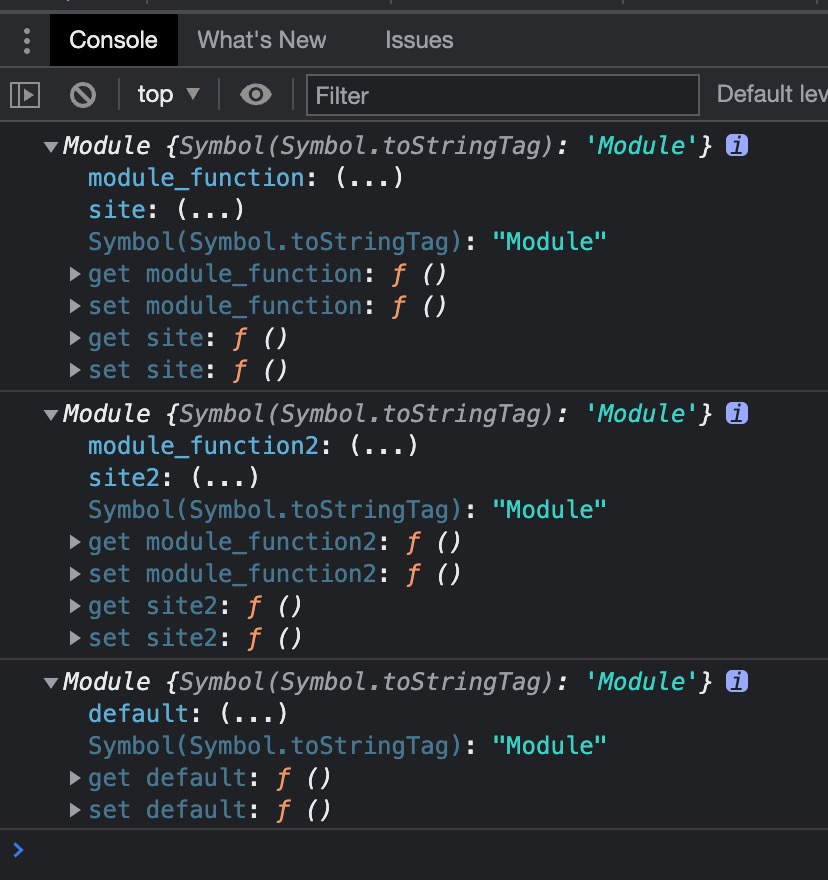
控制台查看结果:


