IoC本质
控制反转IoC(Inversion of Control) 是一种设计思想,DI(依赖注入)是实现IoC的一种方法。
控制反转是一种通过描述(XML或注解)并通过第三方去生产或获取特定对象的方式。在Spring中实现控制反转的是IoC容器,其实现方法是依赖注入(Dependency Injection,DI)。
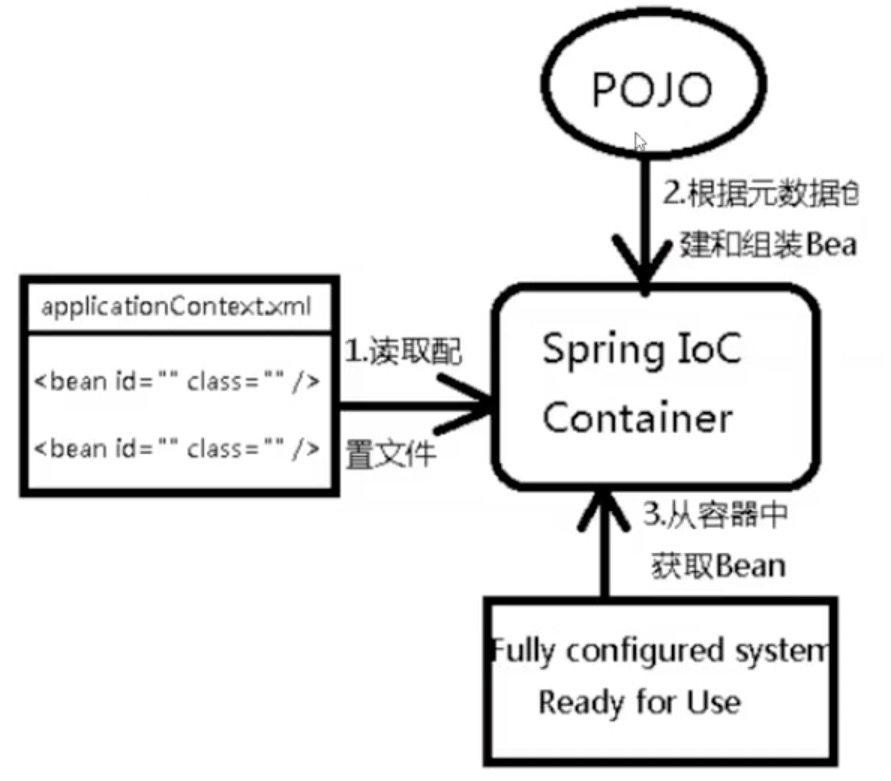
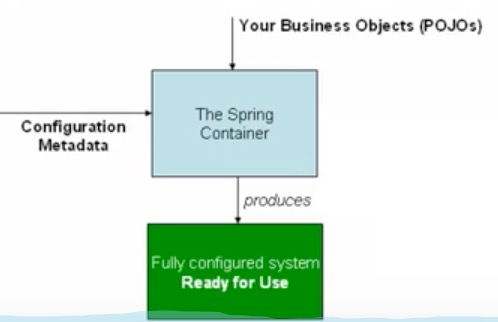
Spring 容器在初始化时先读取配置文件,根据配置文件或元数据创建与组织对象存入容器中,程序使用时再从IoC容器中取出需要的对象。

Spring官方配图:

Bean的自动装配
自动装配是Spring满足bean依赖的一种方式!
Spring会在上下文中自动寻找,并自动给bean装配属性!
在Spring中有三种装配的方式:
- 在xml中显示的配置
- 在java中显示配置
- 隐式的自动装配bean【重要】
Spring4之后,如果要使用注解开发,必须要倒入aop的包和context的约束和注解支持。
常用注解
@Autowired
1
2
|
<context:annotation-config/>
|
@Nullable
标记了字段可以为null,例如:
1
2
3
| public Person(@Nullable String name) {
this.name = name;
}
|
@Qualifier
可以使用Qualifier注解来指定自动装配的bean。
1
2
3
4
5
6
7
| @Autowired
@Qualifier(value = "cat222")
private Cat cat;
@Autowired
@Qualifier(value = "dog111")
private Dog dog;
|
@Resource
也可以使用java原生的@Resource注解,先通过名字进行自动绑定,再通过类型进行自动绑定
1
2
3
4
5
| @Resource(name = "cat111")
private Cat cat;
@Resource
private Dog dog;
|
@Resource 和 @Autowired 的区别
- 都是用来自动装配的,都可以放在属性字段;
- @Autowired通过bytype方式实现,而且必须要求对象存在,否则报空指针;
- @Resource默认通过byname方式实现,如果找不到名字,则通过bytype实现!如果两个都找不到的情况下,就报错!【常用】
- 执行顺序不同:@Autowired通过byType方式实现。
@Component
组件,放在类上,说明这个类被Spring管理了,就是bean!
1
2
3
4
| @Component
public class User {
private String name;
}
|
Component 还有一些衍生的注解 :
- @Repository:一般用于Dao层
- @Service:一般用于service层
- @Controller:一般用于Controller层
上面三个注解与Component的左右基本相同,都是代表把某个类装配到Spring中。
@Value
用于属性注入的方法
@Scope
作用域。等价于配置文件中的scope
@Configuration
java类的方式配置Spring
XML与注解
- XML:更加万能,适用于任何场合,维护方便简单。
- 注解:不是自己的类使用补了,维护相对复杂。
最佳实践:
- xml用来管理bean
- 注解只负责完成属性的注入;
使用Java的方式配置Spring
JavaConfig是Spring的一个子项目,可以完全不适用Spring的xml配置。
AOP
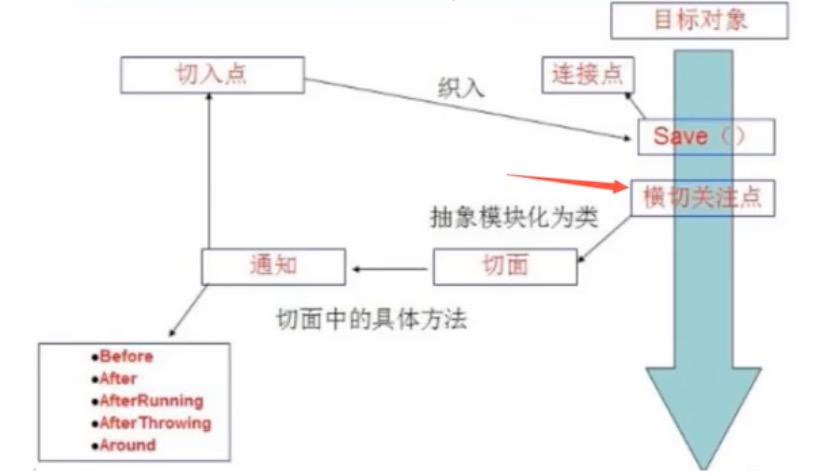
- 横切关注点:跨越应用程序多个模块的方法或者功能。即,与我们业务逻辑无关的,但是我们都需要关注的部分,如:日志、缓存、安全、事务等等。
- 切面(Aspect):横切关注点被模块化的特殊对象。即,它是一个类。
- 通知(Advice):切面必须要完成的工作。即:类中的方法。
- 目标(Target):被通知的对象。
- 代理(Proxy):向目标对象应用通知之后创建的对象。
- 切入点(PointCut):切面通知执行的“地点”的定义。
- 连接点(JointPoint):与切入点匹配的执行点。

需要倒入aspectj依赖包
1
2
3
4
5
6
|
<dependency>
<groupId>org.aspectj</groupId>
<artifactId>aspectjweaver</artifactId>
<version>1.9.6</version>
</dependency>
|
- 方式一:使用Spring的API接口,【主要SpringAPI接口实现】
1
2
3
4
5
6
7
8
9
10
11
12
13
| <aop:config>
<aop:pointcut id="pointcut" expression="execution(* cn.geekhall.service.UserServiceImpl.*(..))"/>
<aop:advisor advice-ref="log" pointcut-ref="pointcut"/>
<aop:advisor advice-ref="afterLog" pointcut-ref="pointcut"/>
</aop:config>
|
1
2
3
4
5
6
7
8
9
10
11
12
13
14
15
16
17
18
| <bean id="diy" class="cn.geekhall.diy.DiyPointCut"/>
<aop:config>
<aop:aspect ref="diy">
<aop:pointcut id="point" expression="execution(* cn.geekhall.service.UserServiceImpl.*(..))"/>
<aop:before method="before" pointcut-ref="point"/>
<aop:after method="after" pointcut-ref="point"/>
</aop:aspect>
</aop:config>
|
1
2
3
4
5
6
7
8
9
10
11
12
13
14
15
16
17
18
19
20
21
22
23
24
25
26
| @Aspect
public class AnnotationPointCut {
@Before("execution(* cn.geekhall.service.*.*(..))")
public void before(){
System.out.println("++++++++++++++++++ 方法执行前 ++++++++++++++++++");
}
@After("execution(* cn.geekhall.service.*.*(..))")
public void after(){
System.out.println("++++++++++++++++++ 方法执行后 ++++++++++++++++++");
}
@Around("execution(* cn.geekhall.service.*.*(..))")
public void around(ProceedingJoinPoint joinPoint) throws Throwable {
System.out.println("++++++++++++++++++ before around ++++++++++++++++++");
Signature signature = joinPoint.getSignature();
System.out.println(signature);
Object proceed = joinPoint.proceed();
System.out.println("++++++++++++++++++ after around ++++++++++++++++++");
}
}
|
1
2
3
4
5
6
7
8
|
<bean id="diy" class="cn.geekhall.diy.AnnotationPointCut"/>
<aop:aspectj-autoproxy proxy-target-class="false"/>
|
整合Mybatis
步骤:
导入相关jar包
- junit
- mybatis
- mysql
- spring
- aop
- mybatis-spring
编写配置文件
测试
MyBatis-Spring
什么是MyBatis-Spring
MyBatis-Spring会帮助你将MyBatis代码无缝地整合到Spring中,它将允许MyBatis参与到Spring的事务管理中,创建映射器Mapper和SqlSession并注入到Bean中,以及将MyBatis的异常转换为Spring的DataAccessException,最终,可以做到应用代码不依赖MyBatis,Spring或者MyBatis-Spring。
官方
步骤
- Model类
1
2
3
4
5
6
7
8
9
10
11
12
13
14
| public class User {
private String id;
private String name;
private String pwd;
@Override
public String toString() {
return "User{" +
"id='" + id + '\'' +
", name='" + name + '\'' +
", pwd='" + pwd + '\'' +
'}';
}
}
|
- 编写数据源配置
使用Spring-jdbc配置数据源:
1
2
3
4
5
6
| <bean id="dataSource" class="org.springframework.jdbc.datasource.DriverManagerDataSource">
<property name="driverClassName" value="com.mysql.jdbc.Driver"/>
<property name="url" value="jdbc:mysql://127.0.0.1:3316/mybatis?useSSL=true&useUnicode=true&characterEncoding=UTF-8"/>
<property name="username" value="mybatis"/>
<property name="password" value="yy123456"/>
</bean>
|
也可以使用DBCP连接池等其他方法配置:
1
2
3
4
5
6
7
8
9
10
11
| <bean id="dataSourceDbcp" class="org.apache.commons.dbcp2.BasicDataSource" destroy-method="close" scope="singleton">
<property name="driverClassName" value="com.mysql.jdbc.Driver"/>
<property name="url" value="jdbc:mysql://127.0.0.1:3316/mybatis?useSSL=true&useUnicode=true&characterEncoding=UTF-8"/>
<property name="username" value="mybatis"/>
<property name="password" value="yy123456"/>
<property name="initialSize" value="5"/>
<property name="maxTotal" value="80"/>
<property name="maxIdle" value="50"/>
<property name="minIdle" value="45"/>
<property name="maxWaitMillis" value="7000"/>
</bean>
|
- sqlSessionFactory
1
2
3
4
5
6
| <bean id="sqlSessionFactory" class="org.mybatis.spring.SqlSessionFactoryBean">
<property name="dataSource" ref="dataSource" />
<property name="configLocation" value="classpath:mybatis-config.xml"/>
<property name="mapperLocations" value="classpath:cn/geekhall/mapper/UserMapper.xml"/>
</bean>
|
UserMapper.xml:
1
2
3
4
5
6
7
8
9
10
11
| <?xml version="1.0" encoding="UTF-8" ?>
<!DOCTYPE mapper
PUBLIC "-//mybatis.org//DTD Config 3.0//EN"
"http://mybatis.org/dtd/mybatis-3-mapper.dtd">
<mapper namespace="cn.geekhall.mapper.UserMapper">
<select id="getUsers" resultType="user">
select * from mybatis.user
</select>
</mapper>
|
- sqlSessionTemplate
SqlSessionTemplate 是 MyBatis-Spring 的核心。作为 SqlSession 的一个实现,这意味着可以使用它无缝代替你代码中已经在使用的 SqlSession。 SqlSessionTemplate 是线程安全的,可以被多个 DAO 或映射器所共享使用。
当调用 SQL 方法时(包括由 getMapper() 方法返回的映射器中的方法),SqlSessionTemplate 将会保证使用的 SqlSession 与当前 Spring 的事务相关。 此外,它管理 session 的生命周期,包含必要的关闭、提交或回滚操作。另外,它也负责将 MyBatis 的异常翻译成 Spring 中的 DataAccessExceptions。
由于模板可以参与到 Spring 的事务管理中,并且由于其是线程安全的,可以供多个映射器类使用,你应该总是用 SqlSessionTemplate 来替换 MyBatis 默认的 DefaultSqlSession 实现。在同一应用程序中的不同类之间混杂使用可能会引起数据一致性的问题。
1
2
3
| <bean id="sqlSession" class="org.mybatis.spring.SqlSessionTemplate">
<constructor-arg index="0" ref="sqlSessionFactory"/>
</bean>
|
- 需要给接口加实现类
1
2
3
4
5
6
7
8
9
10
11
12
13
14
15
16
17
18
19
20
|
public interface UserMapper {
List<User> getUsers();
}
public class UserMapperImpl implements UserMapper {
private SqlSessionTemplate sqlSession;
public void setSqlSession(SqlSessionTemplate sqlSession) {
this.sqlSession = sqlSession;
}
public List<User> getUsers() {
UserMapper mapper = sqlSession.getMapper(UserMapper.class);
return mapper.getUsers();
}
}
|
- 将自己写的实现类,注入到Spring中
1
2
3
| <bean id="userMapper" class="cn.geekhall.mapper.UserMapperImpl">
<property name="sqlSession" ref="sqlSession"/>
</bean>
|
也可以使UserMapperImpl 类继承SqlSessionDaoSupport类来实现:
1
2
3
4
5
6
7
8
9
10
| public class UserMapperImpl2 extends SqlSessionDaoSupport implements UserMapper {
public List<User> getUsers() {
SqlSession sqlSession = getSqlSession();
UserMapper mapper = sqlSession.getMapper(UserMapper.class);
return mapper.getUsers();
}
}
|
- 测试使用
1
2
3
4
5
6
7
8
9
10
11
12
13
14
15
16
17
18
19
20
21
22
23
24
| public class AppTest {
@Test
public void test() throws IOException {
ApplicationContext context = new ClassPathXmlApplicationContext("applicationContext.xml");
UserMapper userMapper = context.getBean("userMapper", UserMapper.class);
List<User> users = userMapper.getUsers();
for (User user : users) {
System.out.println(user);
}
UserMapper userMapper2 = context.getBean("userMapper2", UserMapper.class);
List<User> users2 = userMapper2.getUsers();
for (User user : users2) {
System.out.println(user);
}
}
}
|
回顾事务
- 把一组业务当成一个业务来做,要么都成功,要么都失败。
- 事务在项目开发中,十分的重要,涉及到数据一致性的问题,不能马虎。
- 确保ACID::原子性(Atomicity,或稱不可分割性)、一致性(Consistency)、隔离性(Isolation,又称独立性)、持久性(Durability)
Spring中的事务管理分为两种:
- 声明式事物:AOP方式,交给容器去管理事务;
- 编程式事物:需要在代码中手工进行事务管理;
1
2
3
4
5
6
7
| TransactionStatus txStatus = TransactionManager.getTransaction(new DefaultTransactionDefinition());
try {
userMapper.insertUser(user);
} catch (Exception e){
transactionManager.rollback(txStatus);
throw e;
}
|
Propagation
在声明式的事务处理中,要配置一个切面,其中就用到了propagation,表示打算对这些方法怎么使用事务,是用还是不用,其中propagation有七种配置,REQUIRED、SUPPORTS、MANDATORY、REQUIRES_NEW、NOT_SUPPORTED、NEVER、NESTED。默认是REQUIRED。
REQUIRED:支持当前事务,如果当前没有事务,就新建一个事务。这是最常见的选择。
SUPPORTS:支持当前事务,如果当前没有事务,就以非事务方式执行。
MANDATORY:支持当前事务,如果当前没有事务,就抛出异常。
REQUIRES_NEW:新建事务,如果当前存在事务,把当前事务挂起。
NOT_SUPPORTED:以非事务方式执行操作,如果当前存在事务,就把当前事务挂起。
NEVER:以非事务方式执行,如果当前存在事务,则抛出异常。
NESTED:支持当前事务,如果当前事务存在,则执行一个嵌套事务,如果当前没有事务,就新建一个事务。


