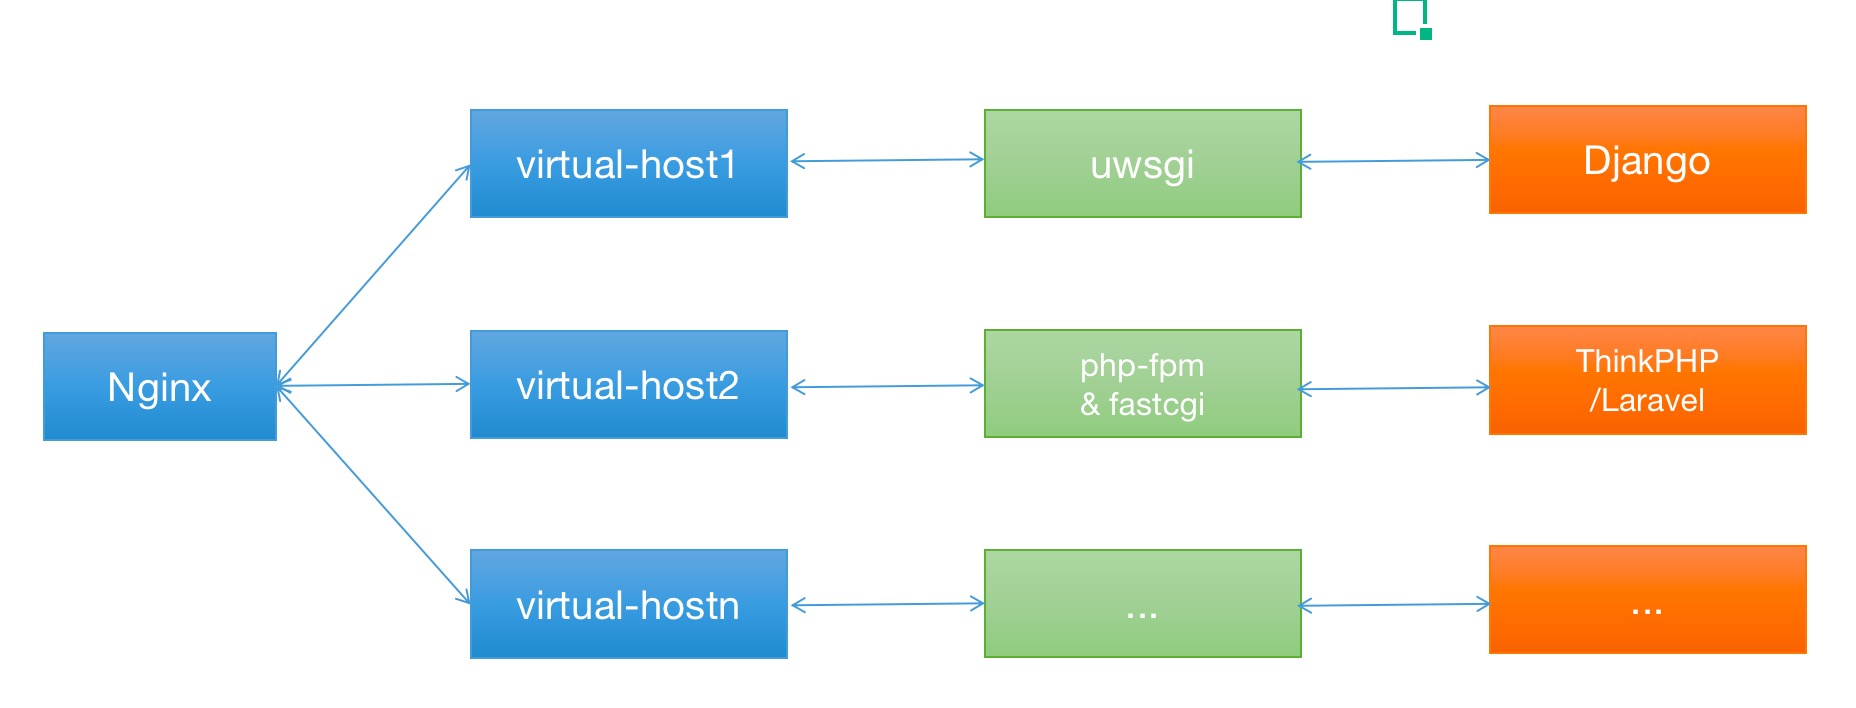
本文的目的是使用Nginx的虚拟主机功能在同一台服务器上配置多个域名,多域名之间可以使用不同架构,比如同时使用php的thinkphp或者Laravel和python的Django。
主要架构思想为使用Nginx作为反向代理,配合php-fpm和fastcgi作为上游服务端提供服务。
1. 目录说明
| 序号 |
目录 |
用途 |
| 1 |
/etc/nginx/nginx.conf |
Nginx主配置文件 |
| 2 |
/etc/nginx/vhosts/ |
Nginx虚拟主机配置文件存放目录 |
| 3 |
/etc/nginx/vhosts/aaa.com.conf |
网站aaa.com的虚拟主机配置文件存放目录 |
| 4 |
/etc/nginx/vhosts/bbb.com.conf |
网站bbb.com的虚拟主机配置文件存放目录 |
| 5 |
/usr/share/nginx/html/aaa.com/ |
网站aaa.com的文件存放目录 |
| 6 |
/usr/share/nginx/html/bbb.com/ |
网站bbb.com的文件存放目录 |
| 7 |
/etc/php-fpm.d/www.conf |
php-fpm配置文件 |
2. Nginx配置
2.1 修改Nginx主配置文件
修改 /etc/nginx/nginx.conf
1
2
3
4
5
6
7
8
9
10
11
| http {
include /etc/nginx/conf.d/*.conf;
include /etc/nginx/vhosts/*.conf;
}
|
2.2 修改php版的虚拟主机配置
/etc/nginx/vhosts/aaa.com.conf:
1
2
3
4
5
6
7
8
9
10
11
12
13
14
15
16
17
18
19
20
21
22
23
24
25
26
27
28
29
30
31
32
33
34
35
36
37
38
39
40
41
42
43
44
| server {
listen 80;
server_name aaa.com www.aaa.com;
access_log /usr/share/nginx/html/aaa.com/log/host.access.log;
error_log /usr/share/nginx/html/aaa.com/log/error.log;
root /usr/share/nginx/html/aaa.com/public;
index index.php index.html index.htm;
location / {
if (!-e $request_filename) {
rewrite ^/(.*)$ /index.php/$1 last;
break;
}
}
location ~ .*\.(gif|jpg|jpeg|png|bmp|swf)$ {
expires 100d;
}
location ~ .*\.(js|css)?$ {
expires 30d;
}
error_page 500 502 503 504 /50x.html;
location = /50x.html {
root html;
}
location ~ \.php(/|$) {
fastcgi_pass 127.0.0.1:9000;
fastcgi_index index.php;
include /etc/nginx/fastcgi.conf;
set $fastcgi_script_name2 $fastcgi_script_name;
if ($fastcgi_script_name ~ "^(.+\.php)(/.+)$") {
set $fastcgi_script_name2 $1;
set $path_info $2;
}
fastcgi_param PATH_INFO $path_info;
fastcgi_param SCRIPT_FILENAME /usr/share/nginx/html/aaa.com/public/$fastcgi_script_name2;
fastcgi_param SCRIPT_NAME $fastcgi_script_name2;
}
}
|
2.3 配置python虚拟环境
使用virtualenv和virtualenvwrapper来新建和管理虚拟环境,相关命令如下:
1
2
3
4
5
6
7
8
9
10
11
12
13
14
15
16
17
18
19
20
21
22
|
pip3 install virtualenvwrapper
export WORKON_HOME=~/Env
source /usr/local/bin/virtualenvwrapper.sh
export LD_LIBRARY_PATH="/usr/local/lib"
export PATH=$PATH:/usr/local/python3/bin/
mkvirtualenv my_env
workon my_env
deactivate
rmvirtualenv my_env
lsvirtualenv
|
2.4 修改Django版的虚拟主机配置
/etc/nginx/vhosts/bbb.com.conf
1
2
3
4
5
6
7
8
9
10
11
12
13
14
15
16
| upstream hello{
server unix:///usr/share/nginx/html/hello/hello.sock;
}
server {
listen 80;
server_name bbb.com www.bbb.com;
charset utf-8;
location / {
uwsgi_pass hello;
include /etc/nginx/uwsgi_params;
}
}
|
3 php-fpm配置
修改/etc/php-fpm.d/www.conf 文件
1
2
| listen = 127.0.0.1:9000
listen.allowed_clients = 127.0.0.1
|
- php-fpm启动命令:
php-fpm
- php-fpm停止命令:
ps -ef|grep php-fpm|grep master|awk '{print $2}'|xargs kill -QUIT
4 配置使用uwsgi
命令行方式:uwsgi --http :4000 --module hello.wsgi --virtualenv=/root/Env/mwd
配置文件方式:/usr/share/nginx/html/hello/hello.ini
1
2
3
4
5
6
7
8
9
10
11
12
13
14
15
16
17
18
19
20
21
22
23
24
25
26
| [uwsgi]
chdir = /usr/share/nginx/html/hello
module = hello.wsgi
home = /root/Env/mwd
master = true
processes = 10
socket = /usr/share/nginx/html/hello/hello.sock
chomd-socket = 666
vacuum = true
|
配置好之后就可以使用uwsgi --ini hello.ini来启动了。
停止命令:wsgi| grep -v grep |awk '{print $2}'|xargs kill -9
这里需要注意的是uwsgi不要安装在虚拟环境,要安装在系统python环境中。
而Django和相关项目依赖要安装在python虚拟环境中。
5. 配置VCS
1
2
3
4
5
6
|
git init
git remote get-url origin
git remote set-url origin 你新的远程仓库地址
|